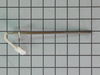
The temperature sensor, also known as an oven probe, detects the temperature within the oven cavity. This temperature sensor is 9 inches in length and is a genuine OEM part. If your oven is too hot, n...
$78.07
In Stock
Order within the next 3 hrs and your part ships today!
This 40-watt appliance light bulb is a reliable replacement for use in select ranges, refrigerators, freezers, and microwaves. It provides bright, consistent lighting to help you see clearly inside yo...
$30.38
In Stock
Order within the next 3 hrs and your part ships today!
This kit is used to convert your appliance to liquid propane. This liquid petroleum gas conversion kit contains seven orifices, each under an inch long.
$83.09
In Stock
Order within the next 3 hrs and your part ships today!
Having trouble with your stove or oven's light indicator? Don't fret - we have a solution for you. Our Frigidaire Range Light Lens Indicator, ideal for select Frigidaire, Electrolux, White Westinghous...
$21.50
In Stock
Order within the next 3 hrs and your part ships today!
Introducing the Frigidaire Light Indicator, an authentic OEM part designed specifically for your cooking needs. This part plays a crucial safety role - it lights up to let you know when the oven or bu...
$68.86
In Stock
Order within the next 3 hrs and your part ships today!
I followed the simple instructions that were included in the kit. I started by replacing the 5 orifices on the top burners. The orifices are well labeled with numbers and colors. Next, I tightened the broiler burner orifice and the oven burner orifice with a 1/2 inch wrench. I had to tighten them pretty good to get the flame down where it is supposed to be. Then, I checked for leaks and I was then ready to cook.
Repair was quite easy, as long as you have the instructions for removing the door. The screws that hold the bottom of the door to the fixed hinge are placed into the side of the hinge assembly after removal; this holds the door at a 45 degree angle for easy removal. After that, just place the door on a flat surface and dismantle the door from the inside. The inner glass is contained in a metal frame with another piece of glass; this frame comes apart easily using the clips in each side. The door assembles easily after the glass is replaced; just take your time and give yourself enough room to lay out the parts as you go. Good luck!