


79073439310 Kenmore Range - Overview
Sections of the 79073439310
[Viewing 5 of 5]


Keep searches simple, eg. "belt" or "pump".

Light Bulb
PartSelect #: PS12751166
Manufacturer #: 316538904
This 40-watt appliance light bulb is a reliable replacement for use in select ranges, refrigerators, freezers, and microwaves. It provides bright, consistent lighting to help you see clearly inside yo...
$30.38
In Stock

LP Conversion Kit
PartSelect #: PS3633782
Manufacturer #: GRLP4
The LP conversion kit is used in ranges
$81.26
In Stock

GLASS
PartSelect #: PS11728351
Manufacturer #: 5304503232
This is also called the heat barrier glass.
$131.53
In Stock

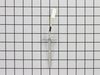
PROBE
PartSelect #: PS11731754
Manufacturer #: 316233903
Note: Connector could be different than original. If so cut & splice wires together with porcelain wire nuts.
$51.09
In Stock


Leveling Leg Assembly
PartSelect #: PS12364627
Manufacturer #: 5304509869
Sold Individually. These legs should be adjusted to make your appliance level on uneven flooring.
$16.43
In Stock

CAP
PartSelect #: PS11775704
Manufacturer #: 5304508441
Sold individually. This part helps the flame to spread for even heat. Also protects your burner head from spills.
$48.14
In Stock

CAP
PartSelect #: PS11775705
Manufacturer #: 5304508442
Sold individually. This part helps the flame to spread for even heat. Also protects your burner head from spills. The surface burner cap is located on the top of the burner head and is used in ranges ...
$43.07
In Stock

Oven Burner Igniter
PartSelect #: PS12071409
Manufacturer #: 5304509706
The oven burner igniter ignites the gas to light the oven burner. Possible Repair Solution For: Will not start, no heat, not enough heat.
$195.50
In Stock

Oven Door Seal with Clips
PartSelect #: PS440011
Manufacturer #: 316239700
Designed to maintain a tight seal around your oven door, this gasket helps prevent heat loss during baking and roasting. It plays a key role in keeping the oven’s internal temperature stable, which is...
$157.19
In Stock

Spark Ignition Switches with Wire Harness
PartSelect #: PS3409151
Manufacturer #: 316580615
This spark ignition switch assembly with wire harness ensures reliable burner ignition for your cooktop or range. Built for durability, it restores proper function when switches fail or wiring becomes...
$116.54
In Stock
Questions And Answers for 79073439310
We're sorry, but our Q&A experts are temporarily unavailable.
Please check back later if you still haven't found the answer you need.
- < Prev
- 1
- Next >
Sort by:
Search filter:
Clear Filter
Your search term must have 3 or more characters.
Keep searches simple. Use keywords, e.g. "leaking", "pump", "broken" or "fit".
Sorry, we couldn't find any existing answers that matched.Try using some different or simpler keywords, or submit your new question by using the "Ask a Question" button above!
Terry
August 12, 2021
The ignitor keeps sparking about every 20 mins and want stop
For model number 79073439310

Hello Terry, Thank you for the question. Food debris can accumulate in the igniter, and cause it to keep clicking when it is turned off. We hope this helps!
Was this helpful?
Thank you for voting!
Related Parts:
Surface Burner Orifice Holder - Left Rear 9.5K


$144.16
Special Order
Surface Burner Orifice Holder - Left Front 9.5K

$144.16
In Stock
Range Ignitor/Orifice Assembly

$107.18
In Stock
Surface Burner Igniter and Orifice Holder

$130.16
Special Order
Range Ignitor/Orifice Assembly

$171.32
In Stock
- < Prev
- 1
- Next >
Common Symptoms of the 79073439310
[Viewing 9 of 9]Little to no heat when baking
Fixed by
these parts
these parts

Show All
Gas igniter glows, but will not light
Fixed by
these parts
these parts

Show All
Will Not Start
Fixed by
these parts
these parts

Show All
Element will not heat
Fixed by
these parts
these parts
Show All
Oven not heating evenly
Fixed by
these parts
these parts
Show All
Oven is too hot
Fixed by
these parts
these parts
Show All
Gas smell
Fixed by
these parts
these parts

Show All
Little to no heat when broiling
Fixed by
these parts
these parts
Show All
Touchpad does not respond
Fixed by
these parts
these parts

Show All


Keep searches simple. Use keywords, e.g. "leaking", "pump", "broken" or "fit".
Safety valve would not open
I am an HVAC tech by trade so it wasn't difficult to diagnose problem with safety valve. The hard part was being without an oven for a week. Repair was simple and effective--oven works good as new.
Shut off gas and unplugged oven. Removed floor of oven between broiler and bake section, used wrenches to disconnect gas line from safety valve in back of oven, used philipps head screwdriver to remove burner assembly and gas valve, reversed process to replace. Checked out operation--OK.
Shut off gas and unplugged oven. Removed floor of oven between broiler and bake section, used wrenches to disconnect gas line from safety valve in back of oven, used philipps head screwdriver to remove burner assembly and gas valve, reversed process to replace. Checked out operation--OK.
Parts Used:

-
Ed from Darby, PA
-
Difficulty Level:Easy
-
Total Repair Time:15 - 30 mins
-
Tools:Nutdriver, Screw drivers, Wrench set
126 of 159 people
found this instruction helpful.
Was this instruction helpful to you?
Thank you for voting!
Range would not come on
Turned off power, took back off stove removed old probe.
I had to splice wires since new probe ends did not match up.
the instructions were to splice the wires. I had the breaker off for about 3 hours. this is not in the instructions, but being a widow, I had to ask a few people why it would not come on after I connected the wires.
After waiting, I turned the breaker on and my range came back on.
Parts Used:
-
MaryLou from Monroe, NC
-
Difficulty Level:Easy
-
Total Repair Time:30 - 60 mins
-
Tools:Pliers, Screw drivers
107 of 192 people
found this instruction helpful.
Was this instruction helpful to you?
Thank you for voting!
Oven light receptacle broken - bulb base broke off
Turned power off at electrical panel. Pulled oven away from wall. Removed back cover (6 screws), then unplugged wires from old receptacle. I had to pull the squeeze clips backwards & break them to remove the old receptacle - couldn't squeeze them enough to remove them otherwise. The old receptacle came out through the inside of the oven, and the new one snapped in easily from inside the oven as well. Replaced wiring, installed new bulb, restored power & tested. Replaced back cover. Good time to vacuum under/behind where the oven usually lives before sliding it back to the wall.
Parts Used:
-
Paul from Spokane Valley, WA
-
Difficulty Level:Easy
-
Total Repair Time:30 - 60 mins
-
Tools:Screw drivers
69 of 111 people
found this instruction helpful.
Was this instruction helpful to you?
Thank you for voting!