79072851301 Kenmore Range - Overview

Sections of the 79072851301

[Viewing 7 of 7]

Manuals & Care Guides for 79072851301

Click to download
Keep searches simple, eg. "belt" or "pump".
Light Bulb – Part Number: 316538904
Light Bulb
★★★★★
★★★★★
(9)
PartSelect #: PS12751166
Manufacturer #: 316538904
This 40-watt appliance light bulb is a reliable replacement for use in select ranges, refrigerators, freezers, and microwaves. It provides bright, consistent lighting to help you see clearly inside yo...
$30.38
  In Stock
LENS – Part Number: 5304524341
LENS
★★★★★
★★★★★
(14)
PartSelect #: PS16218465
Manufacturer #: 5304524341
This lens covers the interior oven light bulb.
$29.12
  In Stock
LP Conversion Kit – Part Number: GRLP3
LP Conversion Kit
★★★★★
★★★★★
(2)
PartSelect #: PS2351422
Manufacturer #: GRLP3
This kit is used to convert your appliance to liquid propane. This liquid petroleum gas conversion kit contains seven orifices, each under an inch long.
$83.09
  In Stock
PROBE – Part Number: 316233903
PROBE
★★★★★
★★★★★
(8)
PartSelect #: PS11731754
Manufacturer #: 316233903
Note: Connector could be different than original. If so cut & splice wires together with porcelain wire nuts.
$51.09
  In Stock
HANDLE KIT, BLACK – Part Number: 5304537685
HANDLE KIT, BLACK
★★★★★
★★★★★
(2)
PartSelect #: PS17647974
Manufacturer #: 5304537685
Handle only.
  No Longer Available
Oven Light Socket – Part Number: 316116400
Oven Light Socket
★★★★★
★★★★★
(9)
PartSelect #: PS439060
Manufacturer #: 316116400
$74.88
  In Stock
Light Indicator - 125v – Part Number: 316022500
Light Indicator - 125v
PartSelect #: PS436960
Manufacturer #: 316022500
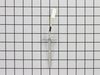
Introducing the Frigidaire Light Indicator, an authentic OEM part designed specifically for your cooking needs. This part plays a crucial safety role - it lights up to let you know when the oven or bu...
$68.86
  In Stock
White Touch up Paint – Part Number: 5303321319
White Touch up Paint
★★★★★
★★★★★
(1)
PartSelect #: PS467298
Manufacturer #: 5303321319
This 18 ml bottle of white appliance touch up paint is a little over two inches tall. It can be used for refrigerators, microwaves, ranges, clothes dryers, and freezers.
$29.12
  In Stock
Igniter/Orifice Mounting Screw – Part Number: 316240600
Igniter/Orifice Mounting Screw
PartSelect #: PS440022
Manufacturer #: 316240600
This part is the igniter/orifice mounting screw for your cooktop or range. It is approximately ½ an inch in length and is made of metal. The mounting screw connects the orifice to the cooktop. If the ...
$24.05
  In Stock
Flat Style Oven Igniter - Broiler – Part Number: 5303935068
Flat Style Oven Igniter - Broiler
★★★★★
★★★★★
(1)
PartSelect #: PS470131
Manufacturer #: 5303935068
This flat style gas oven igniter comes with a bracket and wires. Its amperage range is between 3.2 and 3.6 amps.
$250.16
  In Stock
Steel Washer – Part Number: 316008401
Steel Washer
★★★★★
★★★★★
(1)
PartSelect #: PS436497
Manufacturer #: 316008401
Size: 3/4 inch od x 1/4 inch id
$24.05
  In Stock
Screw – Part Number: 5303288565
Screw
PartSelect #: PS461124
Manufacturer #: 5303288565
This is an authentic mounting screw, which works with ranges, wall ovens, cooktops and warming drawers.
$9.68
  In Stock

Questions And Answers for 79072851301

Ask our experts a question about this model and we'll get back to you as soon as possible!

1 question answered by our experts.
  • 1
Sort by:
Sorry, we couldn't find any existing answers that matched.Try using some different or simpler keywords, or submit your new question by using the "Ask a Question" button above!
Allen
January 24, 2025
oven slow in heating. what part do I need
For model number 79072851301
PartSelect logo
Hi Allen, Thank you for your question. If the oven is not heating correctly, the issue may be with the oven temperature sensor. The oven temperature sensor monitors the oven temperature and signals the electronic control board to turn the elements on and off. Before removing this part from the oven and testing it for continuity with a multimeter on the Rx1 setting, unplug the oven from the electrical outlet. This test needs to be done with the sensor at room temperature to produce accurate results. The reading should be between 1080 and 1100 ohms. If you get any other reading, you need a replacement temperature sensor. If the sensor is fine, you will need to check the igniter, the electronic control board, and the wiring between the parts to see which part is causing the issue. We hope this helps with the repair!

1 person found this helpful.

Was this helpful?
Thank you for voting!
Related Parts:
  • 1

Common Symptoms of the 79072851301

[Viewing 8 of 8]
Little to no heat when baking
Fixed by
these parts
Fixing Fixing
Show All
Will Not Start
Fixed by
these parts
Fixing Fixing Fixing
Show All
Gas igniter glows, but will not light
Fixed by
these parts
Fixing Fixing Fixing
Show All
Element will not heat
Fixed by
these parts
Fixing Fixing
Show All
Oven not heating evenly
Fixed by
these parts
Fixing
Show All
Oven is too hot
Fixed by
these parts
Fixing
Show All
Little to no heat when broiling
Fixed by
these parts
Fixing Fixing
Show All
Door won’t close
Fixed by
these parts
Show All
Keep searches simple. Use keywords, e.g. "leaking", "pump", "broken" or "fit".
Bought a new gas oven that did not come with a propane conversion kit.
I followed the simple instructions that were included in the kit. I started by replacing the 5 orifices on the top burners. The orifices are well labeled with numbers and colors. Next, I tightened the broiler burner orifice and the oven burner orifice with a 1/2 inch wrench. I had to tighten them pretty good to get the flame down where it is supposed to be. Then, I checked for leaks and I was then ready to cook.
Parts Used:
LP Conversion Kit
  • Denny from Bishop, CA
  • Difficulty Level:
    Easy
  • Total Repair Time:
    30 - 60 mins
  • Tools:
    Nutdriver, Wrench set
123 of 177 people found this instruction helpful.
Was this instruction helpful to you?
Thank you for voting!
Stove was set up for natural gas and needed to be converted to LP
The LP conversion kit contained very good, detailed instructions. I replaced the gas orifices, took off the bottom door and adjusted the regulator.

Used the screwdriver to adjust the low flame and everything was done.
Parts Used:
LP Conversion Kit
  • Ed from Orange, TX
  • Difficulty Level:
    Easy
  • Total Repair Time:
    30 - 60 mins
  • Tools:
    Nutdriver, Screw drivers
118 of 193 people found this instruction helpful.
Was this instruction helpful to you?
Thank you for voting!
Range would not come on
Turned off power, took back off stove removed old probe.
I had to splice wires since new probe ends did not match up.
the instructions were to splice the wires. I had the breaker off for about 3 hours. this is not in the instructions, but being a widow, I had to ask a few people why it would not come on after I connected the wires.
After waiting, I turned the breaker on and my range came back on.
Parts Used:
PROBE
  • MaryLou from Monroe, NC
  • Difficulty Level:
    Easy
  • Total Repair Time:
    30 - 60 mins
  • Tools:
    Pliers, Screw drivers
107 of 192 people found this instruction helpful.
Was this instruction helpful to you?
Thank you for voting!