


79071343709 Kenmore Range - Overview
Sections of the 79071343709
[Viewing 5 of 5]
Manuals & Care Guides for 79071343709
Click to downloadInstall
Installation Instructions
(0.62MB)
Install
Installation Instructions
(2.05MB)
Manual
Owner's Manuals
(8.14MB)
Keep searches simple, eg. "belt" or "pump".

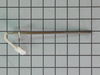
Temperature Sensor
PartSelect #: PS1528542
Manufacturer #: 316490000
The temperature sensor, also known as an oven probe, detects the temperature within the oven cavity. This temperature sensor is 9 inches in length and is a genuine OEM part. If your oven is too hot, n...
$78.07
In Stock

Handle Mounting Screw
PartSelect #: PS978302
Manufacturer #: 316433300
This handle mounting screw works with your oven or range, and bolts the door handle to the door. It is approximately 2 inches in length and is an OEM part sourced directly from the manufacturer. If yo...
$29.12
In Stock


Light Bulb
PartSelect #: PS12751166
Manufacturer #: 316538904
This 40-watt appliance light bulb is a reliable replacement for use in select ranges, refrigerators, freezers, and microwaves. It provides bright, consistent lighting to help you see clearly inside yo...
$30.38
In Stock

LENS
PartSelect #: PS16218465
Manufacturer #: 5304524341
This lens covers the interior oven light bulb.
$29.12
In Stock

GLASS
PartSelect #: PS11728351
Manufacturer #: 5304503232
This is also called the heat barrier glass.
$131.53
In Stock


GLIDE
PartSelect #: PS11770783
Manufacturer #: 807047102
Struggling with a sticky, stubborn stove drawer? Our Frigidaire Range Front Drawer Glide is here to restore the easy glide of your cooker's storage or broil drawer. Produced as an authentic OEM part, ...
$25.31
In Stock

Leveling Leg Assembly
PartSelect #: PS12364627
Manufacturer #: 5304509869
Sold Individually. These legs should be adjusted to make your appliance level on uneven flooring.
$16.43
In Stock

Metal Rack
PartSelect #: PS977699
Manufacturer #: 316404500
This is a genuine oven rack, which works with ranges.
No Longer Available

Questions And Answers for 79071343709
We're sorry, but our Q&A experts are temporarily unavailable.
Please check back later if you still haven't found the answer you need.
Common Symptoms of the 79071343709
[Viewing 9 of 9]Little to no heat when baking
Fixed by
these parts
these parts

Show All
Oven is too hot
Fixed by
these parts
these parts
Show All
Gas igniter glows, but will not light
Fixed by
these parts
these parts


Show All
Oven not heating evenly
Fixed by
these parts
these parts
Show All
Will Not Start
Fixed by
these parts
these parts
Show All
Element will not heat
Fixed by
these parts
these parts
Show All
Door won’t close
Fixed by
these parts
these parts


Show All
Gas smell
Fixed by
these parts
these parts
Show All
Door won’t open after self cleaning cycle
Fixed by
these parts
these parts

Show All


Keep searches simple. Use keywords, e.g. "leaking", "pump", "broken" or "fit".
Oven wouldn't operated. Error code F9
I called a repair place. They charged $54 to diagnose, (said it needed a new latch motor) then wanted $220 to complete the repair. I checked online prices and did it myself for about 15 minutes work and the latch motor itself ($44?).
Was necessary to uplug the range, pull it away from the wall and remove the back panel sheet metal, then 3 screws that mount the motor. Replace motor, reattach sheet metal. Plug in. Done. Ready to bake cookies.
Was necessary to uplug the range, pull it away from the wall and remove the back panel sheet metal, then 3 screws that mount the motor. Replace motor, reattach sheet metal. Plug in. Done. Ready to bake cookies.
Parts Used:

-
Richard from Centennial, CO
-
Difficulty Level:Really Easy
-
Total Repair Time:Less than 15 mins
-
Tools:Nutdriver
74 of 96 people
found this instruction helpful.
Was this instruction helpful to you?
Thank you for voting!
Cracked oven door inner glass
Repair was quite easy, as long as you have the instructions for removing the door. The screws that hold the bottom of the door to the fixed hinge are placed into the side of the hinge assembly after removal; this holds the door at a 45 degree angle for easy removal. After that, just place the door on a flat surface and dismantle the door from the inside. The inner glass is contained in a metal frame with another piece of glass; this frame comes apart easily using the clips in each side. The door assembles easily after the glass is replaced; just take your time and give yourself enough room to lay out the parts as you go. Good luck!
Parts Used:
-
Mitch from Fernandina Beach, FL
-
Difficulty Level:Easy
-
Total Repair Time:15 - 30 mins
-
Tools:Screw drivers
75 of 131 people
found this instruction helpful.
Was this instruction helpful to you?
Thank you for voting!
oven did not heat up
Replaced the probe because that's what this site recommended.The oven still does not heat up.
Parts Used:
-
Tim from ASHAWAY, RI
-
Difficulty Level:Really Easy
-
Total Repair Time:15 - 30 mins
-
Tools:Socket set
73 of 125 people
found this instruction helpful.
Was this instruction helpful to you?
Thank you for voting!