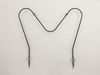
The Oven Bake Element is a black, metal part which supplies heat to the oven. This element is 19-1/2" wide x 18-1/2" long and has 3-1/2" inserts. It is rated as "Easy" to install by users, and attache...
This 40-watt appliance light bulb is a reliable replacement for use in select ranges, refrigerators, freezers, and microwaves. It provides bright, consistent lighting to help you see clearly inside yo...
The coil burner element is eight inches in diameter. It has four turns, 220 volts and looped terminal ends. The coil burner element provides heat to the cooking surface on your range. You might need t...
Sold individually. This part is sold individually. This is a part for your stove top. The surface element is what your cookware sits on. The element supplies heat at varying temperatures. This may nee...
If your oven isn’t heating properly when broiling or baking, this top-mounted heating element might be the fix you need. It sits at the very top inside your oven and gives off strong, direct heat—perf...
Struggling with a sticky, stubborn stove drawer? Our Frigidaire Range Front Drawer Glide is here to restore the easy glide of your cooker's storage or broil drawer. Produced as an authentic OEM part, ...
Having trouble with your stove or oven's light indicator? Don't fret - we have a solution for you. Our Frigidaire Range Light Lens Indicator, ideal for select Frigidaire, Electrolux, White Westinghous...
$21.50
In Stock
Questions And Answers for 7906409130D
Be the first to ask our experts a question about this model!
✖
Ask a Question
Ask our experts a question on this model and we'll respond as soon as we can.
1. Removed two screws, pulled out the element, voltage tested the element and determined it was an open circuit (bad element). 2. Ordered the part from partselect.com 3. Disconnected element, connected the new one, and screwed it back in.
Shut off circuit breaker to stove and collected the tool from the basement. Turned on flashlight. Unscrewed the two hex nuts from the old element/back of the oven. Slid the old element prongs out of the back, exposing the connecting wires. Pulled the connecting wires off of the old element, carefully, so that the connections wouldn't come off of the wires. Threw the old element pieces in the garbage. Connected the new element to the connecting wires and re-fastened the hex nuts. My husband had wanted to call the repair man, but it didn't look too difficult, so I decided to try it on my own. Boy was he surprised when I fixed it, and for a fraction of the cost of hiring a repairman! Ladies, we can do this ourselves!!! :) Thank you for being there for us to order our part from, Parts Select, we had our new part in less than 24 hours, so the shipping was blazing fast!!! Keep up the good work!!! :)