


74043 (ASTCSE2) LG Refrigerator - Overview
Sections of the 74043
[Viewing 7 of 7]


Exact Part matches for your search term
[Viewing 1 of 1]-M6 – Part Number: 74043")
Lockwasher(Shake-Proof)-M6
This part number matches the current model number 74043
PartSelect #: PS16717222
Manufacturer #: 74043
No Longer Available
Keep searches simple, eg. "belt" or "pump".

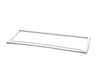
Door Bin
PartSelect #: PS3637058
Manufacturer #: AAP73252202
Refrigerator door bin AAP73252202 is an original equipment manufacturer (OEM) part that fits some Kenmore Elite bottom-freezer refrigerators in the following series: 7957204, 7957205, 7957209, 7957218...
$95.12
In Stock

Handle Screw
PartSelect #: PS8752913
Manufacturer #: MJB63190001
This handle screw, also known as a mounting bolt, is a mounting screw to help secure the door handle to your refrigerator door. If your handle is loose, you may just need to tighten the screw. If your...
$18.96
In Stock

Door Shelf Bin Assembly
PartSelect #: PS3637059
Manufacturer #: AAP73252302
This refrigerator door shelf bin is a clear, gallon-sized storage accessory designed for installation on the right-side door of select refrigerator models. Crafted from durable, food-safe resin, it fe...
$79.89
In Stock


Refrigerator Glass Shelf
PartSelect #: PS3649796
Manufacturer #: MHL42613229
Are you tired of struggling with a broken or missing shelf in your LG refrigerator? We understand how frustrating that can be, especially when your fridge isn't as organized or reliable as it should b...
$90.28
Special Order


Refrigerator Ice Maker
PartSelect #: PS10063167
Manufacturer #: AEQ73130004
Designed for efficient ice production, this ice maker assembly includes the ice mold and control unit that work together to freeze and release ice. Water enters through the inlet valve and is held in ...
$364.78
In Stock

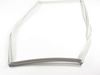
Door Gasket
PartSelect #: PS11758511
Manufacturer #: MDS38201426
Freezer door gasket is on the inner door panel and creates a seal around the door to prevent warm air from entering the freezer compartment.
$113.73
In Stock


Refrigerator Water Filter
PartSelect #: PS12724835
Manufacturer #: AGF80300801
This water filter helps make your fridge’s water and ice cleaner and better-tasting by removing things like chlorine and lead. It’s easy to install—just twist out the old one and twist in the new one....
$118.82
In Stock


MOTOR,DC
PartSelect #: PS12080244
Manufacturer #: EAU63103301
Is your refrigerator not cooling as it should? Our genuine LG DC Motor could be the solution you're seeking. Acting as the heart of your refrigerator, this crucial component ensures your appliance kee...
$147.50
Special Order
Questions And Answers for 74043
We're sorry, but our Q&A experts are temporarily unavailable.
Please check back later if you still haven't found the answer you need.
Common Symptoms of the 74043
[Viewing 10 of 10]Door Sweating
Fixed by
these parts
these parts
Show All
Noisy
Fixed by
these parts
these parts


Show All
Ice maker not making ice
Fixed by
these parts
these parts


Show All
Leaking
Fixed by
these parts
these parts

Show All
Ice maker won’t dispense ice
Fixed by
these parts
these parts

Show All
Frost buildup
Fixed by
these parts
these parts

Show All
Not dispensing water
Fixed by
these parts
these parts
Show All
Door won’t open or close
Fixed by
these parts
these parts
Show All
Ice maker dispenses too much ice
Fixed by
these parts
these parts
Show All
Freezer section too warm
Fixed by
these parts
these parts
Show All
Keep searches simple. Use keywords, e.g. "leaking", "pump", "broken" or "fit".
Ice Maker Quit Making Ice
For this model the ice maker is very easy to replace. All it takes is a phillips head screwdriver. There are two wire connections you have to unplug. Easy out easy in. You do not have to disconnect the water line, just make sure the line is lined up correctly when you reinstall the new icemaker. It seems to take approximately 8 hours before you start getting ice again. If you have this same model, you already know this ice maker is very slow in making ice and is not able to keep up with daily usage of ice for a household of 3.
Parts Used:
-
Jeff from HUMBLE, TX
-
Difficulty Level:Very Easy
-
Total Repair Time:Less than 15 mins
-
Tools:Screw drivers
8 of 12 people
found this instruction helpful.
Was this instruction helpful to you?
Thank you for voting!
The door gaskets had become hard and curled up - would not seal properly
Watch YouTube videos on this topic if you are uncertain before tackling the job. The right door was easy to replace. Just pull the gasket with your fingers and it will come off easily. Place new gasket over door and use fingers to press it inside the groove few inches at a time. Pay attention to gasket orientation.
The left door is a bit harder because you need to remove the mullion at the door edge using a screw driver. Remove two screws on the center hinge and then slide the mullion up to disengage. Then unplug the wires to remove the mullion. Replace the gasket as described above and replace the mullion reversing the directions shown above.
Could not believe how easy it was!
Parts Used:


-
Vispi from SUGAR LAND, TX
-
Difficulty Level:Really Easy
-
Total Repair Time:15 - 30 mins
-
Tools:Screw drivers
4 of 4 people
found this instruction helpful.
Was this instruction helpful to you?
Thank you for voting!
Replaced Old Molded Gasket with new one
For the right side of the refrigerator door, just pulled off the old gasket and replaced it with the new one. Old gasket came off easily. Just had to pull it off. No screws on the right side. Just pushed the new one in place in the groove on the door.
For the left side, needed a Phillip’s screwdriver to remove the flap first. Helps to have a second person hold the door from moving. Once flap was off, pulled the old gasket off and installed the new one just like the right side. Then screwed the flap back on once the gasket was in the groove properly.
Initially after install, it seemed like the magnet on the door was not strong enough but after a couple of days, the magnet seems a lot stronger, sealing the air out. Very happy I replaced it. It was a lot simpler to replace than I thought it would be.
Parts Used:
-
Megan from Elk Grove, CA
-
Difficulty Level:Very Easy
-
Total Repair Time:Less than 15 mins
-
Tools:Screw drivers
3 of 3 people
found this instruction helpful.
Was this instruction helpful to you?
Thank you for voting!