This handle screw, also known as a mounting bolt, is a mounting screw to help secure the door handle to your refrigerator door. If your handle is loose, you may just need to tighten the screw. If your...
$18.96
In Stock
Order within the next 6 hrs and your part ships today!
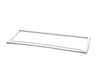
This refrigerator door shelf bin is a clear, gallon-sized storage accessory designed for installation on the right-side door of select refrigerator models. Crafted from durable, food-safe resin, it fe...
$79.89
In Stock
Order within the next 6 hrs and your part ships today!
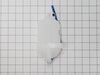
Having trouble with your LG fridge's ice or water dispenser? We have a solution: the Refrigerator Ice Water Line Tube Assembly is ready to get your fridge back in top shape. Why is this part crucial...
$53.89
In Stock
Order within the next 6 hrs and your part ships today!
This is a manufacturer-approved refrigerator door closure for your refrigerator. It is made of white plastic and measures approximately 3 inches by 2 inches. If your old closure is damaged, your refri...
$28.96
In Stock
Order within the next 6 hrs and your part ships today!
Questions And Answers for 72373
Be the first to ask our experts a question about this model!
✖
Ask a Question
Ask our experts a question on this model and we'll respond as soon as we can.
Shut off water supply. Disconnect main supply line. Remove rear lower panel on back of refrigerator. Remove all tubing clamps on back. Disconnect leaking tubing from water supply valve. Remove water filter and unscrew/remove water filter housing. Replace tubing - connect to water filter housing then to water supply valve. Reconnect filter housing and filter. Reinstall lower panel, then main water supply line, then all tubing clamps. Turn water back on and check for leaks after discarding several glasses of water to fill filter. Job complete!
The heavy work is moving the fridge, then take off the lower plans. Use a bowel or cup for screws and the water line connector spacers so you don't loos them. undo connections holding water line, including the bottom brakes for the solenoid. Reuse the spring around the lower waterline to prevent external wear on the line.
NOTE: remove the waterline connector spacers and save! NOTE: you must compress (not pull) the connect to then pull the waterline out of the connectors. NOTE: You must also remove the water filter and housing inside the fridge but this is easy. MOTE: Test the line for leaks by turning on the water and then using the door water. The filter will need to refill so it may take a minute before water comes up. This line only have pressure when the door water is used or the ice maker needs to make ice.
After replacing the line, test the line for leaks by using the door water so the solenoid fills the lines
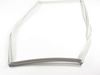
Watch YouTube videos on this topic if you are uncertain before tackling the job. The right door was easy to replace. Just pull the gasket with your fingers and it will come off easily. Place new gasket over door and use fingers to press it inside the groove few inches at a time. Pay attention to gasket orientation.
The left door is a bit harder because you need to remove the mullion at the door edge using a screw driver. Remove two screws on the center hinge and then slide the mullion up to disengage. Then unplug the wires to remove the mullion. Replace the gasket as described above and replace the mullion reversing the directions shown above.