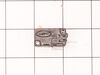
The locker, or door latch assembly fits to the inside of the microwave door, and keeps the door closed. If the door on your microwave oven doesn’t appear to close properly, you may have a problem with...
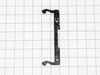
This bracket holds the metal or plastic flapper that closes off the exhaust duct when the fan is not running and opens when the fan turns on. If the exhaust fan on your microwave does not appear to be...
This metal vent damper door closes off the exhaust duct when the fan is not running to stop outside air from entering the microwave unit, and opens when the fan turns on to allow air to vent away from...
This is the replacement charcoal filter for your microwave. It is approximately 8 inches by 5 inches. The charcoal filter removes cooking odors from the air that circulate through the microwave vent. ...
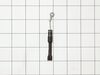
This spring provides tension or controlled movement within the appliance mechanism. Engineered for durability, it supports smooth operation and helps maintain proper alignment of connected components.
This turntable assembly, also known as a rotating ring, is a genuine OEM replacement part for your microwave. It is brown in color and about 10 inches in diameter. This part supports the glass turntab...
Are you looking to get your LG microwave back up and running smoothly? You're in the right place! With our LG Hardware Mounting Kit, you'll have everything you need for a straightforward, fuss-free in...
$52.44
In Stock
Questions And Answers for 72180594401
Be the first to ask our experts a question about this model!
✖
Ask a Question
Ask our experts a question on this model and we'll respond as soon as we can.
Removed the retaining clip that keeps the door on, took the door off. Removed the plastic rim that is clipped into place. Removed old screws holding on handle and replaced.
Unplug the unit before servicing. Need phillips screwdriver. Open door. Use step ladder to access and remove 2 small screws from top of the room air diffuser at top of unit. Slide diffuser slightly to the left to align the diffuser's plastic tab on the left side to rotate toward you. (The wires for the front control panel are at the far left side of this difuser, but difuser is slotted for easy removal). Once the difuser is removed you will see 1 screw at the top that secures the pannel cover on the left side of the unit. Remove screw and slide this panel slightly up and out. This exposes the plastic frame that holds the upper and lower door switches. To locate the door switches and observe how they work, close and open the door and watch the door (bayonets) open and close the micro switches. Do the (red) buttons on top of the switches move up and down when the door bayonets push and release? If the buttons do not "pop" up when opened the switch is defective. The switch frame is secured with 2 screws. Remove screws and rotate the unit out for easy access to the micro switch(s). The internal (spring?) on my unit that is suposed to allow the red (visible) button on top of the switch to "pop" up when the door is opened was broken. Carefully pry the switch outward while being careful to lift the plastic holder-piece that holds the switch in place. Be careful, there is a small pin on the frame, so rotate the switch OUT toward you while lifting (carefully) the plastic holder-piece (you will see it on top of the switch). You can use an ohm meter to test the continuity of the switches. But if the buttons don't "pop" they are defective. Replace switch and reassemble.
Open the door and start at the outside perrimeter of the plastic moulding by inserting the putty knife and gently prying up.I started at the 2 latches that secure the door when it closes.Work your way around to the top and bottom. I was able to leave the portion of the plastic moulding by the door hinges still intact while removing the screws for the handle and replacing with the new one.After handle is on gently snap moulding back in place.Remember start at the inside of the door in the small opening at the outter edge of the door.