


72180002401 Kenmore Microwave - Overview
Sections of the 72180002401
[Viewing 7 of 7]
Manuals & Care Guides for 72180002401
Click to downloadKeep searches simple, eg. "belt" or "pump".


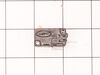
Microwave Grease Filter
PartSelect #: PS3527528
Manufacturer #: 5230W1A012B
Sold individually.
$18.65
In Stock

Air Duct Bracket
PartSelect #: PS3523851
Manufacturer #: 4810W1A151A
This bracket holds the metal or plastic flapper that closes off the exhaust duct when the fan is not running and opens when the fan turns on. If the exhaust fan on your microwave does not appear to be...
$26.92
In Stock

Microwave Damper
PartSelect #: PS3524148
Manufacturer #: 4900W1A001B
This metal vent damper door closes off the exhaust duct when the fan is not running to stop outside air from entering the microwave unit, and opens when the fan turns on to allow air to vent away from...
$17.85
In Stock


Microwave Door Latch Hook
PartSelect #: PS3522839
Manufacturer #: 4026W2A019C
The locker, also knows as a door latch assembly fits to the inside of the microwave door, and keeps the door closed. If the door on your microwave oven doesn’t appear to close properly, you may have a...
$17.47
In Stock


Glass Cooking Tray
PartSelect #: PS3517413
Manufacturer #: 1B71961H
This tray rotates in your microwave ensuring more even temperatures.
$70.42
In Stock

Magnetron
PartSelect #: PS3529034
Manufacturer #: 6324W1A001L
This part is used to generate microwave energy/heat.
$229.17
In Stock

Hardware Mounting Kit
PartSelect #: PS3522503
Manufacturer #: 3861W1A043C
Are you looking to get your LG microwave back up and running smoothly? You're in the right place! With our LG Hardware Mounting Kit, you'll have everything you need for a straightforward, fuss-free in...
$52.44
In Stock
Questions And Answers for 72180002401
We're sorry, but our Q&A experts are temporarily unavailable.
Please check back later if you still haven't found the answer you need.
Common Symptoms of the 72180002401
[Viewing 5 of 5]No heat
Fixed by
these parts
these parts


Show All
Won’t turn on
Fixed by
these parts
these parts

Show All
Doesn’t shut off
Fixed by
these parts
these parts

Show All
Door not closing properly
Fixed by
these parts
these parts


Show All
Tray won’t turn
Fixed by
these parts
these parts
Show All
Keep searches simple. Use keywords, e.g. "leaking", "pump", "broken" or "fit".
Microwave would not rotate or heat up food.
After watching a few youtube videos, I used a phillips SD to take controll pannel off to access the switches that sense when microwave door is closed. Swapped out all 3 switched and mocrowave works like new. $20 fix (shipping included)
Parts Used:

-
Joshua from WHITE LAKE, MI
-
Difficulty Level:Very Easy
-
Total Repair Time:15 - 30 mins
-
Tools:Screw drivers
51 of 74 people
found this instruction helpful.
Was this instruction helpful to you?
Thank you for voting!
Broken door micro switch. (unit does not start heating)
Unplug the unit before servicing. Need phillips screwdriver. Open door. Use step ladder to access and remove 2 small screws from top of the room air diffuser at top of unit. Slide diffuser slightly to the left to align the diffuser's plastic tab on the left side to rotate toward you. (The wires for the front control panel are at the far left side of this difuser, but difuser is slotted for easy removal). Once the difuser is removed you will see 1 screw at the top that secures the pannel cover on the left side of the unit. Remove screw and slide this panel slightly up and out. This exposes the plastic frame that holds the upper and lower door switches. To locate the door switches and observe how they work, close and open the door and watch the door (bayonets) open and close the micro switches. Do the (red) buttons on top of the switches move up and down when the door bayonets push and release? If the buttons do not "pop" up when opened the switch is defective. The switch frame is secured with 2 screws. Remove screws and rotate the unit out for easy access to the micro switch(s). The internal (spring?) on my unit that is suposed to allow the red (visible) button on top of the switch to "pop" up when the door is opened was broken. Carefully pry the switch outward while being careful to lift the plastic holder-piece that holds the switch in place. Be careful, there is a small pin on the frame, so rotate the switch OUT toward you while lifting (carefully) the plastic holder-piece (you will see it on top of the switch). You can use an ohm meter to test the continuity of the switches. But if the buttons don't "pop" they are defective. Replace switch and reassemble.
Parts Used:
-
JAMES from BILLINGS, MT
-
Difficulty Level:Very Easy
-
Total Repair Time:30 - 60 mins
-
Tools:Screw drivers
36 of 65 people
found this instruction helpful.
Was this instruction helpful to you?
Thank you for voting!
Broke the round glass tray
-
Eileen from DETROIT LAKES, MN
-
Difficulty Level:Very Easy
-
Total Repair Time:Less than 15 mins
10 of 13 people
found this instruction helpful.
Was this instruction helpful to you?
Thank you for voting!