This handle screw, also known as a mounting bolt, is a mounting screw to help secure the door handle to your refrigerator door. If your handle is loose, you may just need to tighten the screw. If your...
$13.15
In Stock
Order within the next 3 hrs and your part ships today!
This is the replacement shelf glass for your refrigerator. It is made of glass and is approximately 31 inches wide and 16 inches long. The shelf glass for your refrigerator slides over the crisper cov...
$69.25
In Stock
Order within the next 3 hrs and your part ships today!
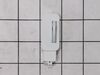
This is a genuine replacement switch. It is a push button style switch that is designed for use in your refrigerator. When the door of your appliance is opened the switch is released, and the light co...
$47.07
In Stock
Order within the next 3 hrs and your part ships today!
This ice maker assembly is for refrigerators. This Ice maker assembly contains the complete ice maker and housing. The assembly may include multiple parts; refer to your parts diagram for a complete ...
$180.02
In Stock
Order within the next 3 hrs and your part ships today!
This 13-volt evaporator fan motor helps circulate air over the refrigerator coils. These coils will then convert the heat into cool air, which is then circulated from the freezer section to the fresh ...
$216.10
In Stock
Order within the next 3 hrs and your part ships today!
This is a manufacturer-approved refrigerator door closure for your refrigerator. It is made of white plastic and measures approximately 3 inches by 2 inches. If your old closure is damaged, your refri...
Need a fix for your disorganized fridge? Our LG Refrigerator Door Bin Assembly could be exactly what you need. This authentic, OEM product is skillfully designed to fasten to the inside of your refrig...
$72.55
Special Order
Questions And Answers for 71049
Be the first to ask our experts a question about this model!
✖
Ask a Question
Ask our experts a question on this model and we'll respond as soon as we can.
Video makes it look easy. Kenmore refrigerator does not have "groove" along the right hand side of switch that allows for pushing down on release. Used a thin screwdriver to get under to push while holding switch edge with pliers. Kept slipping. Tape sides to avoid scratching inside of refrigerator.
This couldn't have been easier. Two tiny screws in the front needed unscrewed, and then two plastic clips in the middle just had to be popped lose. Finally, you unplugged the power cord. Then, you just needed to reverse the process by plugging the new ice maker in, popping the clips in place, and screwing the two holes back in and turning the whole thing on. Voila! Perfect ice cubes again. And for only a little over $100.