If your fridge doors aren’t sealing properly or you’re noticing cold air escaping, this front plate assembly might be the fix. Also called a mullion or flipper, it fits between the French doors to kee...
Having issues with your LG refrigerator's shelving? Our genuine OEM Retractable Glass Shelf is here to help. It's not just an ordinary shelf'this sleek and sturdy glass panel is a practical solution s...
This is an ice maker assembly kit designed for use within LG refrigerator-freezers. Ice makers are made to pull water from the water line, freeze it, and then store it in the form of cubes to be dispe...
This 13-volt evaporator fan motor helps circulate air over the refrigerator coils. These coils will then convert the heat into cool air, which is then circulated from the freezer section to the fresh ...
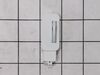
This is a manufacturer-approved refrigerator door closure for your refrigerator. It is made of white plastic and measures approximately 3 inches by 2 inches. If your old closure is damaged, your refri...
This refrigerator door gasket is a durable, flexible rubber seal designed to create a tight closure around the door, helping maintain proper temperatures and overall cooling efficiency. It replaces wo...
Looking for a reliable solution to keep your LG refrigerator or freezer in prime condition? Our genuine OEM Defrost Sensor Assembly from LG could be just what you need. Designed specifically to fit ...
$58.16
In Stock
Questions And Answers for 71033
Be the first to ask our experts a question about this model!
✖
Ask a Question
Ask our experts a question on this model and we'll respond as soon as we can.
1. Shut off water to refrigerator. 2. Removed bottom sheet metal cover (6 screws). 3. Removed leaking water inlet valve assembly from refrigerator (1 screw). 4. Remove water inlet tube (loosen nut) and tube back to refrigerator (pull from water valve after remove cotter pin washer). 5. Detach two electrical wire harnesses. 6. Install new water inlet valve assembly to refrigerator (1 screw). 7. Replace both water tubes to water inlet assembly. 8. Re-attach both wiring harnesses. 9. Turn water to refrigerator on. 10. Check for leaks. 11. Re-attach bottom sheet cover (6 screws).
Video makes it look easy. Kenmore refrigerator does not have "groove" along the right hand side of switch that allows for pushing down on release. Used a thin screwdriver to get under to push while holding switch edge with pliers. Kept slipping. Tape sides to avoid scratching inside of refrigerator.