This an authentic OEM 40-Watt replacement light bulb, used in a number of household appliances. It is specially designed to withstand extreme temperatures, which is why these replacement bulbs are mos...
The flat style gas oven igniter included in this kit has a body length of 3-3/4 inches. This kit comes with all of the pieces you need to replace longer ceramic igniters, though this kit can also repl...
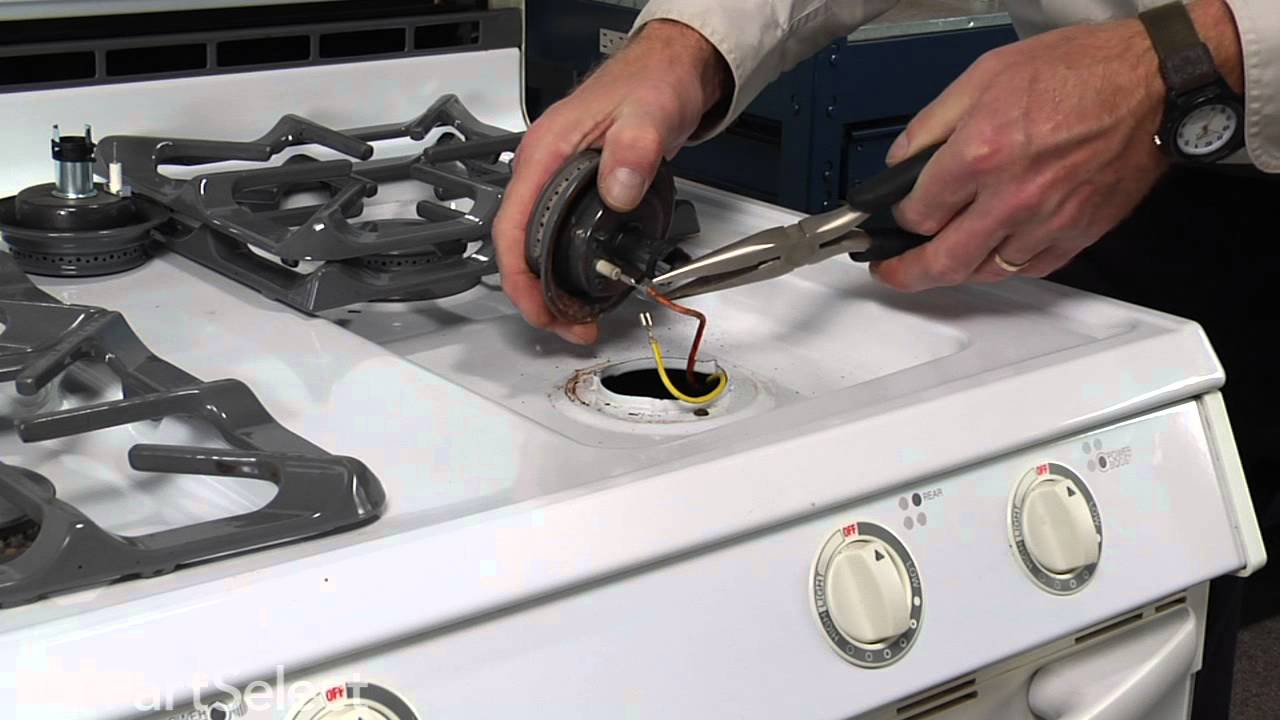
This burner cap assembly is sold with the spark electrode. Please note this part has been redesigned and no longer requires a gasket. Sold individually.
This is a multi-use and multi-appliance screw. It can be used on a microwave, refrigerator, range/oven, air conditioner, dehumidifier, washer, or dryer. The measurements of this screw are 8 x 1/2 inch...
This part may differ in appearance, but functions same as original part. : This part sends enough current to the igniter to create a spark to the bottom of the burner cap.
Ask our experts a question about this model and we'll get back to you as soon as possible!
2 questions answered by our experts.
< Prev
1
Next >
Sort by:
Search filter:
Clear Filter
Your search term must have 3 or more characters.
Keep searches simple. Use keywords, e.g. "leaking", "pump", "broken" or "fit".
Sorry, we couldn't find any existing answers that matched.Try using some different or simpler keywords, or submit your new question by using the "Ask a Question" button above!
Mike
December 20, 2023
How do you lift top of stove to get access to change front right gas control knob.
For model number 6498VVV
Hi Mike, Thank you for writing. You will need to remove the Burner Grates and Burner Heads to lift the Cooktop. We have attached a video on replacing the Burner Heads and it should help on removing yours. We hope this helps!
Was this helpful?
Thank you for voting!
Debra
September 27, 2023
What part needs replacing for F3 code?
For model number 6498VVV
Hello Debra, thank you for your question! The F3 error code means shorted or open oven temperature sensor. Check the connection between the oven control and oven sensor, as well as the sensor harness. If wiring is ok, replace oven temperature sensor, part number PS2003225. Good luck with your repair!
The oven had been working intermittently for a while and after repeated threats of starvation from my spouse I finally took a look even though it was summer and the grill was working fine. The Igniter would glow red when the oven was turned on but the gas would not flow to it no matter what the temperature setting. I searched online and found this site that explained it was possible for the igniter to glow but if it was not drawing the correct amperage (because its resistance was too high) then the main brain would not allow the gas valve to open. So I took a look at the broiler and it had the same igniter. I measure the resistance of both of them and the oven igniters resistance was higher (don't rememeber the reading) then I moved the Igniter from the broiler to the oven and the oven worked from there it was just a matter of ordering the part. End of story except for I am still doing all the cooking on the barbecue outside.
Repair tech checked oven and said the control panel was bad and needed to be replaced. The new control panel would cost over $450.00! I found that the oven sensor was bad and replaced it for $30.00. The old oven sensor had failed following a self cleaning cycle. I found that the wires coming out of it were burnt.
Replacing the oven sensor was very easy. I removed the back panels 6 screws to gain access to the sensor's connection. I then removed the 2 screw that hold the sensor in place inside the oven and pulled the old sensor out through the oven. I reversed this process to place the new sensor in the oven.
Replacement of these burners is very easy. You just twist the burner counterclockwise a quarter turn and pull it out. (You may need a big wrench if the range is very old.) Once out, just pull the two wires off and push them onto the new burner. Crimp them on with pliers if they're loose -- mine were. Twist the burner back on. If the gasket under the burner has disintegrated, don't worry about it. They don't offer replacements for them because they're not necessary as a safety feature. They were designed to keep overspills from running under the cooktop, but the ridge around the hole is likely higher than you'd ever need.


 Diagram and Parts List for Magic Chef Range")


 – Part Number: W11665456")