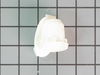
This Refrigerator Air Filter is a white 1.8x3.2" plastic filter which neutralizes odor and bacteria in the air. It should be replaced every six months at a minimum. Refer to your user manual and model...
This 18 ml bottle of white appliance touch-up paint is used to cover scratches or marks on your appliance. The white touch-up paint can be used on refrigerators, microwaves, ranges, clothes dryers, an...
This clear plastic door bin attaches to the inside of the refrigerator door and holds jars and bottles. Door bins can crack and break due to frequent and heavy use, and faulty bins should be replaced.
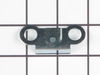
This hinge bracket, also known as a door stop, is attached to the bottom of the door and is used to limit how far the door swings out to protect the refrigerator itself, and any surrounding cabinets f...
This track is a genuine OEM replacement part for your refrigerator. It is made of white plastic. The track supports the shelf within your fridge, and can be snapped in and out of place, which makes re...
This is a genuine Whirlpool replacement part. This drawer hanger is for refrigerators and its job is to support the drawer. It is approximately 11 inches in length, and is made of plastic.
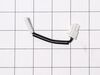
With our Whirlpool Door Hinge Nylon Washer, you can help extend the life of your refrigerator and improve its functionality. This small but mighty part is designed to keep your fridge door running smo...
This genuine OEM ice maker kit is designed to fit refrigerators that did not originally come with an ice maker. This kit contains everything needed to install the new ice maker on your refrigerator in...
$162.49
In Stock
Questions And Answers for 5MT711BFEG00
Be the first to ask our experts a question about this model!
✖
Ask a Question
Ask our experts a question on this model and we'll respond as soon as we can.
I used a flat-head screwdriver to pop out the old light rocker switch. Then, I unplugged the wires, plugged them into the new light rocker switch, and then popped the new switch into the hole. That's it! Lights began working again.
An easy job for smaller hands. Removed the two bolts holding the light cover. Removed two electrical connections from the old switch by pinching the retaining clip,removed the switch, snapped in the new one and re-attached the connectors. Your online illustrations helped me to know that the plastic housing for the light switch would only swing down so far and was not intended to be removed. Saved me from breaking that plastic cover's tabs. This home repair saved me more than 5 times the cost of hiring a professional to do it. Very happy homeowner.
Once I saw the replacement part I understood how to pry out the switch with a small screwdriver. Then just unplug the old one, plug in the new one and pop it into place.
The PartSelect site made it easy to correctly identify the correct part, it was inexpensive, and the shipping was fast.