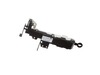
Introducing the Samsung Washer Shock Damper Front, a vital component for optimal washer performance. This part maintains the stability of your washer, helping minimize vibration and noise during opera...
Introducing the Hex Head Bolt, a vital component designed to keep your Samsung, Kenmore, or Maytag washer functioning at its best. Manufactured with strict quality controls, this part ensures you rece...
$11.95
In Stock
Order within the next 3 hrs and your part ships today!
Revive the wide array of your appliances including your Samsung Refrigerator, Samsung Dryer, Samsung Washer, and even your Samsung Dishwasher with the Tapping Screw, a crucial component engineered by ...
$6.95
In Stock
Order within the next 3 hrs and your part ships today!
Add exceptional longevity and superb performance to your Samsung washer and dryer with the high-quality Water Temperature Thermistor. Specially designed by Samsung, this exceptional product ensures ac...
$54.95
In Stock
Order within the next 3 hrs and your part ships today!
Upgrade your domestic laundry routine with our Washer Tub Gasket/Seal. Designed by leading brands, Samsung and Maytag, this product is designed for maximum efficiency and durability. Guaranteed to fit...
$35.95
In Stock
Order within the next 3 hrs and your part ships today!
As a vital component of your Samsung Washer, this Assembly Flange Shaft (purple) significantly enhances the overall performance and efficiency of your laundry machine. Crafted with caution by Samsung,...
$250.75
In Stock
Order within the next 3 hrs and your part ships today!
Is your Samsung washing machine door glass broken or cracked? We've got just what you need to fix that problem. Introducing our Samsung Washer Door Glass ? a reliable, high-quality replacement part cr...
Enhance the performance of your Samsung or Kenmore washer with the Outer Seal Clamp. This essential part is expertly crafted by Samsung, ensuring excellent quality and a fit precise like original equi...
$17.44
In Stock
Order within the next 3 hrs and your part ships today!
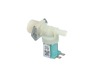
Introducing the highly efficient Water Inlet Valve, exclusively designed for your Samsung, Maytag, and Kenmore washers. This essential component ensures a controlled and steady water flow into your wa...
$84.95
In Stock
Order within the next 3 hrs and your part ships today!
Improve the performance of your Samsung or Kenmore Washer with this genuine Guide Spring. This crucial component ensures smooth operation by assisting in the suspension system of the washer's drum. As...
$6.95
In Stock
Order within the next 3 hrs and your part ships today!
Upgrade the performance of your Samsung or Maytag washer with the Rear Tub Oil Seal designed for smooth operation and durability. This premium part delivers superior sealing to prevent leaks in your w...
$43.95
On Order
Questions And Answers for 592-49196
Ask our experts a question about this model and we'll get back to you as soon as possible!
1 question answered by our experts.
< Prev
1
Next >
Sort by:
Search filter:
Clear Filter
Your search term must have 3 or more characters.
Keep searches simple. Use keywords, e.g. "leaking", "pump", "broken" or "fit".
Sorry, we couldn't find any existing answers that matched.Try using some different or simpler keywords, or submit your new question by using the "Ask a Question" button above!
Warren
November 29, 2024
water level error on machine.
Should i just clean the water inlet fiter first before need ing to chsange water level switch?
For model number 592-49196
Hi Warren,
Thank you for your question. If you get a water fill error code, remove the water inlet hoses from the back of the washer and use a bucket to see if the water flows through them. If there is not a lot of water following through the hoses, check and make sure that the water supply is completely turned on. If they are, you may have a water pressure issue in your home and you may need to have a plumber inspect the water pressure. If the water pressure is fine, inspect the screens on the water inlet valve. If screens do have sediment, try gently cleaning them with a fine brush to see if you can remove it. Using too much force may damage the screens. If they become damaged, you will need to replace the water inlet valve. If the screens are free of sediment, check the water inlet valve for continuity with a multimeter on the Rx1 setting. You should receive a reading of 200-500 ohms. If you get any other reading, you will need a replacement water inlet valve. We hope this helps!
The part did not fit this model. The flap part fit the hole but the seal ring is too big. I cut 1\4inch out and used super glue the make it small enough to fit and seal the hose. Make sure you only use a drop of glue and keep the seal even and flat so it will seal
First unplug or turn off thee circuit breaker. Then remove the two screws to the top cover. Slide the cover back about three inches then remove the cover. Next take out the screw to the old sensor. Then unplug the electrical connection by squeezing and the pulling to disengage. Now set the old unit aside. You then grad your eight inch wire tie and hold the with flat side to the right and just to the right of the screw hole for the bracket is a square hole. Feed to wire tie into the square hole with your left hand then loop down left side of the end of new sensor and back up threw the square hole and tighten with the pliers. Your new sensor will be positioned just like it was mounted to the metal bracket. And pretty ridged. Now connect the vacuum hose and electrical connector.
Take pics every step, easier re-assembly. Dismantled washer keeping bolt/screw section removed compartmentalized in a tackle box in the order of removal. Replaced drum support, bearings, seal, old blots. Too much to write but I was able to do it all in about 4 hours once all the parts finally came in.