This kit includes one bearing, one ball shaft, one ball bearing, one ball bearing retainer, a small tube of high temperature lubricant, and installation screws.
The rear drum support bearing helps support the dryer drum to rotate quietly and smoothly during operation. The bearing attaches on the inside of the rear panel of the dryer cabinet. If your dryer is ...
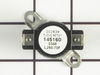
This thermal fuse limiter, with a limit of 220 degrees Fahrenheit, is manufactured for both gas and electric clothes dryers. Once the internal temperature of the dryer reaches 220 degrees, the heating element cuts out.
This dryer lint screen is for laundry centers.
Dryer lint screen captures lint and debris from the exhaust air flowing from the dryer.
Follow the instructions in the owner's manual when installing this part.
The pump is what your washer uses to remove the water from the tub. This part is the pump and motor assembly which includes the red flapper to prevent drain back flow.
The upper felt seal for your dryer is attached to the top edge of the drum support area, and is held there by a high temperature adhesive. It creates a seal where the dryer door opens and closes, so t...
This start switch is a manufacturer-approved replacement part for your dryer. A faulty start switch means your dryer will not begin its drying cycle. In order to complete this repair, you will need a ...
$96.81
In Stock
Questions And Answers for 41794802301
Ask our experts a question about this model and we'll get back to you as soon as possible!
5 questions answered by our experts.
< Prev
1
Next >
Sort by:
Search filter:
Clear Filter
Your search term must have 3 or more characters.
Keep searches simple. Use keywords, e.g. "leaking", "pump", "broken" or "fit".
Sorry, we couldn't find any existing answers that matched.Try using some different or simpler keywords, or submit your new question by using the "Ask a Question" button above!
Randy
February 28, 2023
Dryer squeals when running. Sounds like a bearing noise to me. If I pull out and disconnect to repair, I want to replace other likely parts needing replacement as well as the unit is 22 years old. I think both dryer belts as well. Any other replacement parts recommended while I have the unit open and the drum out?
For model number 41794802301
Hello Randy, thank you for reaching out to PartSelect. If you have a noisy dryer, you may need to replace the dryer belt, part number PS1148434. Basically, noise is caused by a broken belt that is unable to hold the drum. Also, if your dryer does not tumble and creates squeaking noise, you may need to replace the drum support bearing, part number PS418807. The drum is supported at the rear by a bearing, which attaches to the inside of the rear panel of the cabinet. You will need to remove the dryer drum before completing this repair. Although replacing the drum support bearing is a fairly easy job, you will need tools to complete it. For this repair, you will need a putty knife, a Phillips screwdriver, a 5/16 nut driver, and maybe a small flat-blade screwdriver. We hope that helps!
Timer won't continue in any setting past the fill/agitate stage. It will not empty or spin or rinse. The pump has continuity and there is no blockage in the drain line. I can move the timer to another wash cycle setting and it will start but not drain or rinse and then spin. Timer knob is fine, pump if fine, but the timer never moves to the next stage.
Does the drain pump get it's signal from the timer or the circuit board
For model number 41794802301
Hi Robert, thank you for contacting us. If your timer is not advancing from the wash cycle, the washer timer, part number PS815562, itself might be faulty. It controls most of the functions of the washer including the tub filling and emptying, cycle lengths, and cycle setting sequences. Checking the timer for continuity using a multimeter might help. Good luck with the repair!
My dryer has a new heating element but still doesn't heat up good. What else could be the issue?
For model number 41794802301
Hello Deb, thank you for contacting us. Based on our understanding of the issue, we would suggest checking the cycling thermostat, part number PS446464, to solve the problem. We hope this helps.
The hood to the washing machine comes down and closes and enters into a small plastic Catch. It appears that there are two pieces one top of the hood that is attached with two screws and the piece we are looking for is.
On the base. It is a rectangular white piece of plastic with originally two clips to hold it in. This is the top and bottom. Dryer on the top washer on the bottom it is a very small part visible when you open the hood sitting to the right side, you might be able to describe it as a latch catch. 417.94802301 model
For model number 41794802301
Hello Michael, thank you for reaching out. The part that you are referring to is the lid strike, part number PS417676, that needs to be replaced. We hope this helps!
washer won't fill up with is that have any thing to do with the pump
For model number 41794802301
Hi Everett, thank you for the question. A washing machine not filling with water is usually not caused by the pump, but rather by issues with the water supply, inlet valve, or pressure switch. Ensure that the water inlet valve is working properly. If it is fine, the issue could be with the water level pressure switch, part number PS2373332. It allows your washing machine to detect when it's sufficiently filled. You may need to replace it to fix the issue. We hope this solves your problem!
1. Unplug dryer from outlet 2. Using Lg. flat screwdriver, pry under the front edge of the top and release two spring tabs 3. Lift up top and tilt back out of your way 4. Unscrew two phillips scews on inside of front panel 5. Lift up and out the front panel. Two spring clips at bottom. 6. Rlease tension on drum belt at the motor. Access panel at rear of dryer. 7.Unscrew 3 screws from inside, center rear of drum. 8. Remove drum through the front of the dryer. You may have to spread the sides apart a little bit for it to fit 9. Lift up on the rear drum bearing to remove it from the bearing retainer. ( U shaped plastic socket) 10. unsrew 2 screws and remove the bearing retainer, ground ball. Ball retainer is on outside of dryer. 11. Vacuum everything--duct, blower, lint trap, ect. 12. Intall new bearing retainer and grounding ball, an assistant is helpful at this time, one to hold ball retainer on rear of dryer, one to screw it in from the inside 13. reassemble remainder of parts in reverse order.
carefully pry up on front washer top to release plastic keeper pins,remove 2 phillips screws from beneath lower front washer panel,slightly lift upward on panel to release.remove old broken belt,push new belt beneath large tub pulley,put belt on small motor pulley,push back belt tension /idler arm,start belt on large tub pulley,turn tub pulley by hand to run belt on,release tension on idler arm.replace front panel and lower top.WALAAH!!!! you are done.
Unplugged Dryer. Opened top of Dryer, over the drum. Removed Thermal Limiter. Tested the Thermal Limiter - found it was open. Checked all vents and exhaust tube for lint build-up. Replaced Thermal Limiter. Closed top of dryer. Plugged Dryer back. Tested Dryer - it works.