


36368592896 Kenmore Refrigerator - Overview
Sections of the 36368592896
[Viewing 7 of 7]
Keep searches simple, eg. "belt" or "pump".

Light Bulb - 40W
PartSelect #: PS217532
Manufacturer #: 40A15
This 40-Watt light bulb is sold individually.
It is specially designed to withstand extreme temperatures, so this bulb is compatible with a variety of appliance types including refrigerators, ranges,...
$19.10
Special Order

Evaporator/Condensor Fan Grommet
PartSelect #: PS284555
Manufacturer #: WR02X10098
This evaporator fan motor grommet, or condenser fan grommet is built for refrigerators. It provides a cushion between the fan motor and the motor mounting bracket. It is made or round, black plastic a...
$17.70
Special Order

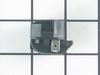
LIGHT SWITCH
PartSelect #: PS16554876
Manufacturer #: WR23X37285
The interior light of your refrigerator is controlled by a switch that is activated when the door is opened and closed. If your refrigerator light will not turn on, there could be an issue with the sw...
No Longer Available

Condenser Fan Motor
PartSelect #: PS967022
Manufacturer #: WR60X10168
This fan motor circulates the air through the refrigerator grille and cools the compressor and condenser coils. It also helps to evaporate extra water in the drain pan.
$85.95
Special Order

Door Shelf Retainer Bar End Cap - Right Side
PartSelect #: PS299259
Manufacturer #: WR2X8700
This is the replacement door shelf retainer bar end cap for your refrigerator. An end cap connects to the lower shelf bar on either side, and then snaps into position on the refrigerator door, allowin...
No Longer Available

Vegetable Drawer Slide Rail - Right Side
PartSelect #: PS292796
Manufacturer #: WR17X2769
No Longer Available

Vegetable Drawer Slide Rail - Left Side
PartSelect #: PS292797
Manufacturer #: WR17X2770
This is the replacement vegetable drawer side rail for the left side of your refrigerator. It is made of white plastic and is approximately 18 inches long, and 6 inches wide. The slide rail supports t...
No Longer Available

Door Shelf Retainer Bar End Cap - Left Side
PartSelect #: PS299258
Manufacturer #: WR2X8699
This part is the replacement door shelf retainer bar end cap for the left side of your refrigerator door. The end cap is approximately 4 inches by 5 inches and is made of white plastic. The end cap sn...
No Longer Available

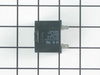
Run Capacitor
PartSelect #: PS11764031
Manufacturer #: WR55X24064
This part helps the compressor kick on and off while maintaining a constant temperature to keep things frozen in your freezer. This part has been updated by the manufacturer and may appear different t...
No Longer Available

Light Socket
PartSelect #: PS299782
Manufacturer #: WR2X9391
This part is a replacement light socket for your refrigerator. It connects to the power source, and holds the light bulb. If the light in your refrigerator is not working, you could have a faulty sock...
$23.24
Special Order

Screws - Package of 12
PartSelect #: PS294595
Manufacturer #: WR1X1763D
This is a package of twelve replacement screws. They are designed as replacement screws for refrigerators. Be sure to check that your appliance model is compatible with these screws. The screws are ap...
$16.16
Special Order

Center Cover Slide
PartSelect #: PS292795
Manufacturer #: WR17X2768
This slide cover or slide rail is a genuine OEM replacement part for your refrigerator. This part is made of white plastic. To install it, simply remove the glass shelf, remove the current slide rail ...
No Longer Available
Common Symptoms of the 36368592896
[Viewing 14 of 14]Light not working
Fixed by
these parts
these parts


Show All
Noisy
Fixed by
these parts
these parts


Show All
Fridge too warm
Fixed by
these parts
these parts

Show All
Will Not Start
Fixed by
these parts
these parts
Show All
Freezer section too warm
Fixed by
these parts
these parts

Show All
Leaking
Fixed by
these parts
these parts


Show All
Fridge and Freezer are too warm
Fixed by
these parts
these parts
Show All
Door Sweating
Fixed by
these parts
these parts

Show All
Clicking sound
Fixed by
these parts
these parts
Show All
Freezer not defrosting
Fixed by
these parts
these parts
Show All
Too warm
Fixed by
these parts
these parts
Show All
Fridge runs too long
Fixed by
these parts
these parts
Show All
Element will not heat
Fixed by
these parts
these parts

Show All
Ice maker not making ice
Fixed by
these parts
these parts
Show All


Keep searches simple. Use keywords, e.g. "leaking", "pump", "broken" or "fit".
No power to the fan and compressor
I have a fridge in my garage. I have found that a glass of ice water or a cold drink outside is very important to me. When I discovered melting ice dripping onto the garage floor I was very upset. I spun the fridge and found that the compressor and fan weren't starting. I got out my multi-meter and discovered that power was not making it to these components. I did some research and found the wiring diagram online. There really isn't too much going on with a fridge and the most likely candidate seemed to be the run capacitor. I ordered the part, replaced it in a few minutes and the fridge began working again.
Parts Used:
-
Christian from Kearneysville, WV
-
Difficulty Level:Really Easy
-
Total Repair Time:Less than 15 mins
-
Tools:Screw drivers
222 of 302 people
found this instruction helpful.
Was this instruction helpful to you?
Thank you for voting!
Sticking Light Switch
I applied some tips learned by reading other reviews. So before I started I grabbed my trusty vise grip pliers and a small screw driver. I locked onto the switch actuator, the part that the refrigerator door pushes in, with the vise grips and pulled on it just hard enough to get the screw driver inserted in the right side to push in the catch clip so the switch could be pulled out further each time the catch clip was depressed to the next detent. Then I used the screw driver on the left site to encourage the switch past the detents on the left and very quickly the switch was out of the mount. The wires from the refrigerator pulled out with the old switch. I unplugged the old switch from the wires and plugged in the new switch and shoved the new switch back into the mount, wiggled it a couple of times to make sure it was secure and the job was done. Once I applied the vise gripes at first, the whole job took less than a minute.
Parts Used:
-
Jonathan from Lilburn, GA
-
Difficulty Level:Really Easy
-
Total Repair Time:Less than 15 mins
-
Tools:Pliers, Screw drivers
121 of 175 people
found this instruction helpful.
Was this instruction helpful to you?
Thank you for voting!
bad light socket
unplugged refrigerator. removed light bulb from old socket. unsnapped old light socket and pulled it out just enough to diconnect the electrical plug that plugs into the socket . discarded the old socket and plugged in new socket. snapped in new socket into refrigerator. i watched how to do this simple procedure on you tube and decided to do it myself. easy easy easy
Parts Used:
-
nancy from silsbee, TX
-
Difficulty Level:Really Easy
-
Total Repair Time:Less than 15 mins
45 of 56 people
found this instruction helpful.
Was this instruction helpful to you?
Thank you for voting!