


25326092100 Kenmore Freezer - Overview
Sections of the 25326092100
[Viewing 4 of 4]
Manuals & Care Guides for 25326092100
Click to downloadKeep searches simple, eg. "belt" or "pump".

Defrost Thermostat
PartSelect #: PS2350702
Manufacturer #: 297216600
This authentic defrost thermostat is sourced directly from the original equipment manufacturer and is designed for use with Frigidaire freezers. It regulates the internal temperature to ensure the fre...
$38.00
In Stock

Freezer Door Key
PartSelect #: PS1991481
Manufacturer #: 297147700
This plastic freezer door key is designed to operate the lock mechanism on upright and chest freezers, providing secure access to the appliance’s contents. Compatible with a range of models, it helps ...
$18.95
In Stock

Refrigerator Light Bulb
PartSelect #: PS12712277
Manufacturer #: 5304517886
This 3.8-watt LED light bulb is designed to illuminate the interior of select refrigerator models, providing bright and efficient lighting when the door is opened. If your current bulb is dim, flicker...
$84.22
In Stock

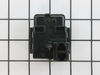
Run Capacitor - 120V
PartSelect #: PS3495561
Manufacturer #: 297286803
The run capacitor is attached to the compressor. This part is 120 volts and 15 mfd. The run capacitor helps the compressor kick on and off while maintaining a constant temperature to keep things froze...
$48.95
In Stock

Refrigerator Ice Maker Assembly
PartSelect #: PS12364147
Manufacturer #: 241798231
This 8-cube ice maker is used to create ice for your refrigerator. The ice maker receives water from the water inlet valve and will freeze until ice cubes are formed. Once the water has been frozen t...
$216.90
In Stock

Water Inlet Valve
PartSelect #: PS7784017
Manufacturer #: 242252603
When energized, the water inlet valve will release water from the supply line into the ice mold and the water dispenser in the refrigerator. If the ice maker is not making or dispensing ice, not disp...
$83.00
In Stock

Replacement Ice Maker
PartSelect #: PS735469
Manufacturer #: 5303918277
This part is the replacement heat-release ice maker unit only. This kit comes with four round female connectors at the end of the wire harness. It also comes with the adaptor that converts the harnes...
$123.28
In Stock

Adjustable Leveling Foot - Black
PartSelect #: PS425733
Manufacturer #: 216396900
Sold Individually.
$41.81
In Stock

Freezer Door Gasket
PartSelect #: PS11770643
Manufacturer #: 5304507199
This freezer door gasket is a genuine replacement component designed to create a secure seal when the door is closed, helping maintain consistent internal temperatures and energy efficiency. Finished ...
$206.29
In Stock

Screw
PartSelect #: PS1526032
Manufacturer #: 240521303
This small, Phillips-head screw works with your refrigerator/freezer. It screws in to the freezer door and connects to the door handle. This part is made of stainless steel and is sold individually. T...
$32.89
In Stock
 – Part Number: 297309000")
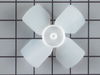
Evaporator Fan Motor (115v)
PartSelect #: PS3502361
Manufacturer #: 297309000
This evaporator fan motor is located in the back of the freezer, and circulates air over the refrigerator coils. These coils will convert the heat into cool air, which is then circulated.
$81.34
In Stock

Handle Mounting Block
PartSelect #: PS427804
Manufacturer #: 218396700
Sold individually.
$57.02
In Stock
Common Symptoms of the 25326092100
[Viewing 19 of 19]Ice maker not making ice
Fixed by
these parts
these parts


Show All
Frost buildup
Fixed by
these parts
these parts


Show All
Too warm
Fixed by
these parts
these parts


Show All
Fridge too warm
Fixed by
these parts
these parts
Show All
Noisy
Fixed by
these parts
these parts
Show All
Won’t start
Fixed by
these parts
these parts
Show All
Ice maker won’t dispense ice
Fixed by
these parts
these parts
Show All
Doesn’t stop running
Fixed by
these parts
these parts

Show All
Leaking
Fixed by
these parts
these parts
Show All
Will Not Start
Fixed by
these parts
these parts
Show All
Freezer section too warm
Fixed by
these parts
these parts
Show All
Fridge and Freezer are too warm
Fixed by
these parts
these parts
Show All
Freezer not defrosting
Fixed by
these parts
these parts
Show All
Clicking sound
Fixed by
these parts
these parts
Show All
Fridge runs too long
Fixed by
these parts
these parts
Show All
Freezer too cold
Fixed by
these parts
these parts
Show All
Not dispensing water
Fixed by
these parts
these parts
Show All
Too cold
Fixed by
these parts
these parts
Show All
Door won’t open or close
Fixed by
these parts
these parts

Show All


Keep searches simple. Use keywords, e.g. "leaking", "pump", "broken" or "fit".
Broken ice maker
Unplugged faulty ice maker, removed two screws holding it to the refrigerator and took it out. Reversed the operation with the new ice maker and after a few minutes presto, we have ice.
Parts Used:

-
Juan from Miami, FL
-
Difficulty Level:Really Easy
-
Total Repair Time:15 - 30 mins
-
Tools:Socket set
255 of 343 people
found this instruction helpful.
Was this instruction helpful to you?
Thank you for voting!
Ice Maker Stopped Working
It was pretty straight forward. Remove the two screws that hold the unit to the wall of the freezer. In my case, I had to use a different ice maker than what came with the frig. In order to install the replacement unit they sent a wire adaptor so it would attach to the existing wiring. That too was all fine and dandy. The only problem was that the end of the wire adaptor did not fit through the existing hole in the rear of the frig. I used a utility knife to cut through the thin metal lining. That worked just fine. However, I could not cut through the insulation because I could not reach it through the small hole. The excess wire was supposed to be pulled through the hole and out through the back of the unit. So now the excess is between the wall of the freezer and the insulation. The unit is working wonderfully. In fact, it is making more ice than I can use. I am very pleased with the replacement unit. This is the 3rd ice maker that has been in this frig. All the others had a design flaw that had a leak in the rear of the unit. This caused all the ice to form into a big block. The replacement unit has not had this problem so far. Thank you for allowing me to explain my situation so that maybe others may benifit from my experience. Thank you. Jack
Parts Used:
-
JACK from MESA, AZ
-
Difficulty Level:A Bit Difficult
-
Total Repair Time:1- 2 hours
-
Tools:Screw drivers
164 of 183 people
found this instruction helpful.
Was this instruction helpful to you?
Thank you for voting!
Gasket old and leaking
This freezer has many screws that hold the cover on the back of the door and assist clamping the edge of the gasket in place. Be sure to just loosen the screws 3/4 the way out, use a flat head screw driver to pry the cover from the door in case over time it is stuck to the door. The new gasket will come in a creative box trying not to kink the gasket itself, but there will be some distortion of the gasket when you get it. Put it in the sun or in hot water. I put it in my dryer for 10 minutes. Remove the old gasket, and start at the top of the door to replace the gasket. TIPS: If the screws are backed out enough, there should not be any problem sliding the back part of the gasket under the cover. When on the sides, do not pull the gasket down to make it easier to slide the gasket underneath the cover. This will distort and lengthen the gasket so it will not fit and thin it out so it will not function well. Once the gasket is in place, tighten the screws being sure to feel along the outside edge of the gasket for any bulging that would indicate that portion of the gasket is NOT under the cover properly.
Parts Used:
-
Thomas from RIXEYVILLE, VA
-
Difficulty Level:A Bit Difficult
-
Total Repair Time:30 - 60 mins
-
Tools:Screw drivers
117 of 124 people
found this instruction helpful.
Was this instruction helpful to you?
Thank you for voting!