This condenser fan motor operates in a clockwise fashion and carries carries 2W and 115V. It comes with screws, a mounting nut for the blade and a cushion. This part provides forced-air cooling for the condenser coil.
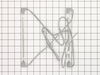
This set includes two nine and a quarter inch radiant glass defrost heaters joined together with wire. Each heater carries 500 watts and 115 volts. The defrost heater heats the evaporator in the defr...
This hose clamp extends from half an inch to an inch in diameter. It is made entirely of metal and is intended for use with Maytag brand washing machines.
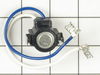
This part is both the start relay and the overload. The start relay boosts the compressor, and then shuts off as soon as the motor gets up to speed and the overload provides extra protection against e...
This part may appear different than the original, but will function the same. This device acts like a clock. It continually advances and alternates between activating the cooling cycle and the defrost heater.
Unplug the appliance. Removed the screws holding the back panel. Removed the fan blade. removed 3 screws holding the condenser fan. Remove the 3 metal brackets attached to the fan. (First note which studs the brackets are attached to. Attach the 3 metal brackets to the new fan. (New screws were supplied) Cut and strip the wire about two inches from the fan. Cut and strip the new wire. I cut the new wire in half (about 6 inches.) Connect the two wires, twist and used 2 wire nuts. Tie wrap the wire to the wire harness. Mount the new fan (three screws) Screw the back panel back on. Mount the new
This is a problem in the defrost cycle. It is one of three items the heater, timer or thermostat.. I removed the screws from the back side of the freezer and romoved the sheet metal from the back which exposes all the elements. Below the evaporaro coils are two small plates which cover the heating elements ( two glass tubes conected to insulated wire), You may be able to look at it and tell if they are bad. Mine was burnt and obviously gone. If you disconnect from conectors you can check for conitinuity to tell if bad. Simply remove the four screws holding these in place and install new one the same way. quite easy. I did check the thermostat for continuity and relaced it also. It simply plugs into a clip on the back wall and two power connectors. If checking themostat for continuity make sure it is cold otherwise it will be open and you won't get a good read. The timer for this model is under \neather behind the grill on the bottom. simply turn the dial and if the motor stops it is probbably good. It runs 8 hr. and then will shut off for defrost heater to come on. Do this before closing up to tell that your new heater is working. It will get red quickly. Saved a lot of money on this one
I had read on a fix it site that the start device for the compressor on this particular model was known to fail after 3-5 years. When we received the part it looked like something that just plugged into the compressor. My husband unscrewed the panel in the back of the fridge and saw the part on the compressor. He first removed the three wires that it was connected to, and the wires were inside a plug so all he had to do was remove the plug from the start device. He then removed the old start device from the compressor. Plugged in the wire plug into the new start device, and pushed in the new start device into the compressor. There was also another black part plugged into the old start device that he plugged inot the new start device that connected to the compressor. Our freezer and refrigerator starting working. Within a couple of hours our freezer had made ice.