1276*0A Roper Range - Overview

Sections of the 1276*0A

[Viewing 8 of 8]
Keep searches simple, eg. "belt" or "pump".
Surface Burner Element Switch, Large Burner – Part Number: WP3149400
Surface Burner Element Switch, Large Burner
★★★★★
★★★★★
(47)
PartSelect #: PS11740783
Manufacturer #: WP3149400
This control switch controls the stove top 8" surface burner. 8.9- 11.0 amp. This surface burner element switch is for an 8-inch surface burner on an oven, stove, or range. The element switch control...
$74.85
  In Stock
Lid Switch – Part Number: W10820036
Lid Switch
★★★★★
★★★★★
(7)
PartSelect #: PS11723153
Manufacturer #: W10820036
Keep your washer or dryer running safely with this easy-to-install lid or door switch kit. It stops the machine from working when the door is open, helping prevent spills and accidents. Compatible wit...
$30.03
  In Stock
Broil Element – Part Number: 326795
Broil Element
PartSelect #: PS340509
Manufacturer #: 326795
This five loop broil element has a hanger style mount.
  No Longer Available
Blower Belt – Part Number: WP691371
Blower Belt
★★★★★
★★★★★
(3)
PartSelect #: PS11743766
Manufacturer #: WP691371
If your dryer isn’t drying clothes like it used to or making strange noises, this blower belt might be the fix. It connects the motor to the blower wheel, helping move air through the drum so clothes ...
$63.91
  In Stock
Trim, End R.H. (New Avocado) – Part Number: 328142
Trim, End R.H. (New Avocado)
PartSelect #: PS585032
Manufacturer #: 328142
  No Longer Available
USE WPL 330313 – Part Number: 327875
USE WPL 330313
PartSelect #: PS585302
Manufacturer #: 327875
  No Longer Available
Hinge Bracket – Part Number: 327403
Hinge Bracket
PartSelect #: PS598482
Manufacturer #: 327403
  No Longer Available
Inverted Nut – Part Number: 113384
Inverted Nut
PartSelect #: PS598719
Manufacturer #: 113384
  No Longer Available
Screw-Adjustment – Part Number: 312989
Screw-Adjustment
PartSelect #: PS598799
Manufacturer #: 312989
  No Longer Available
Air Shutter (3 Req) – Part Number: 327198
Air Shutter (3 Req)
PartSelect #: PS598814
Manufacturer #: 327198
  No Longer Available
Main Top Spacer(Lt. or Rt.) – Part Number: 326914
Main Top Spacer(Lt. or Rt.)
PartSelect #: PS598957
Manufacturer #: 326914
  No Longer Available
Hex Nut – Part Number: 79673
Hex Nut
PartSelect #: PS599153
Manufacturer #: 79673
  No Longer Available

Questions And Answers for 1276*0A

Be the first to ask our experts a question about this model!

Common Symptoms of the 1276*0A

[Viewing 8 of 8]
Element will not heat
Fixed by
these parts
Fixing
Show All
Will Not Start
Fixed by
these parts
Fixing Fixing
Show All
Will not drain
Fixed by
these parts
Fixing
Show All
Oven is too hot
Fixed by
these parts
Fixing
Show All
Will not agitate
Fixed by
these parts
Fixing
Show All
Won’t Start
Fixed by
these parts
Fixing
Show All
Will not program
Fixed by
these parts
Fixing
Show All
Oven not heating evenly
Fixed by
these parts
Fixing
Show All
Keep searches simple. Use keywords, e.g. "leaking", "pump", "broken" or "fit".
the element did not turn compleatly off, the on light stayed on.
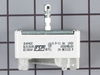
removed the screws holding the back metal panel, this exposed the wires to the switch. tested the wires to find that they were live when the switch was in the off position. ordered a new switch. UNPLUGED THE STOVE. removed the knob on the front of the stove. this exposed 2 screws, removed screws and the switch came away from the stove. removed each wire from the old switch and replaced them in the same position on the new switch. inserted new switch into the stove and attached the 2 screws. replaced back panel and pluged in stove. all tested well
Parts Used:
Surface Burner Element Switch, Large Burner
  • chaz from fairplay, CO
  • Difficulty Level:
    Easy
  • Total Repair Time:
    15 - 30 mins
  • Tools:
    Screw drivers
85 of 105 people found this instruction helpful.
Was this instruction helpful to you?
Thank you for voting!
Burner would go high without warning
We felt the only possible problem could be the switch assembly. I removed the switch panel, removed the wires from the old switch, one at a time, removed the old switch assembly and installed the new switch assembly. The extended stem did have to be snapped off (per your instructions) and that too was a very simple task.
Parts Used:
Surface Burner Element Switch, Large Burner
  • John from Clinton, CT
  • Difficulty Level:
    Easy
  • Total Repair Time:
    15 - 30 mins
  • Tools:
    Pliers, Screw drivers
60 of 63 people found this instruction helpful.
Was this instruction helpful to you?
Thank you for voting!
Left front burner would not adjust heat downward
Pull unit away from wall.
Unplug power
remove topmost four screws from rear metal cover
Pull knob off switch shaft.
Remove two screws holding switch to panel.
Break off shaft of new switch to correct length.
Remove each wire from old switch and attach to Corresponding lug on new switch.
Reattach the new switch to the panel and reverse the first four instructions.
Parts Used:
Surface Burner Element Switch, Large Burner
  • ALTON from ROUND ROCK, TX
  • Difficulty Level:
    Easy
  • Total Repair Time:
    15 - 30 mins
  • Tools:
    Screw drivers
35 of 40 people found this instruction helpful.
Was this instruction helpful to you?
Thank you for voting!