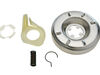
This direct drive motor coupling (Direct Drive Washer Motor Coupling, Motor Coupling, Washer Motor Coupling, Coupling Kit) provides a cushioned connection between the transmission and the motor shaft....
A worn clutch can cause a slower spin speed which will leave your clothes wet after a cycle. This clutch assembly comes with brake cam driver, blue spring for large capacity washers and black spring f...
This dryer drum roller kit is designed to restore smooth and quiet operation in a wide range of dryer models. It includes two drum rollers, four tri-rings, and one to two retaining washers, providing ...
This gas dryer ignition coil set comes with two ignition coils: one three-terminal boost/hold coil, and one two terminal secondary coil. Usually only one of them burns out but you should replace them ...
The valve body of this part could be blue or green in color. There are two ports for water to enter, and this valve is compatible with a half inch ID hose. It has two 3/4-11x1/2 NHT hose threads.
If you notice that your dryer is noisy or will not tumble, you may need to replace the tri ring. This part is triangular, and is less than an inch in size. Tri rings can be found both on the idler pul...
This 18 ml bottle of white appliance touch-up paint is used to cover scratches or marks on your appliance. The white touch-up paint can be used on refrigerators, microwaves, ranges, clothes dryers, an...
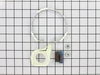
This dryer lint filter and screen assembly is a genuine replacement part designed to trap lint and fibers during the drying cycle, helping to maintain airflow and prevent blockages in the vent system....
This part senses if the igniter is hot enough to ignite the flame for heat, allowing the gas valve to open. The sensor is three inches long and is used for many gas clothes dryers. If your dryer is no...
This silicone carbide igniter with ceramic holder kit includes the 3" flat igniter, bracket, 4" wire leads, and the plug. It can replace both round and flat igniters. This kit is used for many gas clothes dryers.
This hose clamp extends from half an inch to an inch in diameter. It is made entirely of metal and is intended for use with Maytag brand washing machines.
The job looked intimidating but turned out to be very easy. First take off the water pump by removing the two clips that hold it in place. Place a shallow pan under the pump to catch the water that is in the pump and hoses. Open the hose clamps with a pair of pliers or channel locks (better) and slide the hoses off of the water pump. The motor comes off next. Unplug the electrical connector from the motor and two wires from the capacitor. Remove the two screws holding the clamps in place and then pop off the two clamps. You will need to hold up the motor with one hand while you remove the clamps or it will fall to the floor once the clamps are removed. One piece of the coupling assemble will be attached to the motor and the other will be attached to the gearcase drive shaft. If you want to clean up the mess created by the shredded rubber center piece of the coupling assembly you will have to take off the motor mounting plate. It is held on by two bolts and removing it makes installing the coupling easier but probably not necessary. Push the back half of the coupling on to the gearcase drive shaft until the shaft is flush with the face of the coupling. Install the new rubber center piece on to the coupling then re-install the motor mounting plate. Install the other half of the coupling on to the motor shaft and lift the motor up to the coupling. You have to rotate the motor shaft by spinning the fan blades until the coupling lines up so you can slide it into the other half of the coupling. Then just reattach the motor, connectors and water pump in the reverse order of disassembly.
researched potential causes, found cluch dust under the washer and determined that it wouldn't engage because clutch was too worn. ordered the assembly, removed agitator from inside the tub as it is connected to the gear shaft, turned washer on it's back for access to motor, unattached the direct drive water pump from the motor drive, unbolted the 3 gearcase mounting bolts and took the entire gearcase, shaft, motor, etc... together, out from under the washtub. the clutch slides off the gearshaft with a little fidgeting and the new assembly is easily installed where the previous was. put everything back together... then... spin spin! worked perfectly
PartSelect showed seven different possibilities why the dryer wouldn't heat. I removed the two screws to remove the bottom panel and turned the dryer on and noticed that the heating element that ignites the gas was working fine. This meant that it was not getting gas so it could be the gas valve or one of the two gas valve coils which are located on top of the gas valve. I borrowed my neighbor"s ohm meter and touched the two probes on the coils terminals to check for continuity and found that one of the coils read zero. I then took both of the coils out by removing two screws and tested each coil again. One coil read 500-850 and the other read zero. This meant that it was no good so I called for the part and received it in three days. I reassembled the parts and turned the dryer on and it fired up after a few seconds. It works as good as new. The part plus shipping was less than $30. My repairman would have charged me $150-$200. While the dryer was apart I gave it a good cleaning with a vacuum and a toothbrush in delicate areas. I also removed and cleaned the lint trap housing by removing two nuts. I didn't know much about gas dryers, but thanks to PartSelect I easily fixed it myself.


 Diagram and Parts List for Kenmore Washer Dryer Combo")