


106T14GL Kenmore Refrigerator - Overview
Models starting with 106T14GL
Click on the best match to narrow your results.
Keep searches simple, eg. "belt" or "pump".

Defrost Timer
PartSelect #: PS11723171
Manufacturer #: W10822278
This eight-hour defrost timer will replace most other defrost timers. This device acts like a clock. It continually advances and alternates between activating the cooling cycle and the defrost heater....
$45.48
In Stock
Order within the next 12 hrs and your part ships today!

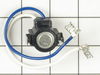
Refrigerator Condenser Fan Motor Kit
PartSelect #: PS395284
Manufacturer #: 833697
This condenser fan motor operates in a clockwise fashion and carries carries 2W and 115V. It comes with screws, a mounting nut for the blade and a cushion. This part provides forced-air cooling for the condenser coil.
$110.99
In Stock
Order within the next 12 hrs and your part ships today!

Air Conditioner Cover Screw
PartSelect #: PS11740701
Manufacturer #: WP308685
Sold individually.
$10.09
In Stock
Order within the next 12 hrs and your part ships today!

Dryer Screw
PartSelect #: PS11746840
Manufacturer #: WP90767
This screw is sold individually.
$10.09
In Stock
Order within the next 12 hrs and your part ships today!

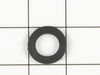
Refrigerator Door Hinge Nylon Washer
PartSelect #: PS11742705
Manufacturer #: WP487576
With our Whirlpool Door Hinge Nylon Washer, you can help extend the life of your refrigerator and improve its functionality. This small but mighty part is designed to keep your fridge door running smo...
$15.17
In Stock
Order within the next 12 hrs and your part ships today!

Screw
PartSelect #: PS11742721
Manufacturer #: WP488729
Metallic screw that is less than an inch long. Does not include the plastic washer.
$10.62
In Stock
Order within the next 12 hrs and your part ships today!

Refrigerator Defrost Thermostat
PartSelect #: PS11742795
Manufacturer #: WP52085-29
This refrigerator defrost thermostat will cut out at 40 degrees Fahrenheit and kick back when the temperature drops to 25 degrees Fahrenheit.
No Longer Available

Refrigerator Hinge Washer
PartSelect #: PS11742707
Manufacturer #: WP487802
$10.09
In Stock
Order within the next 12 hrs and your part ships today!

Refrigerator 40w Light Bulb
PartSelect #: PS11742839
Manufacturer #: WP548049
This light bulb is found behind the controls box in some refrigerators.
$66.52
Special Order

Washer Inlet Hose Washer
PartSelect #: PS11757437
Manufacturer #: WPY013783
This high pressure inlet hose washer is black. It is an inch in diameter, made of rubber, and used with many washing machines, refrigerators, and dishwashers.
$9.68
Special Order

Refrigerator Ice Cube Container
PartSelect #: PS11747544
Manufacturer #: WP982704
$32.93
In Stock
Order within the next 12 hrs and your part ships today!

Spray Paint - 12 oz. - White
PartSelect #: PS347819
Manufacturer #: 350930
$27.89
In Stock
Order within the next 12 hrs and your part ships today!
Common Symptoms of models starting with 106T14GL
[Viewing 14 of 14]Fridge too warm
Fixed by
these parts
these parts


Show All
Freezer section too warm
Fixed by
these parts
these parts
Show All
Freezer not defrosting
Fixed by
these parts
these parts
Show All
Noisy
Fixed by
these parts
these parts
Show All
Leaking
Fixed by
these parts
these parts
Show All
Will Not Start
Fixed by
these parts
these parts
Show All
Fridge and Freezer are too warm
Fixed by
these parts
these parts
Show All
Fridge runs too long
Fixed by
these parts
these parts
Show All
Door won’t open or close
Fixed by
these parts
these parts


Show All
Frost buildup
Fixed by
these parts
these parts
Show All
Too warm
Fixed by
these parts
these parts
Show All
Freezer too cold
Fixed by
these parts
these parts
Show All
Fridge too cold
Fixed by
these parts
these parts
Show All
Won’t start
Fixed by
these parts
these parts
Show All


Keep searches simple. Use keywords, e.g. "leaking", "pump", "broken" or "fit".
Sometimes the condenser fan would start causing the refrigerator to overheat.
Unplug the appliance.
Removed the screws holding the back panel.
Removed the fan blade.
removed 3 screws holding the condenser fan.
Remove the 3 metal brackets attached to the fan.
(First note which studs the brackets are attached to. Attach the 3 metal brackets to the new fan. (New screws were supplied)
Cut and strip the wire about two inches from the fan.
Cut and strip the new wire. I cut the new wire in half (about 6 inches.) Connect the two wires, twist and used 2 wire nuts. Tie wrap the wire to the wire harness. Mount the new fan (three screws)
Screw the back panel back on.
Mount the new
Parts Used:
-
Tom from Franklin, WI
-
Difficulty Level:A Bit Difficult
-
Total Repair Time:15 - 30 mins
-
Tools:Nutdriver, Pliers
183 of 219 people
found this instruction helpful.
Was this instruction helpful to you?
Thank you for voting!
Defrost timer was faulty. Required a mild tap to restart
Trouble shot the electrical circuit per the electrical schematic and zeroed in when I noted the Defrost Timer circuit was open. When I tapped on the bottom of the timer it began functioning normally (for a few days). Ordered a new Defrost Timer Kit and along with the installation instruction, I watched the on-line video. It was very helpful!!
After installation was complete, I plugged the Refrigerator into the electrical outlet and.......nothing happened! Hmmm!
Removed the Defrost Time Kit and inspected it for any damage and found none. Then I placed a flathead screwdriver to the manual advance knob and slightly rotate the gear mechanism. I heard a distance "click”. I believe the Timer was in the ‘defrost’ mode when received.
I reinstalled the timer, verified the wiring connections and this time plugged the Refrigerator into the electrical outlet and ….. it worked!!!
I unplugged the refrigerator, finished the installation per the instructions, plugged the unit in and monitored it for a few hours (just in case). That was a week ago and the Refrigerator is working like new.
The instructions were written in a manner which required re-reading a few times as they could be a bit vague. The video was what really helped and I appreciate PartSelect adding it to the instructions.
Parts Used:
-
LES from MADERA, CA
-
Difficulty Level:Really Easy
-
Total Repair Time:30 - 60 mins
-
Tools:Nutdriver, Screw drivers
69 of 76 people
found this instruction helpful.
Was this instruction helpful to you?
Thank you for voting!
Freezer Iced up, dripping water into refrigerator below
De-iced the refrigerator. Removed two screws from the thermostat panel on the upper refrigerator section. Tilted it down, removed two speed nuts holding the timer, unplugged the timer plug. Determined from the instruction sheet (easy to follow) what time delay function is used, based on wire colors, placed the jumper on the correct terminal on the new timer. Plugged it in, replaced the speed nuts and screws. The timer fit perfect, works just like it is supposed to, quick easy job.
Parts Used:
-
Robert from Bradenton, FL
-
Difficulty Level:Really Easy
-
Total Repair Time:Less than 15 mins
-
Tools:Pliers, Screw drivers
62 of 73 people
found this instruction helpful.
Was this instruction helpful to you?
Thank you for voting!