


10670934900 Kenmore Refrigerator - Overview
Sections of the 10670934900
[Viewing 7 of 7]
Manuals & Care Guides for 10670934900
Click to downloadKeep searches simple, eg. "belt" or "pump".

Touch-Up Paint - White
PartSelect #: PS385132
Manufacturer #: 72017
This 18 ml bottle of white appliance touch-up paint is used to cover scratches or marks on your appliance. The white touch-up paint can be used on refrigerators, microwaves, ranges, clothes dryers, an...
$15.95
In Stock
Order within the next 32 mins and your part ships today!

Refrigerator Bimetal Defrost Thermostat
PartSelect #: PS11750673
Manufacturer #: WPW10225581
If ice is building up in your freezer or if your freezer is getting too warm on the defrost cycle you may need to replace the bi-metal thermostat.
$43.07
In Stock
Order within the next 32 mins and your part ships today!

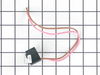
Refrigerator Door Switch
PartSelect #: PS12728638
Manufacturer #: W11384469
Door switch turns the light off when you close the door.
$48.68
In Stock
Order within the next 32 mins and your part ships today!

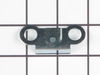
BRACKET-DOOR STOP,ZINC
PartSelect #: PS17917873
Manufacturer #: W11745278
This hinge bracket, also known as a door stop, is attached to the bottom of the door and is used to limit how far the door swings out to protect the refrigerator itself, and any surrounding cabinets f...
$16.43
In Stock
Order within the next 32 mins and your part ships today!

Crisper Pan
PartSelect #: PS11739936
Manufacturer #: WP2256704
This clear crisper pan helps keep produce fresh by maintaining the right humidity inside your refrigerator. It measures roughly 13 inches by 10 inches at the base and is made of sturdy plastic. Always...
$145.87
In Stock
Order within the next 32 mins and your part ships today!

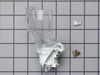
Replacement Ice Maker
PartSelect #: PS358591
Manufacturer #: 4317943
***NOTE: Ice maker does NOT come with the bail or shut off arm. You must order them separately if required. It does come complete with flat and round plug wiring harness, the mounting hardware, and th...
$176.56
In Stock
Order within the next 32 mins and your part ships today!

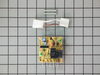
Freezer Evaporator Fan Motor
PartSelect #: PS11740359
Manufacturer #: WP2315539
This evaporator fan motor is located in the back of the freezer, and circulates air over the refrigerator coils. These coils will convert the heat into cool air, which is then circulated.
$84.25
In Stock
Order within the next 32 mins and your part ships today!

Screw
PartSelect #: PS11743743
Manufacturer #: WP681249
Sold individually.
$10.09
In Stock
Order within the next 32 mins and your part ships today!

Refrigerator Shelf Glass Insert
PartSelect #: PS11739987
Manufacturer #: WP2262441
Restore the functionality and appearance of your refrigerator with this replacement glass shelf. Made from durable tempered glass, it serves as both a storage surface and a crisper cover, helping to k...
$188.49
In Stock
Order within the next 32 mins and your part ships today!

Ice Maker Water Fill Tube Kit
PartSelect #: PS11739222
Manufacturer #: WP2196157
This kit comes with a fill tube and a compression nut.
$15.93
In Stock
Order within the next 32 mins and your part ships today!

Refrigerator Door Shelf Retainer Bar End Cap
PartSelect #: PS11738927
Manufacturer #: WP2156003
The door shelf retainer bar end cap connects to the retainer bar on your refrigerator’s door shelf, and attaches it to the refrigerator door. If your shelf retainer bar has become disconnected, a dama...
$16.69
In Stock
Order within the next 32 mins and your part ships today!

Refrigerator Single Water Inlet Valve
PartSelect #: PS11740365
Manufacturer #: WP2315576
Also known as a Water Solenoid Valve. The water inlet valve is a solenoid-operated switch that, when activated, releases water from the supply line to the water valve and into the compact icemaker mold.
$90.60
In Stock
Order within the next 32 mins and your part ships today!
Questions And Answers for 10670934900
We're sorry, but our Q&A experts are temporarily unavailable.
Please check back later if you still haven't found the answer you need.
Common Symptoms of the 10670934900
[Viewing 21 of 21]Ice maker not making ice
Fixed by
these parts
these parts


Show All
Light not working
Fixed by
these parts
these parts

Show All
Leaking
Fixed by
these parts
these parts

Show All
Fridge too warm
Fixed by
these parts
these parts


Show All
Freezer not defrosting
Fixed by
these parts
these parts
Show All
Door won’t open or close
Fixed by
these parts
these parts


Show All
Ice maker won’t dispense ice
Fixed by
these parts
these parts

Show All
Freezer section too warm
Fixed by
these parts
these parts
Show All
Fridge and Freezer are too warm
Fixed by
these parts
these parts

Show All
Fridge too cold
Fixed by
these parts
these parts
Show All
Frost buildup
Fixed by
these parts
these parts

Show All
Noisy
Fixed by
these parts
these parts

Show All
Freezer too cold
Fixed by
these parts
these parts
Show All
Too warm
Fixed by
these parts
these parts
Show All
Not dispensing water
Fixed by
these parts
these parts
Show All
Ice maker dispenses too little ice
Fixed by
these parts
these parts
Show All
Will Not Start
Fixed by
these parts
these parts
Show All
Fridge runs too long
Fixed by
these parts
these parts
Show All
Ice maker dispenses too much ice
Fixed by
these parts
these parts
Show All
Won’t start
Fixed by
these parts
these parts
Show All
Clicking sound
Fixed by
these parts
these parts
Show All


Keep searches simple. Use keywords, e.g. "leaking", "pump", "broken" or "fit".
Ice Maker quit working, I could manually cycle unit but then the water would overflow when unit was re-filling.
I backed out the 2 top screws about a quarter inch and then removed bottem screw with a quater inch nut driver. I then lifted Ice Maker clear of the two top screws and lowered it enough to unclip the power connection with a small screwdriver. The new Ice Maker was wired correctley for my refrigeator so all I had to do wea reconnect the power connection and mount new Ice Maker on the two top screws and install the bottem screw. It took e while for the new Ice Maker to start it's cycle but after it did, it worked GREAT. Part Select service was OUTSTANDING, ordered part one day and received the next. THANKS!!!!
Parts Used:
-
Max from Green Castle, IN
-
Difficulty Level:Really Easy
-
Total Repair Time:15 - 30 mins
-
Tools:Nutdriver, Screw drivers
595 of 638 people
found this instruction helpful.
Was this instruction helpful to you?
Thank you for voting!
No Ice in the Ice Maker
I am NOT a handyman, and my family laughed at me when I said I was going to fix the ice maker all by myself. I ordered a replacement ice maker. When it arrived, I opened the box and read the instructions. It seemed easy. I removed the old ice maker, with a socket set. I then took off the shut off lever from the old one and placed it on the new one, since the new one didn't come with it. I then put the new one in place. All the parts fit perfectly. The ice machine was making ice within an hour. My family was amazed... and I got the last laugh!
Parts Used:
-
Chris from Duluth, GA
-
Difficulty Level:Really Easy
-
Total Repair Time:Less than 15 mins
-
Tools:Socket set
201 of 237 people
found this instruction helpful.
Was this instruction helpful to you?
Thank you for voting!
Evaporator Fan failure
The reason I repaired it myself was because the repairman that diagnosed the problem.didn't come back in two weeks. The evaporator fan sits behind a vented wall in the freezer and directs cold air into freezer and refrigerator.I removed the ice make assembly first and then the freezer wall held in place by two sheet metal nuts. Then removed wires from fan motor. Removed the fan blade from fan motor,which was press fitted on,then removed fan motor from bracket assembly(make sure and retain the two vibration rubber washers on back and front of motor. Reinstall new motor with vibration washers and press fan blade on new motor. Install in bracket assemble and reassemnble.
Parts Used:
-
William from Middletown, NY
-
Difficulty Level:Easy
-
Total Repair Time:15 - 30 mins
-
Tools:Nutdriver
164 of 190 people
found this instruction helpful.
Was this instruction helpful to you?
Thank you for voting!