This 18 ml bottle of white appliance touch-up paint is used to cover scratches or marks on your appliance. The white touch-up paint can be used on refrigerators, microwaves, ranges, clothes dryers, an...
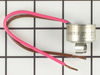
This clip-on thermostat will sense the temperature increase in the evaporator during the defrost cycle and will cycle the defrost heater off after the ice or frost is melted.
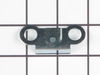
This hinge bracket, also known as a door stop, is attached to the bottom of the door and is used to limit how far the door swings out to protect the refrigerator itself, and any surrounding cabinets f...
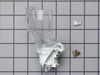
This evaporator fan motor is located in the back of the freezer, and circulates air over the refrigerator coils. These coils will convert the heat into cool air, which is then circulated.
NOTE: ...
This genuine OEM ice maker kit is designed to fit refrigerators that did not originally come with an ice maker. This kit contains everything needed to install the new ice maker on your refrigerator in...
This is a replacement crisper drawer for your refrigerator. The drawer is approximately 24 inches long, 11 inches wide, and 12 inches tall. It is made of clear plastic and is sold individually. The cr...
This kit includes the motor, fan blade, wire harness and screws.
NOTE: The manufacturer has changed the product to appear different than the original, but will still function the same as the origina...
$161.66
In Stock
Questions And Answers for 10663832302
Be the first to ask our experts a question about this model!
✖
Ask a Question
Ask our experts a question on this model and we'll respond as soon as we can.
removed flap door in front of icemaker...removed 3 screws with bolt heads...removed one additional screw with bolt head and ice unit slid out. I removed motor unit (pops out no screws). Replaced and had ice within 3 hours.
The process to repair was very simple, I removed the back of the refrigerator to expose the motor area. I then removed three screws that held the condenser motor in place. once it was loose I detactched the electrical harness and removed the old motor. I then placed the new motor in place and secured it with the screws and reattached the new electrical harness that came with the new part. Once completed I reviewed it to make sure I didn't miss anything. I then replaced the cover over the motor area and enjoyed my success in repairing my own appliance with no added cost for labor, which would have been expensive I'm sure. The part purchased came with clear and consice instructions very easy to follow.