This 18 ml bottle of white appliance touch-up paint is used to cover scratches or marks on your appliance. The white touch-up paint can be used on refrigerators, microwaves, ranges, clothes dryers, an...
This water inlet valve supplies water to your refrigerator’s ice maker and dispenser. It includes a valve, tubing, and a coupling. The pre-filter bracket connector must be purchased separately if requ...
***NOTE: Ice maker does NOT come with the bail or shut off arm. You must order them separately if required. It does come complete with flat and round plug wiring harness, the mounting hardware, and th...
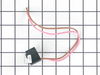
This is a push-on start relay for your refrigerator. It attaches to the compressor and starts it by briefly boosting it. It will then shut off as soon as the motor is up to the required speed. You may...
take out ice bucket, just loosen the top 2 screws, remove the bottom screw, slide ice maker up & out, srewdriver to release wiring harness clip, reverse to put back in. was very simple. did not install water inlet kit yet. water under fridge stopped after i changed the ice maker.
I backed out the 2 top screws about a quarter inch and then removed bottem screw with a quater inch nut driver. I then lifted Ice Maker clear of the two top screws and lowered it enough to unclip the power connection with a small screwdriver. The new Ice Maker was wired correctley for my refrigeator so all I had to do wea reconnect the power connection and mount new Ice Maker on the two top screws and install the bottem screw. It took e while for the new Ice Maker to start it's cycle but after it did, it worked GREAT. Part Select service was OUTSTANDING, ordered part one day and received the next. THANKS!!!!
First I unplugged the fridge, then using the socket set I removed the cardboard shield from the lower rear of the refrigerator. I located the leaking water from a cracked solenoid water valve just inside the lower cavity directly behind the water intake line. Removing the valve was a snap - most of the valve plastic compression couplings unscrewed and came off. The metal compression fittings required an adjustable wrench and a pair of pliers to hold the solenoid unit steady. A couple of hex nuts kept the solenoid bolted to the refrigerator frame and came off easily with the socket. Two simple push-on electrical plugs came right off just by pulling on them. The new valve unit wasn't exactly like the original one. It had push-on instead of compression water fittings and the plugs were oriented differently. I recommend studying which water lines entered which port on the valve because I was a little unsure after I took the old one apart (whoops). After figuring out how to put it pack together, the push-on water fittings were even easier, and the unit was scewed back into place on the fridge frame. The electric plugs have different sized contacts so you can't mix them up. I put the cardboard shield back on. Viola!