This advanced refrigerator water filter utilizes Triple Filtration Technology to reduce a wide range of contaminants, including mercury, lead, and trace pharmaceuticals, ensuring cleaner and safer wat...
This 18 ml bottle of white appliance touch-up paint is used to cover scratches or marks on your appliance. The white touch-up paint can be used on refrigerators, microwaves, ranges, clothes dryers, an...
This icemaker can be used with 25-27 cubic feet refrigerators that have a vertical auger dispenser located on the freezer door. Reuse bottom bracket from the original icemaker and attach to the new.
This twenty-five watt microwave light bulb is two and a half inches long. It has a small, screw-in base and it carries 120V. This item sells in a quantity of one, though many microwaves require two.
This set of two control boards helps your fridge know when to make ice and when to stop. One board sends a signal, and the other receives it—together, they tell the icemaker when to dump ice and when ...
This kit includes the motor, fan blade, wire harness and screws.
NOTE: The manufacturer has changed the product to appear different than the original, but will still function the same as the origina...
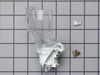
This icemaker water inlet cup is three inches long. It is all white in color and is made of plastic.
$49.45
Special Order
Questions And Answers for 10644423603
Ask our experts a question about this model and we'll get back to you as soon as possible!
1 question answered by our experts.
< Prev
1
Next >
Sort by:
Search filter:
Clear Filter
Your search term must have 3 or more characters.
Keep searches simple. Use keywords, e.g. "leaking", "pump", "broken" or "fit".
Sorry, we couldn't find any existing answers that matched.Try using some different or simpler keywords, or submit your new question by using the "Ask a Question" button above!
Jeff
December 9, 2022
I replaced the defrost sensor but didn't help. thinking thermister now because temp readout is at 48 and freezer is -16. where is it located?
For model number 10644423603
Hello Jeff, thank you for contacting us. A faulty thermistor, part number PS11739132, is a probable cause of the issue. It is located in the rear wall behind a small refrigerator cover. Customer service is available 7 days a week if you require assistance placing an order. Thanks again for reaching out!
Remove the icemaker service door... gently pry the door pins from the hinge sockets. Remove the 3 screws from the under side of the icemaker with a nut driver (1/4"). Gently remove the icemaker . It's a tight fit between the top of the compartment and the icemaker lower support tray. Next, disconnect the electrical connector at the right side. You're done! Reverse procedure for installing. Good luck. Remember, your working with cold plastic...take your time and don't force too much.
First I shut the water off to the refrigerator.then i pushed the big button in the middle of the grille below the refrigerator door. pulled out the old filter, took the front cap off the old filter put it on the new filter. took the two red caps off the new filter. pushed the filter in till it locked in place. all done! Turned the back on.