


Product Description
Thermal Limiter - Limit 220 Specifications
This thermal fuse limiter, with a limit of 220 degrees Fahrenheit, is manufactured for both gas and electric clothes dryers. Once the internal temperature of the dryer reaches 220 degrees, the heating element cuts out.

How Buying OEM Parts Can Save You Time and Money
Part Videos
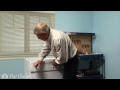
Replacing your Frigidaire Dryer Thermal Limiter - Limit 220

Troubleshooting
This part fixes the following symptoms:
Too hot
This part works with the following products:
Dryer, Washer Dryer Combo.
This part works with the following products:
Frigidaire, Kenmore, Gibson, Kelvinator.
Part# 134120900 replaces these:
AP2108182, 1489053, 146062-000, 3205659, 5303209192
Customer Repair Stories
Average Repair Rating: 3.1 / 5.0, 20 reviews.
What's this?
- < Prev
- 1
- 2
- Next >
Sort by:
Search filter:
Clear Filter
Your search term must have 3 or more characters.
Keep searches simple. Use keywords, e.g. "leaking", "pump", "broken" or "fit".
Sorry, we couldn't find any existing installation instruction that matched.
Thermal Limiter opened
Unplugged Dryer.
Opened top of Dryer, over the drum.
Removed Thermal Limiter.
Tested the Thermal Limiter - found it was open.
Checked all vents and exhaust tube for lint build-up.
Replaced Thermal Limiter.
Closed top of dryer.
Plugged Dryer back.
Tested Dryer - it works.
Opened top of Dryer, over the drum.
Removed Thermal Limiter.
Tested the Thermal Limiter - found it was open.
Checked all vents and exhaust tube for lint build-up.
Replaced Thermal Limiter.
Closed top of dryer.
Plugged Dryer back.
Tested Dryer - it works.
Other Parts Used:
-
Stephen from Newnan, GA
-
Difficulty Level:A Bit Difficult
-
Total Repair Time:15 - 30 mins
-
Tools:Pliers, Screw drivers
243 of 319 people
found this instruction helpful.
Was this instruction helpful to you?
Thank you for voting!
Dryer would not start
I found a electrical diagram and some common problems on some websites which led me to check the thermal limiters. There are two right up top near the back of the dryer - one mounted closer to the heating coils and one mounted directly to the sheet metal on the inside back of the dryer. Using an DMM on the "Ohms" setting, I checked each sensor to make sure that they were "closed" (near zero ohms). Sure enough, the sensor mounted on the back of the enclosure was open (high resistance) which prevented the dryer from starting. To confirm, I shorted the two leads going to the sensor together temporarily and wrapped them with electrical tape and then tested the dryer - it worked perfectly. The part from Part Select was ordered and shipped very quickly. Since the sheet metal screws holding the sensor on were difficult to access with the drum in place, I used small machine screws/nuts to fasten the sensor - this allowed me to tighten the nuts from the outside of the dryer, making it very easy to attach.
Other Parts Used:
-
Stephen from Austin, TX
-
Difficulty Level:Easy
-
Total Repair Time:15 - 30 mins
-
Tools:Nutdriver, Pliers, Screw drivers
100 of 107 people
found this instruction helpful.
Was this instruction helpful to you?
Thank you for voting!
dryer does not get very hot, takes two cycle's to dry
removed the screws, disconnected the wires. installed the new elements replaced the wires.
Other Parts Used:

-
MELISSA from OKEECHOBEE, FL
-
Difficulty Level:Easy
-
Total Repair Time:15 - 30 mins
-
Tools:Pliers, Screw drivers
87 of 152 people
found this instruction helpful.
Was this instruction helpful to you?
Thank you for voting!
Had a professional do the install. He had difficulty aligning the cabinet so that it did not rub against the dryer drum. The parts you mailed me worked fine and resolved the problem. Thanks. Even having to pay the installer saved me 50% on the total job.
Installer unscrewed the screws on the upper panel, loosened the pulley holding the rubber drum cable, and pulled the drum up and out of the unit. With the rear heating element exposed, he unplugged the wire connections to the heating element, unscrewed the four screws holding the element to the rear panel and took the element out. Then he installed the new heating element by re-applying the four screws into the rear panel. He then replaced the thermal limiter which was directly at the right of the heating element by unplugging the wire connections to the thermal limiter and then unscrewing the thermal limiter from the rear panel. The process to install the new thermal limiter was the reverse process. He didn't install a new High Limit Thermostat because there was one attached to the new Heater. When all the new parts were installed, he reinstalled the drum by pushing the rear nub of the drum into the whole at the center of the heating plate. He then placed the rubber drum cable around the drum with the rough service facing the drum, placed the cable on the pulley and adjusted the tension of the cable with a screw driver. He then reinstalled the front panel by aligned the screw holes and reinserting and tightening the screws.
Other Parts Used:

-
michael from jupiter, FL
-
Difficulty Level:A Bit Difficult
-
Total Repair Time:1- 2 hours
-
Tools:Screw drivers
45 of 59 people
found this instruction helpful.
Was this instruction helpful to you?
Thank you for voting!
Dryer overheated and stopped working
The first thing I did was cheked the electrical panel and breaker, then I checked the electrical cord, then I did check the motor on the bottom of the machine (that may be is the blower motor) looking for any indication of burned parts or broken, then I checked the on-off switch with a voltmeter looking for continuity and it was fine. Then I checked the timer switch and it was fine as well. Finally, I took the lid off the top of the dryer machine to check the thermostat and themal limiter fuse. The thermostat was fine but the thermal fuse was open. So after doing some research to understand how the fuse work I decided to place an order to get a new fuse. I installed it and the dryer started working again. After replacing the fuse I monitored the dryer machine while operating it and worked fine. Why the fuse was open or was damaged? It is the first time I have problems w/ the dryer. I checked the end of the conduct line that guide the air out and I noticed and have to clean the end of it because it was dirt. Because it was not completly clean, the dryer got overheated. It took me sometime to figure out the problem but I learned, save me money and the best part was that I do it myself : )
Other Parts Used:
-
Paul from Holiday, FL
-
Difficulty Level:A Bit Difficult
-
Total Repair Time:30 - 60 mins
-
Tools:Nutdriver, Screw drivers
34 of 36 people
found this instruction helpful.
Was this instruction helpful to you?
Thank you for voting!
overheating, squeeking
Unplung it, pop up the top and take it off, unplug the 2 plugs, take 2 screws out that hold the front door, take out the door. Get the belt loose from the back roller, pull out the entire drum. I changed all 3 thermostat, 2 in the back and 1 in the front, also change the rear bearing. Dryer works great now, no more squeeking and no more overheating it's like having a new dryer. I'm a woman and did it all by myself, save me a bunch of bucks!!!
Other Parts Used:

-
Christine from Wheelersburg, OH
-
Difficulty Level:Easy
-
Total Repair Time:30 - 60 mins
-
Tools:Screw drivers
18 of 20 people
found this instruction helpful.
Was this instruction helpful to you?
Thank you for voting!
Dryer would not start. When turning on, I could hear faint humming, but the motor would not start.
1) Unplug the unit.
2) Remove all screws from top of the unit except for the one in the center front that does not go through the outer casing.
3) Find the Thermal Limiter which is on the back wall near the top on the left side when looking from the front.
4) Disconnect the two wires
5) Remove the two screws that mount the limiter to the back wall.
6) Use an ohmeter to test if a current flows through the unit. If no current flows through (an open switch), then the unit will need to be replaced.
7) Clean any lint that you can at this point.
8) Use two screws to mount new Thermal Limiter
9) Reconnect the two wires to the Limiter.
10) Attach the top of the dryer case.
Other Parts Used:
-
Mark from Normalville, PA
-
Difficulty Level:Easy
-
Total Repair Time:15 - 30 mins
-
Tools:Screw drivers
15 of 18 people
found this instruction helpful.
Was this instruction helpful to you?
Thank you for voting!
Dryer would not start.
Unplugged the dryer from electrical socket. Vacuumed lint from dryer and exit hose. Removed top from dryer. Used pliers to remove the 2 wires from the thermal limiter. Used screwdriver to remove 2 screws that held the limiter in place.
Installed the new limiter, connected the 2 wires, plugged in the dryer's electrical connection, turned on dryer, and resumed my "washday chores".
Installed the new limiter, connected the 2 wires, plugged in the dryer's electrical connection, turned on dryer, and resumed my "washday chores".
Other Parts Used:
-
Onmi from Douglas, GA
-
Difficulty Level:Easy
-
Total Repair Time:15 - 30 mins
-
Tools:Pliers, Screw drivers
15 of 18 people
found this instruction helpful.
Was this instruction helpful to you?
Thank you for voting!
Dryer not working
After reading about similar problems people have had with this make of dryer, I focused attention on the thermal limiter. I determined that it was the culprit by "jumping" it with a 6" piece of wire. Then I simply went on the site, ordered the part. It arrived a few days later and I pulled out the old one, screwed in the new one, and the dryer is good as new.
Other Parts Used:
-
Susan from Point Pleasent Beach, NJ
-
Difficulty Level:A Bit Difficult
-
Total Repair Time:15 - 30 mins
-
Tools:Screw drivers
14 of 18 people
found this instruction helpful.
Was this instruction helpful to you?
Thank you for voting!
Dryer would not turn on
I contacted a company to come out and diagnose the problem. They informed me that the thermal limiter is bad and needed to be replaced for $15 for the part and $85 labor. I found the part on this site for about $10, and did the repair myself. The dryer was mostly dismantled so I pulled the drum back, and replaced the part. The tricky part was the pulley system was, so make sure you see it before hand or find a diagram online. Once that was figured out, I set the drum back up, greased and tightened the pulley, reattached the front of the washer with connections, and closed the lid.
Other Parts Used:
-
Michael from Erlanger, KY
-
Difficulty Level:A Bit Difficult
-
Total Repair Time:1- 2 hours
-
Tools:Screw drivers
9 of 10 people
found this instruction helpful.
Was this instruction helpful to you?
Thank you for voting!
- < Prev
- 1
- 2
- Next >
Questions and Answers
We're sorry, but our Q&A experts are temporarily unavailable.
Please check back later if you still haven't found the answer you need.
Related Parts

$119.16
In Stock
High Limit Thermostat
$119.16
PartSelect Number: PS446428
This high limit thermostat has a limit of 260 degrees Fahrenheit. Meaning that it will cut out when the internal dryer temperature reaches 260. This thermostat cuts back in when the temperature drops by 70 degrees Fahren... 
$27.45
In Stock
Produce Preserver Filter
$27.45
PartSelect Number: PS3503014
Fresh Flow Produce Preserver is made for your refrigerator to help keep produce fresh for longer by absorbing the chemical, ethylene, that causes your fruits and vegetables to ripen quicker. Your produce could be fresh f... 
$42.42
In Stock
Solid Element Cleaner
$42.42
PartSelect Number: PS474316
This solid element restorer is for ranges and cooktops. Solid element restorer restores and protects solid elements from rusting and spotting. Follow the instructions on the label when using this product. 
$16.07
In Stock
Affresh Washing Machine Cleaner - 3 pack
$16.07
PartSelect Number: PS1960673
This front load washer cleaner removes odor-causing residue. Use it once a month and it will keep your machine fresh and clean. Package comes with 3 tablets. 
$14.32
In Stock

$38.09
In Stock
Oven Cleaning Gel
$38.09
PartSelect Number: PS12366520
This low-odor gel, easily cleans away tough burnt-on deposits at room temperature. Apply the gel evenly on the cooled oven surface. Leave the gel to set overnight then wipe away with a clean cloth. 
$22.95
In Stock
Cooktop Cleaning Cream
$22.95
PartSelect Number: PS12717774
Make your cooktop shine with Frigidaire ReadyClean Glass and Ceramic Cleaner. Our scratch-free, streak-free formula removes smudges, grease, burnt-on food, dirt and oil, while protecting and polishing to repel dust and d...
Model Cross Reference
This part works with the following models:
PartSelect Number: PS419402
Manufacturer Part Number: 134120900
Manufacturer Part Number: 134120900
Brand
Model Number
Description