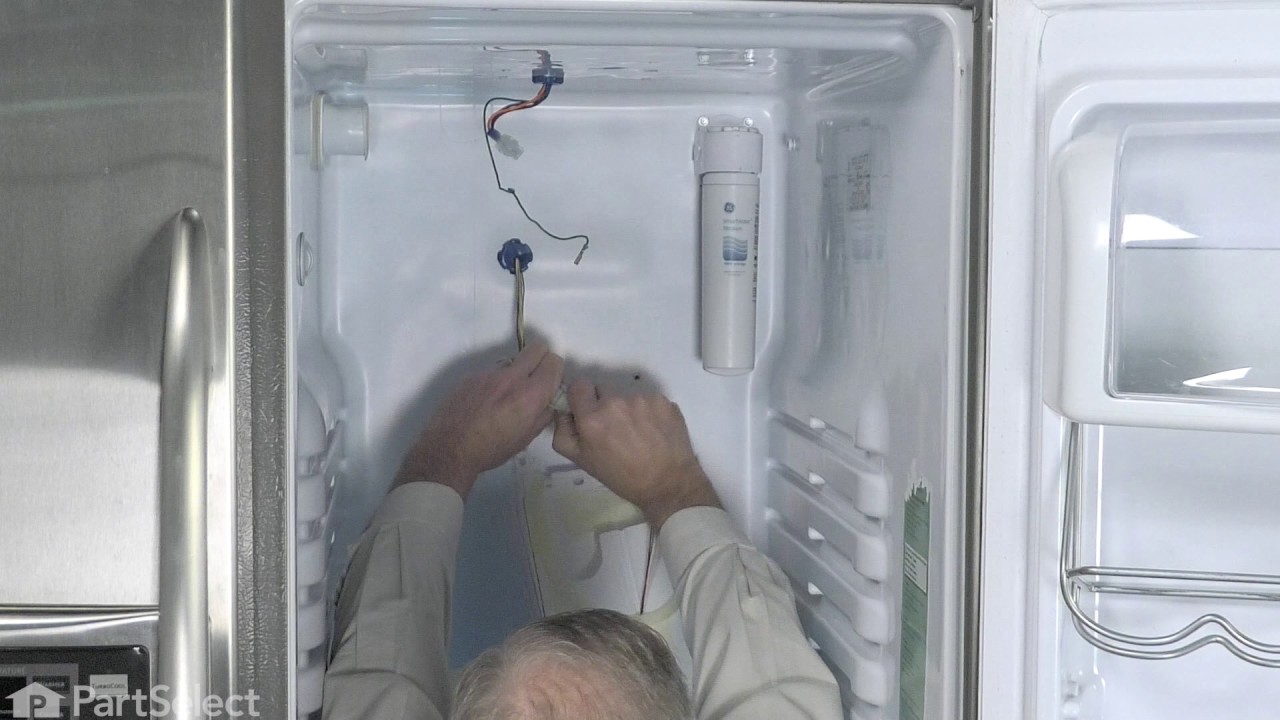
What it does. Why it matters. Everything you need to know for an easy fix.
Air Inlet Cover Kit Specifications
This kit includes damper, fan assembly, nozzle and gasket for nozzle. The damper and fan has been updated by the manufacturer to avoid freezing in the refrigerator. Also known as a damper assembly.
Part #WR49X10091
Manufactured by
GE
for General Electric, Hotpoint, Kenmore
OEM stands for Original Equipment Manufacturer. This means that the company who made your appliance is also supplying the replacement part.
Features
OEM
Generic
Genuine brand name
Guaranteed to fit
Superior Quality
Long term value
Part Videos
Watch our pros, then fix it yourself.
Replacing your General Electric Refrigerator Air Inlet Cover Kit
About this fix
Common problems and models this part fixes.
Easy
30 - 60 mins
Rated by verified customers
What this part fixes:
Fridge too cold
Fridge too warm
Works with the following products:
Refrigerator
Part# WR49X10091 replaces these:
AP3775595, 1055112, WR49X10091, WR02X11254, WR02X11255, WR14X10070, WR14X10071, WR14X10166, WR17X10869, WR17X10870, WR17X10871, WR17X10896, WR17X11508, WR2X11254, WR49X10101, WR49X10149, WR49X10150, WR49X10155, WR60X10051, WR60X10052
...
Show more, WR60X10070, WR60X10132, WR60X10174, WR60X10226 Show less
Customer Reviews
Real ratings from other people who bought this part.
Average Rating:
★★★★★
★★★★★
2 Reviews
5.0
Out of 5
5 Stars
2
4 Stars
0
3 Stars
0
2 Stars
0
1 Star
0
Search reviews left by others. DIY doesn't mean you have to do it alone. Use simple keywords like "fit", "broken", "easy", or "quality" to find reviews that match!
Search filter:
Clear Filter
Your search term must have 3 or more characters.
Sort by:
Prev
1
Next
Sorry, we couldn't find any existing reviews that matched. Try using some different or simpler keywords.
★★★★★
★★★★★
Robert C - February 3, 2021
Verified Purchase
Easy repair.
Air Inlet Cover Kit includes Door Assembly and Fan. Basically a Plug and Operate Assembly. All the Parts required to repair my Refrigerator were included. Fastest Shipping I've ever seen.
★★★★★
★★★★★
Kevin B - May 26, 2020
Verified Purchase
Easy switch out with my General Electric Arctica - Model # PSC23MGMB BB
The right side of my fridge is back to the proper non-freezing temperature. My original part had a path for the air to flow on both the right and left side at the top of the cover, which then fed into to two trim pieces on my fridge that directed the cold air to the front top left and right of the fridge. The new kit part was closed on its top right side. You could punch it out if you wanted to I assume; I left it in, I could punch it out later if I needed to. Those air direction trim pieces specific to my model of fridge had two small tabs that didn't have corresponding slots in the new kit part; I trimmed them off so the kit part would fit. I forgot to confirm the proper fan orientation before I put it in, but since I am having no problems they seem to have assembled my fan correctly.
Prev
1
Next
Repair Tips
See how others fixed this model. Time, tools, difficulty, and steps that lead to victory!
Easy
30 - 60 mins
Average repair rating from 15 real customers like you
Sort by:
Prev
1
2
Next
Search repair tips from other customers using simple keywords like "replace", "fit", "remove", "inspect". DIY doesn't mean you have to do it alone!
Search filter:
Clear Filter
Your search term must have 3 or more characters.
Sorry, we couldn't find any existing installation instruction that matched.
Refrigerator too cold
156 of 163 peoplefound this instruction helpful.
Marc from Orlando, FL
A Bit Difficult
1- 2 hours
Screw drivers
My repair experience was a little more complicated than previous posts, but nothing major. And most importantly replacing the Fresh Food Air Inlet Cover did fix my problem. Here are the steps I followed: 1. You will need to remove a minimum of the top two shelves to get access to the Air Inlet Cover. It runs along the back of the
... Read more fridge and connects to a hole to the freezer side. It has a little fan inside that sucks the cold air from the freezer and diverts to the top and bottom of the fridge. 2. As mentioned in other posts, there are four screws holding the Inlet Cover in place, 2 lower and 2 upper. To get access to the lower two screws,you simply pop off the lower duct assembly (squeeze the sides). Be careful when removing and installing these screws. If you drop one into the lower duct, you will add a few more steps to the installation to remove more shelves and take out the lower duct to get to where the screw fell. Obviously this happened to me. Not difficult to do, just adds more time. 3. To access the upper two screws I had to remove the top light cover (one screw) and then slide out the top duct/diffuser assy (my name, not GE's). 4. Finally to get clearance to pull out the Inlet Cover, I had to remove the water filter and cover. When you pull away the Inlet Cover, you will see the electrical connection that is simple to disconnect. 5. After I removed my Inlet Cover, it was obvious that it was broken because it rattled and I could peek inside to see that the plastic air diverter/flapper thingy was broken. 6. One final surprise was that the replacement Air Inlet Cover did not exactly match the one I removed. The replacement only had one upper air outlet, while my old one had three upper outlets, left, right and center. I noticed there was a plastic cover over one of the side outlets on the replacement, so I just popped that off and hoped for the best. 7. The replacement Air Inlet Cover Kit came with sticky back insulation that you attach to where the Inlet Cover meet the freezer access hole to make sure snug fit to limit extra cold air leaking into the fridge side. 8. Installation of the replacement Air Inlet Cover was fairly easy, just follow the above steps in reverse and make sure you don't drop any screws. It's been a couple of weeks since I performed this installation and my fridge has been maintaining temperature perfectly. No more frozen milk or lettuce. The wife is very happy.
Read less
Was this helpful?
Thank you for voting!
Water line froze, food in fridge started freezing
33 of 37 peoplefound this instruction helpful.
Bradley from Spokane, WA
Easy
30 - 60 mins
Screw drivers
I knew almost as soon as I found the frozen milk that the air-flow diverter, whatever it's called, had broken. It's a plastic part that opens and closes to allow cold air from the freezer into the fridge side.
Step one: clear off the top two shelves and take them out.
Step two: remove the lower piece of the assembl
... Read morey. It pops straight out at the top and drops down after that. If you pull the bottom straight out, you may break the bits that holds it to the fridge wall.
Step three: remove screws holding in light, and then the screws holding in the AASM COVER FF INLET K (wish I had a better name for it).
Step Four: Unplug the unit from the fridge wall.
Installation, reverse, except maybe unplug the unit earlier.
Read less
Was this helpful?
Thank you for voting!
evertthing in frige was freezing
19 of 24 peoplefound this instruction helpful.
justin from brownsville, OH
Easy
15 - 30 mins
Screw drivers
went online to an appliance repair site and found out that this model has problems with the damper malfunctioning. went to partselect and ordered what I needed and it arrived in two days. to replace the damper you just remove the light at the top of the frige and the cover around it . the damper assembly only has 2 screws and is easy to r
... Read moreemove.
Read less
Was this helpful?
Thank you for voting!
Frozen water filter and food in fresh food side
16 of 18 peoplefound this instruction helpful.
Herbert from Sunriver, OR
Easy
30 - 60 mins
Pliers, Screw drivers
Initial diagnosis indicated faulty cold air damper, so first action was to remove the light assembly and then the plastic housing that contains the FF fan and damper. The two hidden screws at base of housing required removal of lower decorative plastic duct that turned to be held by snap in-tabs at top and slide away fastener at bottom.
... Read more The damper housing is held to the roof of the FF chamber by two screws that were taken out to remove the light assembly.
When the plastic housing is pulled towards the front of the refrigerator, the multi-pin wire connector can be disconnected and the damper assembly easily removed.
Installation required need of a thin plate to seat a sponge rubber seal without damage, so I used a thin metal kitchen spatula. Nothing unexpected was encountered in reversing the disassembly process.
Although the new damper corrected the excessive cold situation, the temperature max-min span remained in excess of 15 degrees F, so the control panel was swapped in the small covered cavity located in the outside back of the refrigerator. A 1/4" nut driver and needle nose pliers were all the tools necessary for this operation.
Together the two replacement components have solved the frozen food problem and the over night max-min FF span is now 5 degrees or less.
Refrigerator side gets colder than set temperature. Plastic damper door broken in Fresh Food Air Inlet.
12 of 13 peoplefound this instruction helpful.
Robert from Hurst, TX
Easy
30 - 60 mins
Screw drivers
There were not detailed instructions provided with the parts, however, it was fairly simple to determine how to remove the old part. First, I removed all the shelves. Then I took out four screws holding the top light cover. The plasic around the back center column was removed with a pannel tool. The plastic around the water filter w
... Read moreas also removed. The old Fresh Food Air Inlet was then able to come out. Remove the connector. Reinstall per instructions provided. Install the other parts in order they were removed.
Read less
Was this helpful?
Thank you for voting!
GE Profile Arctica food locker was below freezing
7 of 9 peoplefound this instruction helpful.
Frederick K from Kingston, TN
Easy
30 - 60 mins
Screw drivers
The trouble shooting information on the web site indicated that the damper door within the climate control unit may be broken. This was easily confirmed and the replacement of the climate control unit immediately returned the food locker temperatures to the digital electronic thermostat settings. The part has an improved ventilation gaske
... Read moret interface between the food locker and freezer. The unit works perfectly again, and the food locker temperature is exactly what the thermostat setting is.
Read less
Was this helpful?
Thank you for voting!
Water will not dispense and the refrigerator drawers were freezing our foods and vegetables.
5 of 5 peoplefound this instruction helpful.
Jeff from Manteca, CA
Easy
30 - 60 mins
Screw drivers
It was a simple remove and replace. The new part fits directly in place of the old part. Its a pain to remove the light but once you get the light out the job is simple. The light must be pried out gently. It is snapped in place toward the air inlet cover and needs to be pried loose. Once the light is out there are 4 screws holding
... Read morethe air inlet cover in place. Remove the 4 screws and unfasten the wiring harness. Once the screws and wiring harness are disconnected remove the old part. Reinstall the new part in reverse order.
Read less
Was this helpful?
Thank you for voting!
Refrigerator was getting to cold
4 of 7 peoplefound this instruction helpful.
Lawrence from Crestwood, KY
A Bit Difficult
15 - 30 mins
Screw drivers
Removed light cover, found 2 screws in front and rear of light area.Remove screws and you can unplug light to get out of way, but not necessary. Next pop off plastic cover with flat head screw driver and remove the two screws under cover. Next pull cover off water filter and remove water filter this will give you room to slide inlet cover
... Read more out. Install plastic cone provided by in new kit. Next slide new cover over cone and re-install bottom screws, however leave them loose in order to adjust for the following screws to line up. After all screws and plugs are in place snug all screws. Replace light cover an install water filter and cover. You are done.
Read less
Was this helpful?
Thank you for voting!
water dispen.kept freezing up
3 of 5 peoplefound this instruction helpful.
KENSIL J from JACKSONVILLE, NC
Easy
15 - 30 mins
Screw drivers
remove light cover then remove 4 screws holding light fixture in place pulled out fresh food inlet cover and had to removed 2 more screws at bottom of cover then unplug electrical connector. replace with new one then replace all 6 screws and light cover done. so far its been working great no more freeze ups.
Was this helpful?
Thank you for voting!
No Problem
3 of 7 peoplefound this instruction helpful.
John from Sharpsburg, GA
Easy
15 - 30 mins
Screw drivers
Taken longer to remove food out of refrigerator than replacing the part. Easy
Was this helpful?
Thank you for voting!
Prev
1
2
Next
DIY Questions and Expert Answers
15 questions answered by our Repair Experts.
Ask our experts a question about this part and we'll get back to you as soon as possible!
We may have answered a similar question already! Search questions and answers left by others using simple keywords like "fit", "broken", "easy", or "quality" to find questions that match.
Search filter:
Clear Filter
Your search term must have 3 or more characters.
Sort by:
Prev
1
2
Next
Sorry, we couldn't find any existing answers that matched.Try using some different or simpler keywords, or submit your new question by using the "Ask a Question" button above!
ADAM - For model number PSS26SGPASS
September 13, 2017
Food in crisper drawers freeze, food seems to freeze on any shelf in fact. Water line to ice maker works fine. Replaced lower temperature sensor and that did not help. Does this sound like a problem with the air inlet cover?
Hi Adam,
Thank you for the question. If replacing the sensor did not fix the issue then it sounds like an issue with the Air Inlet Cover Kit. You can take the Inlet you have apart to see if maybe it is stuck open. Sometimes it can freeze open or have some frost build up holding it open and letting to much cold air over to the fresh food section. If the inlet looks fine then it may be just defective and needs to be replaced.
Hope this helps!
9 peoplefound this instruction helpful.
Was this helpful?
Thank you for voting!
Anna - For model number PSS25SGNABS
August 27, 2017
Does this air inlet cover kit include the parts to replace broken damper door? Do we need to buy this entire kit to replace damper door? thanks
Hi Anna,
Thank you for your question. Here is the information on this part: This kit includes damper, fan assembly, nozzle and gasket for nozzle. There is no door to the damper, just the damper and then the cover. This whole part would replace those parts though. I hope this helps. Good luck with your repair.
3 peoplefound this instruction helpful.
Was this helpful?
Thank you for voting!
JOSE - For model number PSS29NGPACC
April 22, 2019
I need to replace the damper assembly in my GE profile refrigerator. Serial: Gf410145. What is the right part number to be get it?
Hello Jose, thank you for contacting us. For your model the Damper Assembly is part PS304651.
1 personfound this instruction helpful.
Was this helpful?
Thank you for voting!
Barry - For model number PSI23MGPCBB
July 22, 2019
What is correct part number for damper assembly? Is their a fan that blows air from freezer to frig?
Hello Barry, thank you for your question. The damper, and air inlet assembly is PartSelect Number: PS966602. The evaporator fan motor moves air around into the unit. That part is PartSelect Number: PS1019114. I hope this helps!
1 personfound this instruction helpful.
Was this helpful?
Thank you for voting!
Enrico - For model number PSG25MCCACWW
December 29, 2017
This item wr49x10091, can also be used for my refrigerator model? Many thanks
Hello Enrico, Thank you for your inquiry. Yes, we do show that this part is compatible to your model. Hope this helps!
1 personfound this instruction helpful.
Was this helpful?
Thank you for voting!
Siddharth Patel - For model number PSS27SGNABS
February 4, 2018
I had problems of freezer not defrosting. I had bad defrost heater which i replaced. That fixed freezer problem. Also milk and vegetables were freezing in refrigerator section and temperature kept going down to 24 and below even i set thermostat to 40. After freezer section heater replacement temperature in refrigerator stays at 26 steady. Dem-per fan seem to turn on and off when i keep door open for few minutes. I have my refrigerator in garage and it is about 40 degree temperature in garage. Could it be temperature sensor in refrigerator of air inlet damper assembly? Thank you for your help. 704-759-6353
Hello Siddharth, Thank you for your inquiry. The temperature sensor measures the temperature of the fridge and sends to the control board. You can test it with a multimeter. If you are unfamiliar with how a multimeter functions, there are YouTube videos available to assist you. We would also recommend checking the defrost thermostat, the air inlet cover kit, the evaporator fan motor, the electronic control board, and make sure your evaporator coils are not frosted over. Hope this helps!
1 personfound this instruction helpful.
Was this helpful?
Thank you for voting!
Jeff - For model number PSS26NSWASS
April 29, 2018
The fresh food compartment was not cooling so I suspected the damper and/or fan in the upper duct was not working. I removed the air inlet assembly, separated the insulation and found only the damper and no fan. There is supposed to be a fan on this model, correct? The damper is working properly and it was cooling. Is there an updated part that I should install? Thanks for your support.
Hello Jeff,
Thanks for your question. We checked the manual for your model, and it does indicate that there is normally a fan used alongside the damper for your model. This part is the most recent version of the part for your model, and so it should have everything you need for the damper and fan.
I hope this helps.
1 personfound this instruction helpful.
Was this helpful?
Thank you for voting!
Craig - For model number GSS25KSTBSS
January 21, 2020
Having an issue where the fridge is freezing vegetables in the fresh food section, but also the freezer will sometimes just go crazy and go to like minus 9 degrees, even though it is only set for 0. Temperatures on both sides are totally out of wack a lot of the time. Usually resolves itself but sometimes too late as the damage is already done (veggies frozen). I took off the damper and confirmed that it is functional (it is opening and closing). What could be the problem? All 3 thermisters look to be in good shape but could it be one of these, or maybe something totally different?
Hello Craig, Thank you for the question. I suggest testing the Defrost Thermostat. The best way to do this is to remove the thermostat from the refrigerator so you can control the temperature of the sensor. You can let the sensor warm up to room temperature. With the sensor warmed up to room temperature the sensor should read approximately 6.2K Ohms at 68°F. With the thermistor submerged is a glass full of ice water, the sensor should be very close to 32°F which should read approximately 16.3K Ohms. If the values that you are getting are far off from these readings, then the sensor is bad and should be replaced. We hope this helps.
The evaporator fan in the freezer kicks off. I replaced it because it was making a noise and stopping.The new one worked ok but later kicked off we replaced the circuit board and it still kicks off and fresh produce frozen.We located the damper and it was in the closed position and i believe it should be open to establish air flow since it won’t pull down. I don’t know if i have another fan in the refrigerator section. I hope you can help i don’t want to buy any more unnecessary parts
Hello Art, when it comes to noise coming from the evaporator fan area the most common culprit is actually the Evaporator Fan Grommet. This part may have become damaged, or even missing from the model during repairs. If this does not help solve the issue please give us a call so we can go over the symptoms list with you. Hope this helps!
Was this helpful?
Thank you for voting!
Ken
December 11, 2018
GE arctica profile freezing things on top shelf of refrigerator. Temp show 29 32 have set on 37.
Hello Ken, thank you for contacting us, In order for us to locate the correct parts and repair information we will require the model number of the unit. Once you have located the model number please feel free to resubmit the question and we will be happy to help you. Look forward to hearing from you!
Was this helpful?
Thank you for voting!
Prev
1
2
Next
✖
Ask a Question
Ask our experts a question on this part and we'll respond as soon as we can.



 My Orders