


Get in touch, we're here to help!
1-866-883-8386
Monday to Saturday
8am - 8pm EST
Defrost Heater with Thermostat WR51X442
$160.86
Special Order
Does this part fit my model?
Need help finding your model number?PartSelect Number
PS303933
Manufacturer Part Number
WR51X442
Manufactured by
GE
Product Description
Defrost Heater with Thermostat Specifications
This part assembly has 2 functions: The defrost heater keeps the cooling coils from frosting over and the thermostat senses that the heat near the cooling coils has reached the desired temperature. Used with side by side models.

How Buying OEM Parts Can Save You Time and Money
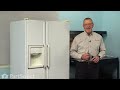
Part Videos
Replacing your General Electric Refrigerator Defrost Heater with Thermostat

Troubleshooting
This part fixes the following symptoms:
Fridge too warm | Freezer not defrosting | Freezer section too warm | Frost buildup
This part works with the following products:
Refrigerator.
This part works with the following products:
General Electric, Kenmore, Hotpoint.
Part# WR51X442 replaces these:
AP2071464, 1972, WR51X442, WR51X342, WR51X371, WR51X463
Customer Reviews
Filter By Rating:
- < Prev
- 1
- Next >
Sort by:
Search filter:
Clear Filter
Your search term must have 3 or more characters.
Keep searches simple. Use keywords, e.g. "leaking", "pump", "broken" or "fit".
Sorry, we couldn't find any existing reviews that matched. Try using some different or simpler keywords.
VIJAY S - August 6, 2019
Verified Purchase
Perfect fit.
Part arrived in 2 days, and was in excellent condition.
- < Prev
- 1
- Next >
Customer Repair Stories
Average Repair Rating: 3.8 / 5.0, 37 reviews.
What's this?
- < Prev
- 1
- 2
- 3
- Next >
Sort by:
Search filter:
Clear Filter
Your search term must have 3 or more characters.
Keep searches simple. Use keywords, e.g. "leaking", "pump", "broken" or "fit".
Sorry, we couldn't find any existing installation instruction that matched.
Defroster failure
Fridge was not really cold. Fan was working at back of freezer. Romoved the drawers and back panel of freezer compartment. Melted ice with a blow dryer and collected water with a towel so that it would not overflow the drip pan. Installed the new defroster units with 4 screws and the easy plug in wiring harness. Bingo! Defrost timer was probably OK but new one is easy to do.
Fixed in one day vs waiting for service call & payng $$$.
Fixed in one day vs waiting for service call & payng $$$.
Other Parts Used:

-
Joseph from North Attleboro, MA
-
Difficulty Level:Really Easy
-
Total Repair Time:15 - 30 mins
-
Tools:Nutdriver, Screw drivers
128 of 145 people
found this instruction helpful.
Was this instruction helpful to you?
Thank you for voting!
Icing on the interior back wall of the freezer and varying temperature in the refrigerator
Disconnected the power to the refrigerator/freezer. Removed the shelving in the freezer. Had to remove the light cover (1 screw in center top of light, slide to left and cover is removed) located in the top of freezer to obtain access to the screw in the back panel. Removed the back panel (using nut driver). Four screws (2 at the top and 2 at the bottom). Used a heat gun to defrost the coils enough to remove the screws and wiring harness. I started at the bottom unit by removing 2 screws with a #2 phillip screwdriver to remove the lower defrosting element. Carefully pulling the wiring forward from the sides of the cooling coils until I reached the next defrost coil. Repeat removing 2 screws to remove the next defrost element. Continue to carefully pull wiring harness toward yourself. Remove the Thermostat (just clipped on the upper left side of coil. Remove the plug. Carefully reverse the process to complete the process.
Other Parts Used:
-
SAMUEL from DUNCANNON, PA
-
Difficulty Level:Really Easy
-
Total Repair Time:15 - 30 mins
-
Tools:Nutdriver, Screw drivers
65 of 70 people
found this instruction helpful.
Was this instruction helpful to you?
Thank you for voting!
Refrigerator NOT Defrosting
Had to use a hair dryer to manually defrost the refrigerator before I could replace the heater assembly . I had to remove the aluminum mounting brackets and reverse them before mounting the assembly so that the wiring would run the same as the old assembly . Overall time spent from start to finish, including manual defrost was about 2 hours.
Thanks for the timer troubleshooting tips, they helped to narrow down the problem.
Thanks for the timer troubleshooting tips, they helped to narrow down the problem.
Other Parts Used:
-
Robert from Woodhaven, MI
-
Difficulty Level:Easy
-
Total Repair Time:30 - 60 mins
-
Tools:Screw drivers
34 of 36 people
found this instruction helpful.
Was this instruction helpful to you?
Thank you for voting!
Frezzer section froze over with ice.
Couldn't find schematic or repair manual
Finally found your site which showed the location and part numbers of the timer and heaters.
I ordered them; they came immediately.
I replaced only the timer, since it was the easiest and took only a few minutes. Defrosting the frezer coils with a hair dryer took about an hour.
Rerigerator froze over again in about two weeks.
I then replaced the heaters. One of the heaters was 'open circuit'.
Other Parts Used:
-
JOSEPH from ORELAND, PA
-
Difficulty Level:A Bit Difficult
-
Total Repair Time:1- 2 hours
-
Tools:Nutdriver, Screw drivers
27 of 32 people
found this instruction helpful.
Was this instruction helpful to you?
Thank you for voting!
defrost heater burned out - coils froze over
Troubleshooting was easy - others had the same problem - coils freeze over and frost blocks air flow to refrigerator - part identification made easier by online picture - many parts look the same so you may want to call and confirm before you order (there were variations to this model number) - To repair: take off five screws that hold the metal panel on the back of the freezer - remove the panel - use a heat gun or hair dryer to melt ice from the coils (put a towel at the bottom to soak up the water) - unplug the kit at the top of the freezer and carefully pull off the thermostat clipped to the coil - remove the four screws that hold the heater kit to the back of the freezer - install the new kit where the old one was then re-install the panel to the back of the freezer - next, make time to clean the condenser coils under the refrigerator/freezer
Other Parts Used:
-
Robin from Vernon Hills, IL
-
Difficulty Level:Easy
-
Total Repair Time:15 - 30 mins
-
Tools:Screw drivers
27 of 32 people
found this instruction helpful.
Was this instruction helpful to you?
Thank you for voting!
Heater / Defroster not working
The job was fairly easy. Removed 4 screws and removed panel. Disconnected cable assembly, removed 4 more screws holding heater coils. Reconnected cable assembly and replaced screws & panel. Partselect was quick to ship and would do business with them again.
Other Parts Used:
-
James from Cleveland, OH
-
Difficulty Level:Really Easy
-
Total Repair Time:Less than 15 mins
-
Tools:Screw drivers, Socket set
16 of 17 people
found this instruction helpful.
Was this instruction helpful to you?
Thank you for voting!
freezer freezing, refrig warm
pretty straight forward,removed threw screws to replace the defrost timer and reverse the procedure. To replace the defrost unit 1st removed metal back plate in freezer. Step 2 defrost freezer. step 3 remove four screws that hold defrost elements in freezer compartment. Step 4 install new defrost elements and secure back in place with four screws. step 5 optional read old defrost heaters with ohm meter to confirm the defective part. step 6 plug back in frig and enjoy a cool brewski ahhhhh. By the way only one defrost element was bad (open) but as mentioned in literature which came with new derost elements I replaced both of them. Thanks again for all the help on this, saved me $2000 on a new frig.
Other Parts Used:
-
Tom from Schofield, WI
-
Difficulty Level:Easy
-
Total Repair Time:30 - 60 mins
-
Tools:Nutdriver, Screw drivers
15 of 20 people
found this instruction helpful.
Was this instruction helpful to you?
Thank you for voting!
The refrigerator section of my side by side was not getting as cold as it should have been.
It was easy after finding PartSelect online. It wasn't obvious at first that my evaporator core(in back of freezer side) was frosting over, (since I have a flat white panel that is about 8 x 30 inches covering it), until I reached inside and ran my fingers over the cover and noticed a thin layer of frost on it. At this point I told my buddies to go get ice for our beer cuz I was fixin to do a lock out/tag out on the Fridge. Seriously, Do disconnect the electrical power before taking it apart. After taking the 9 screws (6-1/4" hex heads & 3-#2 phillips)out and removing the panel, I saw that the evaporator core was completely frosted over. I then put a large towel in the bottom and let it thaw for a day. Next day after getting the old Defrost Heater Kit with Thermostat out (4-#2 phillips, plug-in electrical connection, thermostat snap on clip) , I noticed it was burnt inside the filaments and did not pass the continuity test. I then ordered my part from PartSelect and took the oppurtunity to clean my fridge spotless. 3 business days later, I received my part, installed it, and now have a "like new" refrigertor. Actual repair time - 30 minutes, Overall down time - 4 days, Saving the cost of a new Fridge - a heck of lot more beer!
Other Parts Used:
-
Wayne from Magnolia, TX
-
Difficulty Level:Really Easy
-
Total Repair Time:15 - 30 mins
-
Tools:Nutdriver, Screw drivers
10 of 10 people
found this instruction helpful.
Was this instruction helpful to you?
Thank you for voting!
Ref/frig not cooling
Removed the 4 screws holding the back panel in freezer compartment and then removed panel. Removed the 4 screws holding defrost heater and removed it. The replacement parts fit perfect , plug the new part in and bingo my frig is operating like a new one. Took about 15 minutes to make the repair. Took longer to defrost the ice buildup on the coils ( 1hr ) than to do the repair (15 min). I can't believe i would have been paying an appliance repairman to hold a hair dryer for an hour. Your diagrams showing where the various parts are located on the appliance are invaluable. Would recommend PartsSelect to anyone and I am sure that I will be ordering parts for my other appliances as needed. Thanks
Other Parts Used:
-
Greg from Vicksburg, MS
-
Difficulty Level:Really Easy
-
Total Repair Time:Less than 15 mins
-
Tools:Nutdriver, Screw drivers
10 of 11 people
found this instruction helpful.
Was this instruction helpful to you?
Thank you for voting!
Refrigerator & freezer became warm.
Unplugged the refrigerator. I took all the food items out of the freezer, took out the ice bin and shelves. Then I unscrewed the back panel and removed it. The freezer coils were frozen over with ice. Then I used a large fan to thaw the ice and cleaned up the water with towels.
I unscrewed the old defrost heater at the bottom of the coil section, removed it and screwed the new defrost heater part in. I ended up using some dikes to cut the wiring midway up . ( I was going to use the new plastic plug that came with the new part, but it wasn't correct ). I spliced the wires together ( the color scheme was the same - pink to pink, blue to blue, etc), capped them , taped them with electrical tape, and I covered them with a corner from a sandwich bag and taped them a bit more to keep moisture out. Then I tucked the wiring up away from the coil section. I also spliced this little cylindrical part into the existing wiring harness and clipped it onto the copper tubing. ( I suspect this is the defrost timer, but I'm not sure ). After I removed the the old cylindrical little part, I noticed the cap was popped out of it. (it looked like it was damaged a bit ). Once I got all wiring tucked away and back in place, I put the back panel back on, plugged it back in. Voila'. Easy as pie. It's been running fine ( about a week now) ever since. I replaced the thermostat sensor first since that was the cheapest part, but it wasn't the problem. So I moved on to the defrost heater and that ended up being the bad part. I repaired my refrigerator for less than $100.00. Thanks PartSelect. You rock!
I unscrewed the old defrost heater at the bottom of the coil section, removed it and screwed the new defrost heater part in. I ended up using some dikes to cut the wiring midway up . ( I was going to use the new plastic plug that came with the new part, but it wasn't correct ). I spliced the wires together ( the color scheme was the same - pink to pink, blue to blue, etc), capped them , taped them with electrical tape, and I covered them with a corner from a sandwich bag and taped them a bit more to keep moisture out. Then I tucked the wiring up away from the coil section. I also spliced this little cylindrical part into the existing wiring harness and clipped it onto the copper tubing. ( I suspect this is the defrost timer, but I'm not sure ). After I removed the the old cylindrical little part, I noticed the cap was popped out of it. (it looked like it was damaged a bit ). Once I got all wiring tucked away and back in place, I put the back panel back on, plugged it back in. Voila'. Easy as pie. It's been running fine ( about a week now) ever since. I replaced the thermostat sensor first since that was the cheapest part, but it wasn't the problem. So I moved on to the defrost heater and that ended up being the bad part. I repaired my refrigerator for less than $100.00. Thanks PartSelect. You rock!
Other Parts Used:
-
James from Garland, TX
-
Difficulty Level:Easy
-
Total Repair Time:1- 2 hours
-
Tools:Screw drivers, Socket set
10 of 13 people
found this instruction helpful.
Was this instruction helpful to you?
Thank you for voting!
- < Prev
- 1
- 2
- 3
- Next >
Questions and Answers
We're sorry, but our Q&A experts are temporarily unavailable.
Please check back later if you still haven't found the answer you need.
- < Prev
- 1
- Next >
Sort by:
Search filter:
Clear Filter
Your search term must have 3 or more characters.
Keep searches simple. Use keywords, e.g. "leaking", "pump", "broken" or "fit".
Sorry, we couldn't find any existing answers that matched.Try using some different or simpler keywords, or submit your new question by using the "Ask a Question" button above!
Jamie
January 4, 2018
Is there anyway to test the defrost heater assembly through the pigtail? My defrost timer seems to work correctly but when the defrost cycle "clicks", the heaters do not activate.
For model number TFX22ZRXFWW

Hi Jamie, Thank you for the question. You should be able to tell by looking at the heater if it is defective. The glass will be clouded or have burn type of marks. The thermostat you can test. The best way to do this is to remove the thermostat from the refrigerator so you can control the temperature of the sensor. You can let the sensor warm up to room temperature. With the sensor warmed up to room temperature the sensor should read approximately 6.2K Ohms at 68°F. With the thermistor submerged is a glass full of ice water, the sensor should be very close to 32°F which should read approximately 16.3K Ohms. If the values that you are getting are far off from these readings, then the sensor is bad and should be replaced. Hope this helps!
15 people found this helpful.
Was this helpful?
Thank you for voting!
MIKE
January 27, 2018
Freezer side gets cold then it gets warm would this part fix the problem or is there another part that would work better thank you
For model number TFX20JRBCWW
Hello Mike, Thank you for your inquiry. We would recommend checking the defrost heater, timer and thermostat together. You can test the parts with a multimeter. If you are unfamiliar with how a multimeter functions, there are YouTube videos available to assist you. Hope this helps!
10 people found this helpful.
Was this helpful?
Thank you for voting!
Jay
April 21, 2024
The freezer and refrigerator are not cool. The compressor is running. How do I determine what is wrong? What could be the problem? The water appears to be working. Electric heater under ice cube tray is not working. The blower fan by the ice cube tray is working. The coils under the refrigerator by the compressor are room temperature, not hot or cold. Thank you!
For model number Tfx22zpbbww
Hi Jay, thank you for reaching out. Based on our understanding of the issue, we would suggest replacing the defrost heater with thermostat, part number PS303933, to solve the problem. We hope this helps!
Was this helpful?
Thank you for voting!
- < Prev
- 1
- Next >
Related Parts

$85.95
Special Order
Defrost Timer
$85.95
PartSelect Number: PS310858
This device acts like a clock. It continually advances and alternates between activating the cooling cycle and the defrost heater. 
$27.28
In Stock
Produce Preserver Filter
$27.28
PartSelect Number: PS3503014
Fresh Flow Produce Preserver is made for your refrigerator to help keep produce fresh for longer by absorbing the chemical, ethylene, that causes your fruits and vegetables to ripen quicker. Your produce could be fresh f... 
$25.31
In Stock
Affresh Washing Machine Cleaner - 3 pack
$25.31
PartSelect Number: PS1960673
Having a problem with a funky-smelling washing machine, or one that just doesnt seem to clean your clothes as well as it used to? Say hello to the Affresh Washing Machine Cleaner by Whirlpool. This powerful washing helpe... 
$21.95
In Stock
Affresh Dishwasher Cleaner Tablets - 6
$21.95
PartSelect Number: PS12345667
Affresh dishwasher Cleaner is specially formulated to help remove limescale and mineral build-up that can be unsightly and could affect your dishwasher's performance. Each tablet is designed to clean inside your machine ... 
$37.89
In Stock
Refrigerator Deodorizer
$37.89
PartSelect Number: PS12739141
Refrigerator deodorizers help to reduce bacteria growth and therefore reduce smells and extend the life of food. 
$32.93
In Stock
Cooktop Cleaning Cream
$32.93
PartSelect Number: PS12717774
Make your cooktop shine with Frigidaire ReadyClean Glass and Ceramic Cleaner. Our scratch-free, streak-free formula removes smudges, grease, burnt-on food, dirt and oil, while protecting and polishing to repel dust and d... 
$35.68
In Stock
Model Cross Reference
This part works with the following models:
PartSelect Number: PS303933
Manufacturer Part Number: WR51X442
Manufacturer Part Number: WR51X442
Brand
Model Number
Description
Kenmore
3639454280
Refrigerator
- Kenmore Refrigerator Model 363.9454280 (3639454280, 363 9454280) Parts
Get in touch, we're here to help!
1-866-883-8386
Monday to Saturday
8am - 8pm EST