Product Description
Oven Igniter Specifications
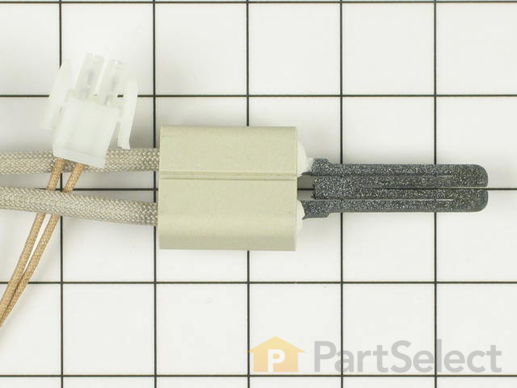
This flat style gas oven igniter has ceramic housing and comes with a connector. The igniter body is just over three inches in length. Be very careful to not touch the black element part of this igniter as it is very fragile.
How Buying OEM Parts Can Save You Time and Money
Troubleshooting
This part fixes the following symptoms:
Gas igniter glows | but will not light | Little to no heat when baking | Will Not Start
This part works with the following products:
Range.
This part works with the following products:
Amana, Caloric.
Part# WP31940001 replaces these:
AP6007826, 0316223, 31940001, Y0316223
Customer Reviews
Filter By Rating:
- < Prev
- 1
- Next >
Sort by:
Search filter:
Clear Filter
Your search term must have 3 or more characters.
Keep searches simple. Use keywords, e.g. "leaking", "pump", "broken" or "fit".
Sorry, we couldn't find any existing reviews that matched. Try using some different or simpler keywords.
Christian A - October 3, 2018
Verified Purchase
Broken part
I receive a broken parts, i need To buy it somewere helse
October 4, 2018
Hello,
Thank you for leaving a review on the part ordered. I have sent you an email in regards to the order. Hope to hear from you!
- < Prev
- 1
- Next >
Customer Repair Stories
Average Repair Rating: 3.8 / 5.0, 81 reviews.
What's this?
- < Prev
- 1
- 2
- 3
- Next >
Sort by:
Search filter:
Clear Filter
Your search term must have 3 or more characters.
Keep searches simple. Use keywords, e.g. "leaking", "pump", "broken" or "fit".
Sorry, we couldn't find any existing installation instruction that matched.
Oven not working but broiler was working fine.
Checked lower oven burner for a problem. Oven Ignitor looked like it was glowing and working properly but the gas valve would not open to let the gas flow to burner. I had read on a forum that just because the oven ignitor looks good does not mean it is creating the proper resistance to open the gas valve. So I took my chances and replaced the ignitor (because it was cheaper than the gas valve) and now the oven works like new.
Other Parts Used:
-
mark from macomb, MI
-
Difficulty Level:A Bit Difficult
-
Total Repair Time:15 - 30 mins
-
Tools:Nutdriver
74 of 88 people
found this instruction helpful.
Was this instruction helpful to you?
Thank you for voting!
Igniter glows, oven won't light
I removed the cover over the flame diffuser, then removed the single nut holding the diffuser to the burner assembly. After removing the three screws from the igniter assembly I found I couldn't reach the connector for the igniter.
I removed the storage tray underneath and found a cover towards the rear of the oven with two screws. After removing this piece I could easily disconnect the igniter. It was a bit difficult replacing this shield as it had to fit between two other pieces on the side towards the front of the oven.
I slid the guard from the old igniter and put it on the new piece and just reversed the procedure. Relatively easy and saved me a bundle!
Other Parts Used:
-
David from Avon, IN
-
Difficulty Level:Easy
-
Total Repair Time:30 - 60 mins
-
Tools:Socket set
32 of 34 people
found this instruction helpful.
Was this instruction helpful to you?
Thank you for voting!
The Amana oven & broiler igniters failed after 7+ years of service
Broiler Igniter:
Disconnected stove from electricity
Removed the two screws that hold the broiler igniter assembly
Pulled asembly out to expose ceramic wire nuts
Removed ceramic wire nuts and save them
Removed broiler igniter assembly (broiler igniter & brolier mounting bracket are assembled together)
Loosened screws/nuts that hold the broiler igniter to the brolier mounting bracket
Remove old broiler igniter
Carefully inserted new brolier igniter into the broiler igniter bracket
Place the brolier igniter bracket into position. Make sure you look at the diagram provided so the position is correct. There is a "up" & "down" side to the broiler igniter
Tightened screws & bolts on broiler igniter bracket
Reconnected the ceramic wire nuts
Inserted two mounting screws and tightened
Finished.
Oven Igniter:
Removed oven door
Removed bottom oven drawer
Removed nut that holds heat shield/disperser in place
Removedheat shield/disperser
Removed all oven tray screws
removed oven burner
disconnected oven igniter
disconneted oven igniter assembly
inserted new oven igniter
reassembled
Other Parts Used:
-
Mark from Munroe Falls, OH
-
Difficulty Level:Really Easy
-
Total Repair Time:30 - 60 mins
-
Tools:Pliers, Screw drivers
27 of 27 people
found this instruction helpful.
Was this instruction helpful to you?
Thank you for voting!
Oven would take awhile to light causing gas fumes
I opened the oven and cleared the racks;
removed the cover of the oven heating area;
took off the nut holding the blast shield on;
removed all the screws holding the drip tray on;
some were quite rusty and fell out in my hand;
removed the 2 screws holding the igniter in;
and the one scew that allows adjustment;
pulled out the igniter and noticed the old one was connected with wire nuts while the new one had a module plug;
cut off the module plug and stripped back the wires;
applied the wire nuts;
stuck the wires back in tjhe hole and screwed it all back together-done,
I must say the best part of the repair was googling the problem "amana oven ignition troubleshooting" and getting a helpful discussion of the problem and a solution and a link to the parts suply house, It couldn't have been simpler. I got the part 2 days after ordering it online.
Other Parts Used:
-
james from Waukesha, WI
-
Difficulty Level:Easy
-
Total Repair Time:30 - 60 mins
-
Tools:Screw drivers, Wrench (Adjustable)
20 of 24 people
found this instruction helpful.
Was this instruction helpful to you?
Thank you for voting!
Igniter was not turning on. This part fixed it.
Get to the ignitor:
Open oven, clean out the crude, and remove the bottom pan to get to the gas parts.
Remove the nut to get the flame sheild off.
Remove screws that hold the ignitor.
I stripped one and had to pry it off with a strait slot screw driver while turning it with a phillips.
Unplugging the ignitor:
Pull out the drawer. Removed the 2 panels under the stove to access the ignitor plug.
Replace the ignitor and reverse the procedure.
I did remove about 20 screws and the main pan at the bottom of the inside of the oven, but it didn't help me do anything, so don't make the mistake that i made with that.
Other Parts Used:
-
Ed from Bonney Lake, WA
-
Difficulty Level:Easy
-
Total Repair Time:15 - 30 mins
-
Tools:Screw drivers
11 of 15 people
found this instruction helpful.
Was this instruction helpful to you?
Thank you for voting!
Oven wouldn't ignite
Bought new igniter based on advice from other stories here. Didn't test the impedance. The igniter glowed, but the oven wouldn't start.
1. Removed single nut on flame pan & remove pan.
2. Removed Pan drawer and disconnected plug to igniter.
3. Removed 3 screws holding igniter in place.
Note: the screws were corroded & one stripped in removal - you may want to purchase the metal housing for the igniter assuming it comes with new screws.
4. Put everthing back in opposite order.
Other Parts Used:
-
Keith from Denver, CO
-
Difficulty Level:Really Easy
-
Total Repair Time:Less than 15 mins
-
Tools:Screw drivers, Wrench (Adjustable)
10 of 11 people
found this instruction helpful.
Was this instruction helpful to you?
Thank you for voting!
Oven would not light
Unplug oven cord from wall receptical,
Remove bottom drawer from oven,
Remove sheet metal plate from rear of oven to gain access to the ignighter connection,
Disconnect old ignighter connection,
Removed the pan on the bottom of the inside of the oven,
Removed the hex nut on the top of baffle plate
Remove baffle plate,
Remove (2) screws holding ignighter in place,
Replace the ignighter and all other commponnents in reverse order
Other Parts Used:
-
Don from Buffalo, MN
-
Difficulty Level:Easy
-
Total Repair Time:Less than 15 mins
-
Tools:Screw drivers, Wrench set
8 of 12 people
found this instruction helpful.
Was this instruction helpful to you?
Thank you for voting!
oven burner not lighting
After reading previous posts regarding this type of problem, I determined the very high likelyhood that the over ignitor needed to be replaced. Accessing the underneath of the oven compartment, I removed the metal shield covering the ignitor wires in order to unplug the ignitor. (Be sure to disconnect power cord first)
From inside of the oven compartment remove the flame spreader plate ( 1-screw) which gives access to the ignitor. Remove the three screws holding the ignitor bracket and pull the wire and plug through. That's it !!
Installation of the new ignitor is the reverse of the above proceedure.
Oven now functions normally again.
A very simple repair.
Other Parts Used:
-
Malcolm from Corona, CA
-
Difficulty Level:Really Easy
-
Total Repair Time:Less than 15 mins
-
Tools:Screw drivers
5 of 5 people
found this instruction helpful.
Was this instruction helpful to you?
Thank you for voting!
oven would light only after 15 to 30 minutes
opened up the oven to locate the position of igniter
disconnected igniter and checked the continuity of the igniter to find that I had an open circuit
once I found out the igniter was no good I google for appliance parts and found parts select had the best prices that I could find. I called a couple local parts stores and there prices were definately inflated. I chose to go with parts.select.com
I receive the part in two days! I installed the new part within 15 minutes and turn on the oven to have it light almost instantly. I won much praise from my wife. Parts.select.com recieves my praise for ease and quickness of part delivery.
Other Parts Used:
-
dion from grayslake, IL
-
Difficulty Level:Really Easy
-
Total Repair Time:Less than 15 mins
-
Tools:Screw drivers
5 of 7 people
found this instruction helpful.
Was this instruction helpful to you?
Thank you for voting!
previous igniter stopped working, oven would not heat up
i had to remove quite a lot of screws in the bottom "pan" of the over to get to the igniter wiring. once it was apart, it was easy to see how to disconnect and reconnect the new igniter. the trickiest part is to put the igniter into the metal sheeted housing before you try to thread the wiring through to the plug at the back of the stove. overall, this is an easy rip out and replace process.
Other Parts Used:
-
Lorin from Palatine, IL
-
Difficulty Level:Easy
-
Total Repair Time:15 - 30 mins
-
Tools:Screw drivers
3 of 4 people
found this instruction helpful.
Was this instruction helpful to you?
Thank you for voting!
- < Prev
- 1
- 2
- 3
- Next >
Questions and Answers
We're sorry, but our Q&A experts are temporarily unavailable.
Please check back later if you still haven't found the answer you need.
Related Parts
Model Cross Reference
This part works with the following models:
PartSelect Number: PS11740951
Manufacturer Part Number: WP31940001
Brand
Model Number
Description
Amana
ARG7102L-P1143338NL
Range
- Amana Range/Stove/Oven Model ARG7102L-P1143338NL (ARG7102LP1143338NL, ARG7102L P1143338NL) Parts
Amana
ARG7102L-P1143341NL
Range
- Amana Range/Stove/Oven Model ARG7102L-P1143341NL (ARG7102LP1143341NL, ARG7102L P1143341NL) Parts
Amana
ARG7102L-P1143344NL
Range
- Amana Range/Stove/Oven Model ARG7102L-P1143344NL (ARG7102LP1143344NL, ARG7102L P1143344NL) Parts
Amana
ARG7102L-P1143347NL
Range
- Amana Range/Stove/Oven Model ARG7102L-P1143347NL (ARG7102LP1143347NL, ARG7102L P1143347NL) Parts
Amana
ARG7102W-P1143338NW
Range
- Amana Range/Stove/Oven Model ARG7102W-P1143338NW (ARG7102WP1143338NW, ARG7102W P1143338NW) Parts
Amana
ARG7102W-P1143341NW
Range
- Amana Range/Stove/Oven Model ARG7102W-P1143341NW (ARG7102WP1143341NW, ARG7102W P1143341NW) Parts
Amana
ARG7102W-P1143344NW
Range
- Amana Range/Stove/Oven Model ARG7102W-P1143344NW (ARG7102WP1143344NW, ARG7102W P1143344NW) Parts
Amana
ARG7102W-P1143347NW
Range
- Amana Range/Stove/Oven Model ARG7102W-P1143347NW (ARG7102WP1143347NW, ARG7102W P1143347NW) Parts