This dryer timer is used to control the unit's cycles by regulating the length of time that power is directed to each setting.
How Buying OEM Parts Can Save You Time and Money
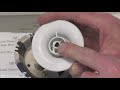
Part Videos
Replacing your Maytag Dryer Timer - 120 Volts - 60hz
Troubleshooting
This part works with the following products:
Dryer.
This part works with the following products:
Maytag, Norge, Crosley, Admiral.
Part# WP31001513 replaces these:
AP6007601, 31001513, 53-1815
Customer Reviews
Average Rating:
★★★★★
★★★★★
1 Review
5.0
Filter By Rating:
5 Stars
1
4 Stars
0
3 Stars
0
2 Stars
0
1 Star
0
< Prev
1
Next >
Sort by:
Search filter:
Clear Filter
Your search term must have 3 or more characters.
Keep searches simple. Use keywords, e.g. "leaking", "pump", "broken" or "fit".
Sorry, we couldn't find any existing reviews that matched. Try using some different or simpler keywords.
★★★★★
★★★★★
Garnet B - July 30, 2021
Verified Purchase
Quick, Easy and Painless!
Part was exactly the right one, came way faster than expected and installed easily.
< Prev
1
Next >
Customer Repair Stories
Average Repair Rating: 3.2 / 5.0, 6 reviews.
What's this?
< Prev
1
Next >
Sort by:
Search filter:
Clear Filter
Your search term must have 3 or more characters.
Keep searches simple. Use keywords, e.g. "leaking", "pump", "broken" or "fit".
Sorry, we couldn't find any existing installation instruction that matched.
Dryer Would Not Shut Off On Its Own
Ordered my part from partselect. Com (even easier than installation) unpluged the dryer,removed all knobs from face plate ,removed three phillips head screws across top ,removed two 5/16 head screws from timer( behind cycle knob) tilted back face plate unpluged one wire at atime from old timer placed back on new timer then reverced the process. Problem solved
Other Parts Used:
johnny from london, KY
Difficulty Level:
Really Easy
Total Repair Time:
15 - 30 mins
Tools:
Nutdriver, Screw drivers
18 of 22 peoplefound this instruction helpful.
Was this instruction helpful to you?
Thank you for voting!
no heat
removed screws (3) holding console face...then lowered console. removed timer dial knob accessing machine nuts (2) holding timer in place. removed timer and transferred all spade connections, wire-for-wire. removed old timer resistor assembly and replaced with new. reassembled everything and tested with one very wet old sock. success.!!!!
Part was perfect replacement thanks to online photos. Removed old timer switched leads one at a time from old to new timer and mounted new timer replaced back cover. Everything went fine.
Other Parts Used:
Ronald from Dardenne Prairie, MO
Difficulty Level:
Easy
Total Repair Time:
15 - 30 mins
Tools:
Nutdriver, Screw drivers
6 of 15 peoplefound this instruction helpful.
Was this instruction helpful to you?
Thank you for voting!
3 wires came loose from switch was twisted to connect.
It should have been easy but when some wires (3) came loose when I moved it to install it, I had a problem. The video that was run at a higher speed and too close up images you could not see which wire went where. Contacted Part Select and received no answer, so I tracked the wires down as much as I could on an old wiring diagram and hooked them up. I then connected the power, stood back and watched the switch smoke and blow circuits. No why to find the correct color wire to what part so I ended up having to buy a new dryer. Part Select has only sale people so don't expect help if something goes wrong. Good Luck
Other Parts Used:
Chuck from GRANTS PASS, OR
Difficulty Level:
Very Difficult
Total Repair Time:
More than 2 hours
Tools:
Nutdriver, Pliers
1 personfound this instruction helpful.
Was this instruction helpful to you?
Thank you for voting!
dryer would not shut off
Unplug dryer as to avoid shocking yourself. Removed 3 screws on top of panel then remove cover then use nut driver to remove 2 screws from timer placed new timer next to old one and transferred wiring from old to new. Place new timer in place and mound with screws. Reinstall cover and 3 screws and you're done.
Other Parts Used:
SHAWN from VERSAILLES, KY
Difficulty Level:
Really Easy
Total Repair Time:
15 - 30 mins
Tools:
Nutdriver, Screw drivers
1 personfound this instruction helpful.
Was this instruction helpful to you?
Thank you for voting!
Dryer will not start. No light in tub for tub.
Process of elimination. Replaced heating element and high limit heat thermostat . Replaced door button switch and timer. Still not working. Replaced control thermostat, and still not working. Purchased ohm meter and checked thermal fuse that comes with high limit kit. Bad thermal fuse. Replaced thermal fuse that comes with kit. Dryer now has tub light and working fine. Learning to use an ohm meter really helps, and will save you a lot of frustration.
Ask our experts a question about this part and we'll get back to you as soon as possible!
1 question answered by our experts.
< Prev
1
Next >
Sort by:
Search filter:
Clear Filter
Your search term must have 3 or more characters.
Keep searches simple. Use keywords, e.g. "leaking", "pump", "broken" or "fit".
Sorry, we couldn't find any existing answers that matched.Try using some different or simpler keywords, or submit your new question by using the "Ask a Question" button above!
Paul
January 2, 2018
My dryer stopped suddenly. Tub light won't come on. I've verified continuity at the door switch and in the thermal fuse, as well as power to the dryer. Thinking that all that is left is the timer switch, and not sure how to test that.
For model number PYE2300AYW
Hi Paul,
Thank you for your question. If your dryer has stopped working, the timer is just one part you will need to check. There are some parts that you will need to check to see which one is causing the issue. You will need to check the high limit kit, which comes with three separate thermal fuses for dryers. One electric thermal fuse with a limit of 258, one gas high limit at 240, and one gas and electric high limit thermostat with a limit at 300. The thermal fuse kit shuts off the motor in the dryer when it begins to overheat. You will also need to check the belt, the door catch and strike, the timer resistor assembly, the high limit thermostat, the door switch, the heating element and the control thermostat. I hope this helps. Thank you and have a great day!
4 people found this helpful.
Was this helpful?
Thank you for voting!
< Prev
1
Next >
✖
Ask a Question
Ask our experts a question on this part and we'll respond as soon as we can.
Fresh Flow Produce Preserver is made for your refrigerator to help keep produce fresh for longer by absorbing the chemical, ethylene, that causes your fruits and vegetables to ripen quicker. Your produce could be fresh f...
This solid element restorer is for ranges and cooktops. Solid element restorer restores and protects solid elements from rusting and spotting. Follow the instructions on the label when using this product.
This front load washer cleaner removes odor-causing residue. Use it once a month and it will keep your machine fresh and clean. Package comes with 3 tablets.
This low-odor gel, easily cleans away tough burnt-on deposits at room temperature. Apply the gel evenly on the cooled oven surface. Leave the gel to set overnight then wipe away with a clean cloth.
Make your cooktop shine with Frigidaire ReadyClean Glass and Ceramic Cleaner. Our scratch-free, streak-free formula removes smudges, grease, burnt-on food, dirt and oil, while protecting and polishing to repel dust and d...
Model Cross Reference
This part works with the following models:
PartSelect Number: PS11740718
Manufacturer Part Number: WP31001513