( Grid squares measure 1x1 inch )
Customer Service Representative

Get in touch, we're here to help!

Daily 8am - 9pm EST

customerservice@partselect.ca

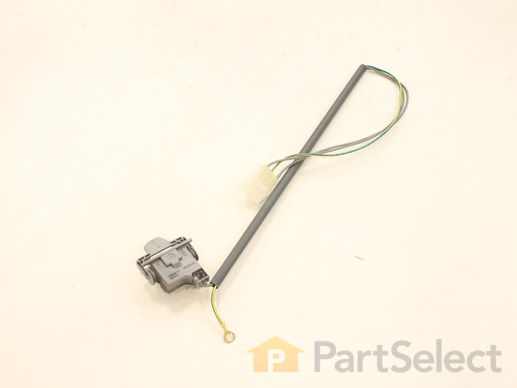
Lid Switch Assembly with Leads

$44.66
  In Stock

Get this part fast! Average delivery time for in-stock parts via standard shipping: 1.8 days.

PartSelect Number PS350434
Manufacturer Part Number 3949247
Manufactured by Whirlpool
Product Description

Lid Switch Assembly with Leads Specifications

The pin on the lid pushes on the lever of the lid switch to tell the machine that the lid is closed.
How Buying OEM Parts Can Save You Time and Money

How Buying OEM Parts Can Save You Time and Money

Part Videos

Replacing your Estate Lid Switch Assembly with Leads

Replacing your Estate  Lid Switch Assembly with Leads
Troubleshooting
This part fixes the following symptoms:
Will not drain | Will Not Start | Will not agitate | Not draining
This part works with the following products:
Estate, KitchenAid, Roper, Whirlpool.
Part# 3949247 replaces these:
AP3100003, 547225, 3949247, 3949247VP
Back to Top
Customer Repair Stories
 Average Repair Rating: 3.5 / 5.0, 160 reviews. What's this?
  • 1
  • 2
  • 3
Sort by:
Sorry, we couldn't find any existing installation instruction that matched.
Washer stopped mid cycle
1. Unplug washer.
2. Remove screws at control panel end caps.
3. Flip control panel back to expose wiring.
4. Detach lid switch wiring harness from control panel.
5. Use screwdriver to pry the 2 brass clips holding the back panel of the washer to the front and sides piece.
6. Tilt the front/sides piece over to expose lid switch.
7. Use nutdriver to detach ground wire.
8. Use screwdriver to remove 2 screws holding lid switch in place.
9. Install new lid switch. Make sure wiring harness piece is facing the right direction.
10. Put washer back together in same order it was disassembled. Make sure front/sides piece connects to the clips at the bottom.
Other Parts Used:
  • Travis from Pearland, TX
  • Difficulty Level:
    Easy
  • Total Repair Time:
    15 - 30 mins
  • Tools:
    Nutdriver, Screw drivers
1018 of 1042 people found this instruction helpful.
Was this instruction helpful to you?
Thank you for voting!
The lid switch had broken on my washing machine; the machine would not run.
First I unplugged the washing machine. Then I removed the two screws that hold the top console in place; these are located in back of the main console (where the dials are). Once removed, the entire console swivels back, exposing the wires underneath. I unplugged the wiring harness that was connected to the washing machine top flat surface. I then removed the two s-shaped brackets with a screwdriver by prying underneath. This allowed me to remove the main sheet metal frame around the washing machine. The lid switch assembly is located under the top console. I simply removed it and replaced with the new assembly and put it back together. A snap!
Other Parts Used:
  • Dennis from Evans City, PA
  • Difficulty Level:
    Easy
  • Total Repair Time:
    15 - 30 mins
  • Tools:
    Screw drivers, Socket set
575 of 601 people found this instruction helpful.
Was this instruction helpful to you?
Thank you for voting!
Machine would stop on Rinse & Spin Cycle
After troubleshooting the timer, found that the drum would spin if I manually pressed the lid switch with a screwdriver, then it wouldn't work at all. Unfortunately, there was a load of laundry and no way to drain the drum. I bypassed the lid switch (snipped the plastic switch off and twisted the wires). Put a small wire nut over the wires and taped the wire to the top of the machine with plenty of electrical tape so not to cause a shock. Finished that load and ordered the part. Followed advice from former story tellers and removed the two long screws that run down into the cabinet on both sides of the machine, followed by two smaller screws on the top corners of the control panel. Slide the whole panel towards the front of the cabinet about 1/4" and rotate it back over the back panel. The wire assembly will hold it from falling to the floor (watch the tubing that runs on the top edge). Located the plug that leads to the lid switch and pull up on the tab and wiggle it out. Push the tabs on the side of the connector on the cabinet and push it through (watch the metal edges). You will see two metal clips on the left & right top of the cabinet. Put a screwdriver in the notch on the front side and pop them off. Take note on how they are set in the two sides Place hands on both sides of the cabinet and pull towards you, it will rotate over and you can access the lid switch. Remove the two screws from the inside of the lid. Slide the wires & plastic casing off the two small clips on the rim & replace with the new switch. Be careful not to tighten too much cause you'll split the plastic mounting. Reverse the process and your back in business. I believe my lid switch broke due to excessive slamming of the washer lid. Hope this helps
Other Parts Used:
  • Michael from Homestead, FL
  • Difficulty Level:
    A Bit Difficult
  • Total Repair Time:
    15 - 30 mins
  • Tools:
    Nutdriver, Screw drivers
225 of 231 people found this instruction helpful.
Was this instruction helpful to you?
Thank you for voting!
The lid switch broke
Removal Steps

1.Unplug washer and pull away from wall 6 inches or so. (You will need space on either side to remove the cover.)
2.Release control panel: Unfasten two screws at corners of panel. Tilt backwards. Unfasten old lid switch wire coupling and push it downward.
3.Remove washer cover (top and sides): Remove clips at two corners under control panel. You should be able to gently lift and remove the cover.
4.Remove lid switch assembly: Unfasten two screws holding switch to washer top. Unfasten ground wire (using 8mm wrench). Use screwdriver to lift up two clips holding switch assembly.

Reassembly is reverse of removal. When replacing the cover, line it up so that the side edges of the cover sit on top of the rail and the front edge slides beneath the rail. I learned this the hard way, and, in fact, it is still not fastened securely.
Other Parts Used:
  • Paul from Glendale, CA
  • Difficulty Level:
    A Bit Difficult
  • Total Repair Time:
    30 - 60 mins
  • Tools:
    Screw drivers, Wrench set
132 of 171 people found this instruction helpful.
Was this instruction helpful to you?
Thank you for voting!
Washer wouldn't drain
I removed the screws & bolts to the control panel. Lifted the panel up & unhooked the wiring, then moved the control back & out of the way. Next I removed the clips that hold the back of the washing machine in place. I lifted up the top of the washing machine & was able to remove the damaged lid switch. Replaced the lid switch, which was relatively easy to do. Then I put the washing machine back together.
The key is to remember what & where the parts go: for example the clips that hold the back of the machine in place. You know where they go but not exactly how they go in & how the rear of the machine connects to it. But otherwise not a hard repair.
Other Parts Used:
  • Karen from Columbus, OH
  • Difficulty Level:
    A Bit Difficult
  • Total Repair Time:
    30 - 60 mins
  • Tools:
    Pliers, Screw drivers, Socket set
60 of 63 people found this instruction helpful.
Was this instruction helpful to you?
Thank you for voting!
Would not rinse or spin
Do not assume it is timer...my bad...had washer apart to begin with , looking for problem...(ALWAYS look at the lid switch,I did not)when i broke the timer,and realized that was NOT the problem,I ordered lid switch and timer , installed both in less than 20 minutes , putting entire washer back together about an hour.Hooked it up , and POW!!!! IT WORKED!! lol!!!
Other Parts Used:
Timer, Control (60 Hz.) (Motor
  • TERRY from LAKELAND, FL
  • Difficulty Level:
    Easy
  • Total Repair Time:
    15 - 30 mins
  • Tools:
    Nutdriver, Screw drivers
56 of 61 people found this instruction helpful.
Was this instruction helpful to you?
Thank you for voting!
lid switch broke and washer would not drain or spin
I read the repair suggestions from Paul and Karen. I was amazed at how easy it really was. I have never fixed something like that before and my husband was not home to do it so I just read the directions for repair on your partselect site. I printed off the directions that another person wrote and followed them as to how to take off the control panel. ONce that was off, the rest was easy. I numbered each screw and hole so it would be easy to put back together but really wasn't that necessary. It really took less than an hour, I am glad I didn't pay someone to do it! It's was extremely helpful to have the directions on your site that told how to take the control panel off.

As for the O ring replacement..that was less than five minutes...just take the top part off and pull the other part out and replace the ring. Anyone can do that. No tools.
Other Parts Used:
Seal, Inner Cap
  • mary from Wilmington, NC
  • Difficulty Level:
    A Bit Difficult
  • Total Repair Time:
    30 - 60 mins
  • Tools:
    Nutdriver, Pliers, Screw drivers
46 of 53 people found this instruction helpful.
Was this instruction helpful to you?
Thank you for voting!
washer will not change to any cycle and lid switch will stay on position.
Real good your web site gave me good repair tips.
Other Parts Used:
Timer, Control (60 Hz.) (Motor
  • luz from New York, NY
  • Difficulty Level:
    A Bit Difficult
  • Total Repair Time:
    30 - 60 mins
  • Tools:
    Nutdriver, Pliers, Screw drivers
33 of 38 people found this instruction helpful.
Was this instruction helpful to you?
Thank you for voting!
lid switch plastic screw holes fatigued and broke - switch then did not close
This is a machine I bought from Costco in 2001 - it has been very reliable and this was its first repair.
Getting the top off this washer requires a lot of disassembly. However, if you push the drum down on the right hand side of the machine, you can easily reach under the lid and remove the old switch. Mine had broken loose from its plastic mounts, so the lid plunger no longer activated it. Save the two screws that go through the washer top to secure the new switch.
I unplugged the electricity, reached under the top and pulled the old switch out. Its cables are enclosed in a stiff plastic hose with a slit down its length so you can pull the wires through the slit. You need to pull out around 6 inches of the wires. I then cut the wires to remove the old switch and next cut the wires on the new switch to the same length as the ones removed. Stagger the cuts about 1 inch so that the two joints will not be on top of each other. I stripped each end of the two wires, slipped shrink-wrap tubing (from radio shack) on to the new switch wires, then soldered the new switch wires to the existing wires back to the control center. I then slipped the shrink wrap over the soldered joints and shrank it with a match. Feed the joined wires back into the plastic tube and feed the switch under the washing machine rim. It takes a little maneuvering to get the switch aligned with the two screw holes in the top. Be sure the switch is pushed up into the lip opposite the screw holes - push the back end of the switch up into the lip before trying to align the front end of the switch with the screw holes. Align the screw holes with the switch holes, install the two screws and check that you hear the slight click of the microswitch if you push down a pencil into the interlock slot before you tighten everything up. Plug in the electricity and off you go!
Other Parts Used:
  • Anthony from La Jolla, CA
  • Difficulty Level:
    A Bit Difficult
  • Total Repair Time:
    30 - 60 mins
  • Tools:
    Pliers, Screw drivers
33 of 42 people found this instruction helpful.
Was this instruction helpful to you?
Thank you for voting!
washer moving 3 ft during the spin cycle sounding like elephants running through the house
Removed back panel to remove tub from shell. Unscrewed the brackets holding the springs. Used screw driver to pop out pads with hammer onto screw driver. Cleaned out tub and put grease on springs where they attach to bracket. Replaced panel and ran machine to find a leak. Took machine apart again to find the knocking of the tub against the back panel caused a whole in the plastic tub. Silicon and mechanical tape. Washer works fine for now.
Other Parts Used:
Leveling Spring Suspension Spring Tub Wear Pads - Package of 3
  • Annie from Haines, OR
  • Difficulty Level:
    A Bit Difficult
  • Total Repair Time:
    More than 2 hours
  • Tools:
    Pliers, Screw drivers, Socket set, Wrench (Adjustable), Wrench set
28 of 36 people found this instruction helpful.
Was this instruction helpful to you?
Thank you for voting!
  • 1
  • 2
  • 3
Questions and Answers

Be the first to ask our experts a question about this part!

Customer Service Representative

Get in touch, we're here to help!

Daily 8am - 9pm EST

Contact Customer Service