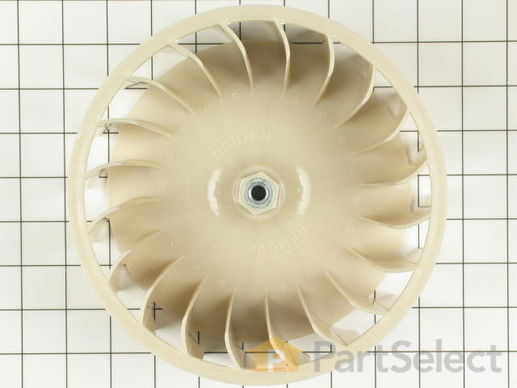
Part Location Diagram of 56000 Whirlpool Blower Wheel
See part 9 in the diagram
Replacing your Amana Dryer Blower Wheel
( Grid squares measure 1x1 inch )
Customer Service Representative

Get in touch, we're here to help!

Daily 8am - 9pm EST

customerservice@partselect.ca

Blower Wheel

 Fits your NDE2330AYW!
★★★★★
★★★★★
2 Reviews
$78.67
  In Stock

Get this part fast! Average delivery time for in-stock parts via standard shipping: 1.8 days.

 Fits your NDE2330AYW!
PartSelect Number PS2052494
Manufacturer Part Number 56000
Manufactured by Whirlpool
Product Description

Blower Wheel Specifications

Part may differ in appearance, but functions same as original part.
How Buying OEM Parts Can Save You Time and Money

How Buying OEM Parts Can Save You Time and Money

Part Videos

Replacing your Amana Dryer Blower Wheel

Replacing your Amana Dryer Blower Wheel
Troubleshooting
This part fixes the following symptoms:
Noisy
This part works with the following products:
Dryer, Range, Washer Dryer Combo.
This part works with the following products:
Amana, Speed Queen, Maytag, Crosley.
Part# 56000 replaces these:
AP4062362, 1004897, 14218925, 56000, 56000P, R0603532, R6035-32
Back to Top
Customer Reviews
Average Rating:
★★★★★
★★★★★
2 Reviews
5.0
Filter By Rating:
  • 5 Stars
    2
  • 4 Stars
    0
  • 3 Stars
    0
  • 2 Stars
    0
  • 1 Star
    0
  • 1
Sort by:
Sorry, we couldn't find any existing reviews that matched. Try using some different or simpler keywords.
  • 1
Customer Repair Stories
 Average Repair Rating: 2.8 / 5.0, 17 reviews. What's this?
  • 1
  • 2
Sort by:
Sorry, we couldn't find any existing installation instruction that matched.
Blower fan cracked
Unplug the power cord from the unit. Remove the lower front panel; then the upper front panel including the door (unplug wire to door switch). Then remove the cover on the fan housing. Need to block the motor from turning; I used a stick to jamb the front of the motor; then unscrew the old blower fan and screw on the new one. Then replace the cover and put front panels back on.
Other Parts Used:
  • Rick from Birch Run, MI
  • Difficulty Level:
    A Bit Difficult
  • Total Repair Time:
    30 - 60 mins
  • Tools:
    Nutdriver, Socket set
44 of 54 people found this instruction helpful.
Was this instruction helpful to you?
Thank you for voting!
The insert-molded nut stripped from the wheel
Because the wheel had stopped and the shaft kept turning (junk from child's pocket got in there), the nut stripped itself away from the wheel causing low RPM and low air movement (lazy flame, vibration and clothes not drying)

I had to use a screwdriver to break the wheel away from the center nut and remove the fan. I then removed the air fan housing (3 bolt behind the fan wheel). I used a small pair of vise grips to hold the motor shaft staionary while I used a pair of channel lock pliers to remove the nut that was molded into the fan from the motor shaft. It was harder to get the nut started then I would have thought.

Once complete, I put the fan housing back on and threaded the new wheel on easily. The motor has external fins on it which turn with the shaft-I held one lightly while I threaded the fan on to keep the shaft from turning. Tighten just slightly more than hand tight-don't go crazy-it's threaded to stay tight with rotation. Works great and very quiet now.
Other Parts Used:
  • Ted from Grayslake, IL
  • Difficulty Level:
    Really Easy
  • Total Repair Time:
    30 - 60 mins
  • Tools:
    Pliers, Screw drivers
18 of 21 people found this instruction helpful.
Was this instruction helpful to you?
Thank you for voting!
Dryer making a lot of noise and clothes were getting very hot
Remove the 2 screws at bottom of front panel, remove lower panel. Then remove the two screws at bottom of front door. Lift door forward so spring hooks can disengage from the top panel. remove door, disconnect the 5 wires to the door latch and light. remove the two screws at top of dryer to lift up top panel. Remove 4 screws at the front holding the drum. Disengage the belt from the tension pulley and remove drum. Replaced both roller wheels at the rear of the drum( one was broke). Then remove the screws (about 6 holding the plate in front of the blower wheel. Use a wrench to hold the nut at the back of the motor and a scocket wrench to remove blower wheel. (The Blower wheel was broken from the shaft and was spinning freely). Then do it all backwards to re assemble. i spent more time cleaning the lint from the inside than I took making the repair!
Other Parts Used:
Drum Support Roller
  • MedPro from Crest Hill, IL
  • Difficulty Level:
    Easy
  • Total Repair Time:
    1- 2 hours
  • Tools:
    Nutdriver, Wrench (Adjustable), Wrench set
7 of 9 people found this instruction helpful.
Was this instruction helpful to you?
Thank you for voting!
Noisy and not drying the clothes
This was my first time repairing a dryer. If I knew when I started the project what I know now, it would have been an easy repair. First, you should know that the series number (used for selecting a wiring diagram) is the last two digits of the unit's serial number (not model number). In my case, the series number was 11. The hardest part for me was figuring out how to take the dryer apart. I made the mistake of starting with the top instead of the front. In fact, I removed the control panel and disconnected all the wires, labeling them carefully, and creating a diagram, so i could put it all back together later. I now realize I could have left that all together and just lifted the top up in the front without removing it. That knowledge would have saved hours of work, so I hope it helps someone (prop up the front a few inches and start by removing the panel on the lower front, then remove the screws on the main front panel, and then pull out the bottom of that panel toward you until the top of that front panel disengages from the top of the dryer - the rest is obvious). So it turns out there were two separate problems: 1) the blower wheel had broken completely off of the motor so it wasn't spinning - this is why hot air wasn't being pulled through from the heater in the back of the dryer; 2) the pulley on the spring-loaded lever arm attached to the motor was squeaking due to lack of lubricant. So the solution was to replace the blower wheel and spray WD-40 in the pulley (and also, for good measure in the roller bearings that support the drum in the back of the dryer). Most of the time spent on the repair was just due to my own mistakes. In particular, once I got everything back together after the repair, it stopped squeaking and there was good airflow, but it wasn't heating. I spent an entire day trying to troubleshoot the lack of heat. I tested and bypassed all of the thermostats and heater fuses and the heating element still wouldn't come on. I even managed to accidentally ground one of the leads from the fuse and had to replace a melted wire connector (trip to the Shack). In the end, it turned out that a wire which had been accidentally disconnected from the main power cord to the dryer, I had put back in the wrong spot. There is L1, L2, and neutral going into the dryer. I had the heater on the same circuit as the motor and other stuff. Once I traced the wiring diagram back, I realized this and corrected it by putting the heating circuit back onto L2. Now it "hums like a Singer". If everything had gone smoothly, instead of being a 2-day repair, it would have been a 2 hour repair. 2 hours instead of 1 because to get the leverage I needed to remove the old blower nut, I had to actually pull the motor assembly out of the dryer and move it to my workbench. Someone who is strong or more limber or has better tools might be able to skip that step, reducing the time by about 45 minutes. Good luck!
Other Parts Used:
  • Pietro from Fairfax, VA
  • Difficulty Level:
    A Bit Difficult
  • Total Repair Time:
    More than 2 hours
  • Tools:
    Nutdriver, Pliers, Screw drivers, Wrench (Adjustable), Wrench set
5 of 6 people found this instruction helpful.
Was this instruction helpful to you?
Thank you for voting!
Load noise from dryer
Had to figure out how to open the dryer - bottom screws in front and work up, removed the drum and found the fan blade was broken. Had some difficulty removing the fanblade from the motor shaft but after that the new one was easy to install. I did need help to place the belt and drum back into place. as one person has to hold the belts on the pulley while the other adjusts the belt while putting the drum back into place.
Other Parts Used:
  • Mike from Pacifica, CA
  • Difficulty Level:
    A Bit Difficult
  • Total Repair Time:
    30 - 60 mins
  • Tools:
    Nutdriver, Pliers, Socket set, Wrench (Adjustable), Wrench set
4 of 5 people found this instruction helpful.
Was this instruction helpful to you?
Thank you for voting!
The dryer made a random grinding/rubbing noise during operation.
After removing the lower access panel, I observed the drum and belt and saw it turning freely. The support rollers in the back turned freely and were in good condition as well. At odd intervals the unit made a humming or grinding noise, and i decided to check the blower wheel (the other rotating part in the system). I found that the central hub of the wheel (which is made of a nylon like plastic) had sheared off from the wheel itself. I ordered a new part and started to remove the old wheel. **NOTE** many of the stories I read described how this part would have a reverse thread, it did not and that cost me an extra 30 minutes to figure out (the new part had arrows showing the correct direction to put on and remove - the original didn't). Once everything was cleaned and reassembled, I started the dryer again, but got no heat. I had previously replaced the heating element, so I thought my wiring was wrong. That wasn't the problem, but a hint from this site about checking the incoming wiring was the solution, my ground wire had come off the terminal in the back of the dryer and I wasn't getting the volatge across the element that it required. With the ground wire back in place, everything worked fine.
Other Parts Used:
  • Timothy from Hardeeville, SC
  • Difficulty Level:
    Difficult
  • Total Repair Time:
    1- 2 hours
  • Tools:
    Nutdriver, Pliers, Wrench (Adjustable)
4 of 7 people found this instruction helpful.
Was this instruction helpful to you?
Thank you for voting!
will not blow air
I first unpluged the dryer. Then I
Removed two screws and removed bottom cover, Then removed the door assembly.Here I had to unplug the light and door switches. I then removed the four screws that holds the tub mount in place, Then I removed the eight screws that hold the blower cover in place, then removed the blower. replaced blower and reassembled in reverse. I started the dryer and it worked fine.
Other Parts Used:
Multi Rib Belt
  • Robert from Ada, OK
  • Difficulty Level:
    Really Easy
  • Total Repair Time:
    1- 2 hours
  • Tools:
    Nutdriver, Pliers
3 of 5 people found this instruction helpful.
Was this instruction helpful to you?
Thank you for voting!
Loud Grinding type noise - Broken Blower Wheel
Very simple repair. Remove front panel, door, drum etc. Try to keep everything seperated, screws etc. I put lockjaws on the back to get the nut off the front. Make sure to check the housing for "melted on" blower wheel residue. Easy enough to remove. I checked with my local parts dealer he wanted twice the price and needed to order it (at least a days wait). PartSelect sent the exact same part in a day and a half. Put everything back the same way I removed. Hardest part is the drum and belt. While you have everything apart don't forget to clean the thermastats etc. PartsSelect was quicker and cheaper.
Other Parts Used:
  • Ron from Portage, MI
  • Difficulty Level:
    Really Easy
  • Total Repair Time:
    15 - 30 mins
  • Tools:
    Screw drivers, Socket set, Wrench (Adjustable)
2 of 3 people found this instruction helpful.
Was this instruction helpful to you?
Thank you for voting!
Dryer started making a terrible sound, when my son opened up the appliance he found that the Blower wheel was broken and the housing was full of debris.
My son will discribe how he did the repair.
First I opened the top, then I removed the front with a 1/4 inch ratchet and socket. I took the cover off the blower housing with a nut driver. Used the appropriate socket and a 1/2 inch ratchet, and an adjustable wrench to hold the motor shaft and removed the Blower wheel. I replaced the broken Blower Wheel and put all it back together.
Our dryer is now working great and there are no unwanted sounds emanating from within. We are very happy with PartSelects promptness and that we recieved the correct part as ordered. PartSelect website was easy to navigate. We plan if the need arises to do so again in the future.
Thankyou Frank and Rodney
Other Parts Used:
  • Frank from HOOPA, CA
  • Difficulty Level:
    Really Easy
  • Total Repair Time:
    15 - 30 mins
  • Tools:
    Nutdriver, Socket set, Wrench (Adjustable)
2 of 3 people found this instruction helpful.
Was this instruction helpful to you?
Thank you for voting!
Dryer racket, not drying clothes
Being my lousy Maytag washer died THE PREVIOUS DAY, spewing water, etc. and I had rushed out and bought a new washer, I was determined not to replace the dryer (though I now am a serious NON_FAN of Maytag).

I disassembled the whole dryer and finally got to the blower wheel which was broken lose from the molded nut. I supposed something like a dime or penny got in there to shred it.

PartSelect's website allowed me to find the part in 5 minutes. It was on my doorstep the next afternoon.

Installation was straightforward BECAUSE I stacked all the screws and and labeled them appropriately. It took about 30 minutes to reassemble and the toughest bit was getting the drum in with the belt positioned properly.
Other Parts Used:
  • Richard P from Fort Worth, TX
  • Difficulty Level:
    A Bit Difficult
  • Total Repair Time:
    More than 2 hours
  • Tools:
    Nutdriver, Screw drivers, Socket set, Wrench (Adjustable)
2 of 3 people found this instruction helpful.
Was this instruction helpful to you?
Thank you for voting!
  • 1
  • 2
Questions and Answers

Ask our experts a question about this part and we'll get back to you as soon as possible!

1 question answered by our experts.
  • 1
Sort by:
Sorry, we couldn't find any existing answers that matched.Try using some different or simpler keywords, or submit your new question by using the "Ask a Question" button above!
STEPHEN
July 30, 2022
Does this part fit LEA30W?
PartSelect logo
Hi Stephen, Thank you for your question. Yes, this would be the correct blower wheel for your dryer. If you need help placing an order for it, customer service is open 7 days a week and anyone will be happy to assist you. Please feel free to give us a call. We look forward to hearing from you!

Was this helpful?
Thank you for voting!
  • 1
Related Parts
Model Cross Reference
This part works with the following models:
PartSelect Number: PS2052494
Manufacturer Part Number: 56000
Brand
Model Number
Description
Amana
7493-LEM437
Dryer - DRYER
Admiral
ADE7005AKW
Dryer - Residential
Admiral
ADE7005AYW
Dryer - Residential
Admiral
ADE9005AGW
Dryer - Residential
Admiral
ADG7005AWW
Dryer - Residential
Speed Queen
AE3213
Dryer - Residential
Speed Queen
AE3413
Dryer - Residential, Electric
Speed Queen
AE4113
Dryer - Residential
Speed Queen
AE4213
Dryer - Residential
Speed Queen
AE4413
Dryer - Residential, Electric
Speed Queen
AE5113
Dryer - Residential
Speed Queen
AE5213
Dryer - Residential
Speed Queen
AE5413
Dryer - Residential, Electric
Speed Queen
AE7133
Dryer - Residential
Speed Queen
AE7233
Dryer - Residential
Speed Queen
AE9133
Dryer - Residential
Speed Queen
AE9233
Dryer - Residential
Speed Queen
AE9433
Dryer - Residential, Electric
Speed Queen
AEE933
Dryer - Residential, Electric
Speed Queen
AEE953
Dryer - Residential, Electric
Speed Queen
AEM197
Dryer - Residential, Automatic
Speed Queen
AEM333
Dryer - Residential, Electric
Speed Queen
AEM353
Dryer - Residential, Electric
Speed Queen
AEM377
Dryer - Residential, Automatic
Speed Queen
AEM397
Dryer - Residential, Automatic
Speed Queen
AEM407L
Dryer - Residential, Automatic
Amana
AEM407L2
Dryer
Speed Queen
AEM407L2-PAEM402L2
Dryer - Speed Queen Dryer Model AEM407L2-PAEM402L2 (AEM407L2PAEM402L2, AEM407L2 PAEM402L2) Parts
Speed Queen
AEM407W
Dryer - Residential, Automatic
Amana
AEM407W2
Dryer
Customer Service Representative

Get in touch, we're here to help!

Daily 8am - 9pm EST

Contact Customer Service