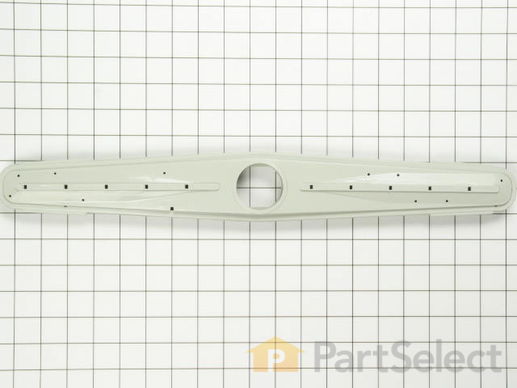
Part Location Diagram of WP99001788 Whirlpool Lower Spray Arm
See part 2 in the diagram
( Grid squares measure 1x1 inch )
Customer Service Representative

Get in touch, we're here to help!

Daily 8am - 9pm EST

customerservice@partselect.ca

Lower Spray Arm

★★★★★
★★★★★
2 Reviews
$106.80
  In Stock

Get this part fast! Average delivery time for in-stock parts via standard shipping: 1.8 days.

PartSelect Number PS11747617
Manufacturer Part Number WP99001788
Manufactured by Whirlpool
Product Description

Lower Spray Arm Specifications

This lower dishwasher spray arm is just about twenty inches in length and three inches wide in the center. Also, this spray arm is gray in color.
How Buying OEM Parts Can Save You Time and Money

How Buying OEM Parts Can Save You Time and Money

Troubleshooting
This part fixes the following symptoms:
Not cleaning dishes properly | Leaking
This part works with the following products:
Dishwasher.
This part works with the following products:
Maytag, Jenn-Air, Amana.
Part# WP99001788 replaces these:
99001427, 99001747, 99001788
Back to Top
Customer Reviews
Average Rating:
★★★★★
★★★★★
2 Reviews
5.0
Filter By Rating:
  • 5 Stars
    2
  • 4 Stars
    0
  • 3 Stars
    0
  • 2 Stars
    0
  • 1 Star
    0
  • 1
Sort by:
Sorry, we couldn't find any existing reviews that matched. Try using some different or simpler keywords.
  • 1
Customer Repair Stories
 Average Repair Rating: 3.8 / 5.0, 25 reviews. What's this?
  • 1
  • 2
  • 3
Sort by:
Sorry, we couldn't find any existing installation instruction that matched.
dishes weren't getting cleaned
1) Lower Spray Arm and Pump Housing Filter:
1a) Unscrewed lower spray arm cap. Removed lower spray arm. Removed metal radiant shields from lower spray arm, cleaned them, and snapped them onto the new lower spray arm.
1b) Removed Torx screws from pump cover, then removed pump cover.
1c) Curled new filter into circular shape, interlocking the tabs to connect the ends together, then replaced the old pump housing filter by removing the old filter and then pushing the new one into place in the pump cover. Old O-ring was fine, so didn't really need to replace it.
1d) Re-installed pump cover by aligning the water ports on the cover with those in the dishwasher, then pushing cover down into place, then installing and tightening the Torx screws. If I were to do this repair again, I would replace the pump cover with a new one.
1e) Installed the spray arm by placing the new lower spray arm into position over pump cover, then screwing in the lower spray arm cap.
2) Upper Spray Arm
2a) Removed upper spray arm by unscrewing the snap outlet nut, then removing the spray arm retainer. This way, the retainer is undamaged and can be re-used.
2b) Attached new upper spray arm to snap outlet nut by pushing old retainer through new upper spray arm and into snap outlet nut.
2c) Installed new upper spray arm by screwing snap outlet nut back into the dishwasher.
Other Parts Used:
O-RING Pump Housing Filter Upper Spray Arm with Retainer
  • Josephine from Clearwater Beach, FL
  • Difficulty Level:
    Easy
  • Total Repair Time:
    30 - 60 mins
  • Tools:
    Screw drivers
134 of 160 people found this instruction helpful.
Was this instruction helpful to you?
Thank you for voting!
Water leaking out of bottom of door when running
Replacing bottom spray arm to fix leaky door:

To fix the leak in the door it is necessary to replace the bottom spray arm. This is because when the lower spary arm fails it gets small splits which, when spraying, send water up into the door vent and inside the door. It then leaks out the bottom of the door to drain.

1. Take out he bottom dish rack.

2. Locate plastic nut (lower spray arm cap) on lower spray arm (see parts diagram).

3. Remove plastic nut (lower spray arm cap) by hand - it twists counter clockwise to loosen.

4. There will be a small piece (jump-up nozzle) under the plastic nut (lower spary arm cap). Note how it was situated. Place it aside with the lower spary arm cap - you'll need them both during reassembly.

5. Pull off lower spary arm and filter guard (they are attached to each other).

6. Note how the lower spray arm was attached to the filter guard. The top and bottom of the lower spray arm are not the same.

7. Unsnap lower spray arm from filter guard by pulling up on one side and then the other to removed it from the plastic clips on the filter guard.

8. Install the new lower spray arm, by snaping it into the plastic retainers on the filter guard, one side at a time. Make sure you installed it with the correct side up.

9. Remove the two metal pieces (Radient Shield)from each end of the old lower spray arm and place the on the new lower spray arm. A small flat head screwdriver is useful to assist in removing them from the old arm.

9. Place the assembly (lower spray arm and filter guard) back onto the dishwasher and place the jump-up nozzle back into position.

8. Attach the palstic nut (lower spray arm cap) and tighten clockwise until secure. Don't over tighten.

9. Slide the bottom dish rack back into position.

This will fix the problem of the leaky door. I went ahead and replaced the upeer spray arm at the same time since it was a connvient time to do so.
If you wish to do so read on.

Replacing upper spray arm.

1. Remove the bottom dish rack.

2. You can remove the top dish rack, but you don't need to.

3. Examine where the upper spray arm is attached to the dishwasher. You will see three parts. The one on the spary arm center - toward the inside of the dishwasher is the SNAP SPRAY RETAINER. Next is the UPPER SPRAY ARM itself. Next, between the UPPERT SPRAY ARM and the body of the dishwasher is the SNAP OUTLET NUT.

4. Remove the SNAP OUTLET NUT by turing it counter clockwise (remember its upside down so you have to be looking up at it to determine which way is counter clockwise). I had to use a screwdriver blade and the palm of my hand to get it to loosen - I set the blade against one of the Knurls on the nut and gave it a tap with the palm of my hand).

5. The whole assembly will drop down. Remove it from the dishwasher. Note the way the UPPER SPRAY ARM is positioned; as the two sides are different.

6. With a pair of needle nose pliers compress the wings of the SNAP SPRAY RETAINER and remove it from the assembly. The assembly is now in three pieces.

7. Replace the old UPPER SPRAY ARM with the new one - again make sure it is in correctrly, as there is a top and bottom to the spary arm.

8. Insert the the SNAP SPRAY RETAINER into the new UPPER SPRAY ARM and into the SNAP OUTLET NUT. Place the assembly back into the dishwasher by tightening down the SNAP OUTLET NUT - turning it clockwise to tighten.

9. Replace the uppper dish rack if you removed it.

10. Repalce the lower dish rack.
Other Parts Used:
Silverware Basket - Gray Upper Spray Arm with Retainer
  • Wayne from Moreno Valley, CA
  • Difficulty Level:
    Easy
  • Total Repair Time:
    15 - 30 mins
  • Tools:
    Pliers, Screw drivers
19 of 23 people found this instruction helpful.
Was this instruction helpful to you?
Thank you for voting!
Spray arms were split in the seams & clogged
After I figured out how to remove the spray arms, and filter guard (that was the hardest part) it was a piece of cake. Just a matter of snapping the spray arm into the filter guard, and replacing it the dishwasher, and tightening it with the screw in retainer. Upper arm was also easy to replace after removing the top rack.
Other Parts Used:
Spray Arm Snap Retainer Filter Guard Upper Spray Arm Snap Outlet Nut Upper Spray Arm with Retainer
  • James from Sun City, AZ
  • Difficulty Level:
    A Bit Difficult
  • Total Repair Time:
    15 - 30 mins
  • Tools:
    Pliers
12 of 29 people found this instruction helpful.
Was this instruction helpful to you?
Thank you for voting!
Water Leaking from Door
The lower spray arm of this model has a chronic problem with the plastic seams splitting and the horizontal blast causing door leaks. This was the third spray arm replaced on this unit. Rather than simply replacing the spray arm with the OEM device purchased, I used a solder gun to reweld the seam on the spray arm. I expect that the additional welding will provide many more years of service than the OEM replacement part. They should really improve the quality of the replacement part to prevent splitting. A metal replacement would be worth $50 and provide a better repair than the plastic arm.
Other Parts Used:
Bottom Door Seal Door Seal
  • Kurt from Renton, WA
  • Difficulty Level:
    Really Easy
  • Total Repair Time:
    15 - 30 mins
11 of 27 people found this instruction helpful.
Was this instruction helpful to you?
Thank you for voting!
Door Leaking, unit was filled with soap film
The repair was very involved, but from previous experience cleaning the dishwasher, it was worth not having to buy a new one. I removed all of the lower parts down to the motor shaft. That process is tricky, but if you do it methodically, and slowly, it is not too bad. The real problem wash the scum that was left behind by the soap used in the dishwasher. After removing all the parts, I ordered the parts I could not clean, and cleaned the parts I could. I figured out that the door was leaking because of the soap scum buildup on all the parts, causing the water level to raise faster than it could be pumped out. After I received the new parts, I simply put everything back together and it works better than ever now. I used the parts layout on your website to help in aiding me to put everything back correctly. I am very appreciative that I can get parts easily through your website, and not have to hire a "service technician" to come out and do the same thing, for the price of a new washer. Thanks!
Other Parts Used:
Upper Spray Arm Impeller Assembly O-RING Secondary Filter Plate
  • Chris from Garden Plain, KS
  • Difficulty Level:
    A Bit Difficult
  • Total Repair Time:
    More than 2 hours
  • Tools:
    Nutdriver, Pliers, Screw drivers
10 of 17 people found this instruction helpful.
Was this instruction helpful to you?
Thank you for voting!
Grinding noise/dishes not washing properly. Soap not dissolving.
Other parts used:
Discharge Housing Assembly (#11)
Impeller Assembly (Wash Impeller) (#14)
O-Ring (#37)
Upper Discharge Housing Gasket (#38)

Removed upper and lower washing baskets.

Pulled off Upper Spray Arm (#33). It pulls off easily by hand. No tools required. Replaced with new Upper Spray Arm (#33) and Snap Spray Retainer (#31).

Removed Large Spray Arm Cap(#34,)which has a right hand thread. This allowed me to take the Lower Spray Arm(#2)off.
Removed Filter Guard (#36).

Next I removed the 6 screws from the Pump Cover & Secondary Filter Assembly (#4) with a Torx screwdriver. Removed Lower Spray Arm Seal(#3), Pump House Filter (#6)(which I cleaned), Assembly, Rinse Arm (#7) Jump Up Nozzle (#1). Unscrewed Discharge Housing Nut(#8) by hand. Removed Support, Wash Arm (#9). This allowed me to remove the three screws holding the Discharge Housing Assembly(#11)with a 5/16th nut driver. Next I removed the Impeller Screw (#12) with a 5/16th nut driver. You must hold the Impeller Assembly (#14) firmly while loosening the nut. Removed Impeller Assembly (#12) and Plate, Suction (#15). Cleaned out area of debris,lint, etc. Put back old Plate, Suction (#15) and replaced Impeller Assembly (#14) with new part. Replaced Upper Housing Gasket and Discharge Housing Assembly with new parts. Put back all parts in the reverse order I removed them replacing the O-Ring (#37) with a new part. This O-Ring goes in the Pump Cover & Secondary Filter Assembly (#4).

After completely assembled it ran as good as new!
Other Parts Used:
Upper Spray Arm Spray Arm Snap Retainer
  • Eric from Gualala, CA
  • Difficulty Level:
    Easy
  • Total Repair Time:
    15 - 30 mins
  • Tools:
    Nutdriver, Screw drivers
7 of 9 people found this instruction helpful.
Was this instruction helpful to you?
Thank you for voting!
Our dishwasher was not working well at all
After realizing that both upper and lower sprayer arms had long thin cracks in them, I decided to try replacing the arms instead of the more expensive option of upgrading the dishwasher altogether. The top arm popped right out with no tools, new one popped right back in place. The lower arm is easily removed after unscrewing the large ring in the middle of the arm. New arm fit right in place and screwed the ring back on. Dishwasher working like new again!
Other Parts Used:
Upper Spray Arm with Retainer
  • William from Niskayuna, NY
  • Difficulty Level:
    Really Easy
  • Total Repair Time:
    Less than 15 mins
6 of 8 people found this instruction helpful.
Was this instruction helpful to you?
Thank you for voting!
Dishwasher no longer cleaning dishes
I have no prior experience fixing any appliance but figured I might be able to save this old dishwasher. I read some where on this web site that I needed to replace the upper and lower spray arm, and someone suggested replacing the filter as well. I ordered the parts by looking at partselect.com's picture of the dishwasher and read someone's explanation that I needed to remove the filter housing to replace the filter.

The upper spray arm comes off by gently pulling down on the spray arm. I put the new one in its place.

The lower spray arm had a thin, large (about 2" diameter) round screw holding it and its housing in place. I removed the large, flat screw and the lower arm came off. Below that was the filter housing. I unscrewed the six screws, took off the housing, replaced the filter, and put the housing back on.

Then I removed the lower arm from the plastic thing that was holding it, removed the stainless steel heat plates and put them on the new washer arm. Put the washer arm back on the thing that held it, and screwed the washer arm assembly in place with the large plastic screw.
Other Parts Used:
Upper Spray Arm with Retainer Pump Housing Filter
  • Susan from Flagstaff, AZ
  • Difficulty Level:
    Really Easy
  • Total Repair Time:
    15 - 30 mins
6 of 9 people found this instruction helpful.
Was this instruction helpful to you?
Thank you for voting!
The dishwasher was not getting dishes clean
We had tried to use dish washer cleaners, and they would work for a time, but we started spending more money on cleaner than we wanted. I ordered and then I replaced the lower spray arm. It took a little effort to get the top screw off, due to hard water deposits. The new one went on very easily, just screwed right in like the old one. It's working great and I really don't mind not getting a new one or paying for a service call!!!
Other Parts Used:
  • Vickie from Lincoln, NE
  • Difficulty Level:
    Really Easy
  • Total Repair Time:
    Less than 15 mins
  • Tools:
    Wrench (Adjustable)
3 of 4 people found this instruction helpful.
Was this instruction helpful to you?
Thank you for voting!
pump cover was gunked up needed yo be replaced
replaced wiyh new parts
Other Parts Used:
Rinse Arm Secondary Filter Plate Lower Spray Arm Seal Pump Housing Filter
  • scott from budd lake, NJ
  • Difficulty Level:
    Easy
  • Total Repair Time:
    30 - 60 mins
  • Tools:
    Screw drivers
3 of 12 people found this instruction helpful.
Was this instruction helpful to you?
Thank you for voting!
  • 1
  • 2
  • 3
Questions and Answers

Ask our experts a question about this part and we'll get back to you as soon as possible!

1 question answered by our experts.
  • 1
Sort by:
Sorry, we couldn't find any existing answers that matched.Try using some different or simpler keywords, or submit your new question by using the "Ask a Question" button above!
Eugene
July 29, 2021
How do you remove the lower spray arm cap if it is frozen in place with debris or soap residue
For model number DWU8912AAE
PartSelect logo
Hello Eugene, Thank you for your question. We suggest using hot water and baking soda or you may choose a cleaning agent like CLR which can be found at any hardware store. A firm twist counter clockwise should do the trick.

Was this helpful?
Thank you for voting!
  • 1
Related Parts
Model Cross Reference
This part works with the following models:
PartSelect Number: PS11747617
Manufacturer Part Number: WP99001788
Brand
Model Number
Description
Amana
ADW662EAB
Dishwasher
Amana
ADW662EAB-PADW662EAB0
Dishwasher - Amana Dishwasher Model ADW662EAB-PADW662EAB0 (ADW662EABPADW662EAB0, ADW662EAB PADW662EAB0) Parts
Amana
ADW662EAC
Dishwasher
Amana
ADW662EAC-PADW662EAC0
Dishwasher - Amana Dishwasher Model ADW662EAC-PADW662EAC0 (ADW662EACPADW662EAC0, ADW662EAC PADW662EAC0) Parts
Amana
ADW662EAS
Dishwasher
Amana
ADW662EAW
Dishwasher
Amana
ADW662EAW-PADW662EAW0
Dishwasher - Amana Dishwasher Model ADW662EAW-PADW662EAW0 (ADW662EAWPADW662EAW0, ADW662EAW PADW662EAW0) Parts
Amana
ADW862EAB
Dishwasher
Amana
ADW862EAC
Dishwasher
Amana
ADW862EAS
Dishwasher
Amana
ADW862EAW
Dishwasher
Amana
DDW2470AWP
Dishwasher - Undercounter
Maytag
DWC6402AAE
Dishwasher
Maytag
DWC6402ABE
Dishwasher
Maytag
DWC7302AAB
Dishwasher
Maytag
DWC7302ABB
Dishwasher
Maytag
DWC7602AAB
Dishwasher
Maytag
DWC7602AAE
Dishwasher
Maytag
DWC7602ABB
Dishwasher
Maytag
DWC7602ABE
Dishwasher
Maytag
DWU4912AAB
Dishwasher
Maytag
DWU4912AAE
Dishwasher
Maytag
DWU5902AAB
Dishwasher
Maytag
DWU5902AAE
Dishwasher
Maytag
DWU5902AAM
Dishwasher
Maytag
DWU5912AAB
Dishwasher
Maytag
DWU5912AAE
Dishwasher
Maytag
DWU6202AAB
Dishwasher
Maytag
DWU6202AAE
Dishwasher
Maytag
DWU6402AAB
Dishwasher
Customer Service Representative

Get in touch, we're here to help!

Daily 8am - 9pm EST

Contact Customer Service