Part Location Diagram of WP67002052 Whirlpool Crushed Ice Wheel
See part 10 in the diagram
( Grid squares measure 1x1 inch )
Customer Service Representative

Get in touch, we're here to help!

Monday to Saturday
8am - 9pm EST

customerservice@partselect.ca

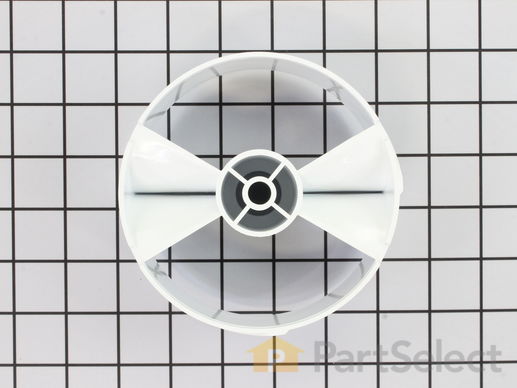
Crushed Ice Wheel

$70.16
  Special Order
PartSelect Number PS11743477
Manufacturer Part Number WP67002052
Manufactured by Whirlpool
Product Description

Crushed Ice Wheel Specifications

This crushed ice wheel is five inches in diameter. It is beige in color and is made of plastic.
How Buying OEM Parts Can Save You Time and Money

How Buying OEM Parts Can Save You Time and Money

Troubleshooting
This part fixes the following symptoms:
Ice maker won’t dispense ice
This part works with the following products:
Refrigerator.
This part works with the following products:
Amana, Maytag, Kenmore, Jenn-Air.
Part# WP67002052 replaces these:
10114702, 10114703, 4343895, 67002052
Back to Top
Customer Repair Stories
 Average Repair Rating: 4.4 / 5.0, 7 reviews. What's this?
  • 1
Sort by:
Sorry, we couldn't find any existing installation instruction that matched.
Crushed Ice Wheel began to fragment
This is a side-by-side refrigerator. The crushed ice wheel is part of the icemaker bin auger, and it began to fragment, popping pieces of plastic into the ice dispenser and on into our drinks. The manuf. manual had nothing about parts in it, so GREAT thanks to Partselect for their website!!! Now, to dismantle the bin and auger is simple on this design: remove the bin from the freezer and allow it to defrost and dry; there are two small phillips-head screws on the front underside of the bin, holding the front panel in place - remove these screws and pop the front cover off; you'll then see two small phillips-head screws holding the auger-cap in place - remove these and pull the auger cap out, along with the auger; using a small pliers, remove the nut from the auger at the auger-cap, then slide the auger-cap off; at this point you just start removing washers, blades, etc, from the auger - MAKING SURE YOU KEEP THEM IN ORDER - until you reach the crushed ice wheel; separate the wheel from its metal brace, slide the wheel off and replace it; gradually replace all the other parts in order, cleaning them as you go, and simply put everything back together. It helps to keep the exploded parts diagram at hand - available on the Partselect website. It was a snap. The ordering process was simply and the part was delivered to my door on the second day after ordering.
Other Parts Used:
  • Fred from Olathe, KS
  • Difficulty Level:
    Really Easy
  • Total Repair Time:
    30 - 60 mins
  • Tools:
    Pliers, Screw drivers, Socket set
26 of 29 people found this instruction helpful.
Was this instruction helpful to you?
Thank you for voting!
ice wheel was broken
remove the bin from the freezer, there are 2 tabs on the lower front cover that pop off and you just pull the entire front cover off. there are 4 nuts that hold the blade cover which you can use the 7in1 with the insert removed.. i believe it's 5/16". remove the cover and the tumbler assembly pops out of the tray.
remove the nut with a set of pliers and lay it out on the table in order.
install is reverse of removal. make sure you get all the washers in the correct location when assembling. don't tighten the nut too tight or it will bind the rotating assembly.

enjoy retrieving ice from the door again!
Other Parts Used:
  • rosemarie from duarte, CA
  • Difficulty Level:
    Really Easy
  • Total Repair Time:
    15 - 30 mins
  • Tools:
    Pliers
14 of 17 people found this instruction helpful.
Was this instruction helpful to you?
Thank you for voting!
Ice maker not making ice, also needed drumwheel for the front of the ice bucket, wouldn't crush ice , and ice would get stuck
Took the rear bottom panel loose , the ice maker and water dipenser valve is in the right corner. Turn off water line to the refrigerator , and also unplug the electric from the outlet. It is easier to take the ground wire loose from the valve bracket now , before taking valve out of the bracket. take the two water lines that run to the door and the ice maker loose, then remove the main inlet line. Once you have the water lines off, then you can remove both electrical plugs from the electric coils. The water lines that run to the door and the ice maker cant be confused , because they are two different sizes , so they will only fit the correct side. The electrical plugs are pretty simple as well as, the wires are the same color as the coils, so its fairly easy to see which one goes where. The replacement process is pretty self-explanitary , just reverse the order. Just as a hint of advice , have a sponge or mop ready to clean up the water that comes out of the lines when you remove them. I also changed the drum wheel in the front of the ice bin, this process is not easy if you let the blades and spacers fall apart , as they have to pretty much have to be in correct order , or your ice bin will not crush ice , and you could possibly bust the bin into pieces. The process is not really hard , just pay close attention to what is coming off from where!!! There are two bolt on the bottom of the front cover , take them loose and pull the cover forward from the bottom, then lift a little , should come off. Then the metal front cover should be exposed, ther are two bolts in it as well , remove them , and the front should be loose , this is when you hold the auger and keep an eye on the blades. There is also a nut , right in the center of the wheel you have to take loose , hold the auger then take the nut loose with a 1/2 in. wrench. Once you remove the nut the drum pulls right off the auger. When going back together , make sure the ice crusher blades all line up correctly , as the blades wont work at all . They have to slide back into the blade pivot bracket (slot made into the plastic bucket front). As I said before , be sure and pay close attention , and this process will go easily. The drum is marked front side , or this side out, be sure its installed correctly , as the ice will not feed right. The first cycle of the ice maker making ice will probably be only 1 or 2 cubes , but the second time around you will have a full set of 8 , the water lines get air in them while they are unhooked so you wont get a full cycle the first time.
Other Parts Used:
Water Inlet Valve - 120V 60Hz Light Bulb - 120V 25W Light Bulb - 7W
  • Andy from Somerset, KY
  • Difficulty Level:
    Easy
  • Total Repair Time:
    Less than 15 mins
  • Tools:
    Nutdriver, Pliers, Screw drivers
6 of 7 people found this instruction helpful.
Was this instruction helpful to you?
Thank you for voting!
The wheel broke in half.
Remove ice tray from freeze. Removed all screws, replaced wheel. Reassembled unit.
Other Parts Used:
  • Gregory from Lemon Grove, CA
  • Difficulty Level:
    Really Easy
  • Total Repair Time:
    Less than 15 mins
  • Tools:
    Nutdriver
3 of 8 people found this instruction helpful.
Was this instruction helpful to you?
Thank you for voting!
crushed ice wheel broken
very easy, with use of screwdriver and 1/4 in nut driver. just remember the way the blades go and get them back the same way. had it fixed in 15 mins.
Other Parts Used:
  • michael from pleasant grove, UT
  • Difficulty Level:
    Really Easy
  • Total Repair Time:
    Less than 15 mins
  • Tools:
    Nutdriver, Screw drivers
2 of 5 people found this instruction helpful.
Was this instruction helpful to you?
Thank you for voting!
Plastic wheel in icemaker broke
I removed the ice tray from the freeze. Turn over and remove screws holding the face plate on. Remove the 4 screws holding the crushing mechanism in place. Pull the entire mechanism out and remove the nut holding the blades together. Remember the alignment of the blades. Remove blades and then the pastic crush wheel. Replace in reverse order. Very easy.
Other Parts Used:
  • Bryan from Lancaster, SC
  • Difficulty Level:
    Easy
  • Total Repair Time:
    15 - 30 mins
  • Tools:
    Nutdriver, Pliers
2 of 3 people found this instruction helpful.
Was this instruction helpful to you?
Thank you for voting!
Wheel broken
Took auger apart laid out sequence as removed parts replace the same way . Parts have to go back like they were removed.
Other Parts Used:
  • Dean from STEWARTVILLE, MN
  • Difficulty Level:
    Really Easy
  • Total Repair Time:
    15 - 30 mins
  • Tools:
    Nutdriver
1 person found this instruction helpful.
Was this instruction helpful to you?
Thank you for voting!
  • 1
Questions and Answers

Ask our experts a question about this part and we'll get back to you as soon as possible!

1 question answered by our experts.
  • 1
Sort by:
Sorry, we couldn't find any existing answers that matched.Try using some different or simpler keywords, or submit your new question by using the "Ask a Question" button above!
Jeanenne
August 22, 2017
Do you need any special tools to replace a crushed ice wheel. Is this something i can do without calling an appliance person?
For model number MZD2665HES
PartSelect logo
Hello Jeanenne, thank you for contacting us. This is an easy repair, you should be able to complete this in a reasonable amount of time, you will need a screw driver and possibly a socket wrench. Good luck with the repair!

Was this helpful?
Thank you for voting!
  • 1
Related Parts
Model Cross Reference
This part works with the following models:
PartSelect Number: PS11743477
Manufacturer Part Number: WP67002052
Brand
Model Number
Description
Amana
1999A
Refrigerator
Amana
1999A-P1193906WL
Refrigerator - SIDE BY SIDE REFRIGERATOR
Amana
1999W
Refrigerator
Amana
1999W-P1193906WW
Refrigerator - SIDE BY SIDE REFRIGERATOR
Amana
2599A
Refrigerator
Amana
2599A-P1190419WL
Refrigerator - SIDE BY SIDE REFRIGERATOR
Amana
2599W
Refrigerator
Amana
2599W-P1190419WW
Refrigerator - SIDE BY SIDE REFRIGERATOR
Amana
2699A
Refrigerator
Amana
2699W
Refrigerator
Litton
35271
Refrigerator
Amana
35271-P1121805W
Refrigerator - REFRIGERATOR
Amana
35271W-P1121805WW
Refrigerator - 20, 25, & 27 CUBIC FOOT SIDE BY SIDE ICE AND WATER
Litton
35278
Refrigerator
Amana
35278-P1121806W
Refrigerator - REFRIGERATOR
Amana
35278L-P1121806WL
Refrigerator - 20, 25, & 27 CUBIC FOOT SIDE BY SIDE ICE AND WATER
Litton
35501
Refrigerator
Amana
35501-P1121711W
Refrigerator - REFRIGERATOR
Amana
35501W-P1121711WW
Refrigerator - 20, 25, & 27 CUBIC FOOT SIDE BY SIDE ICE AND WATER
Litton
35508
Refrigerator
Amana
35508-P1121712W
Refrigerator - REFRIGERATOR
Amana
35508L-P1121712WL
Refrigerator - 20, 25, & 27 CUBIC FOOT SIDE BY SIDE ICE AND WATER
Litton
35541
Refrigerator
Amana
35541-P1121709W
Refrigerator - REFRIGERATOR
Amana
35541W-P1121709WW
Refrigerator - 20, 25, & 27 CUBIC FOOT SIDE BY SIDE ICE AND WATER
Litton
35548
Refrigerator
Amana
35548-P1121710W
Refrigerator - REFRIGERATOR
Amana
35548L-P1121710WL
Refrigerator - 20, 25, & 27 CUBIC FOOT SIDE BY SIDE ICE AND WATER
Litton
36051
Refrigerator
Amana
36051-P1122003W
Refrigerator - REFRIGERATOR
Customer Service Representative

Get in touch, we're here to help!

Monday to Saturday
8am - 9pm EST

Contact Customer Service