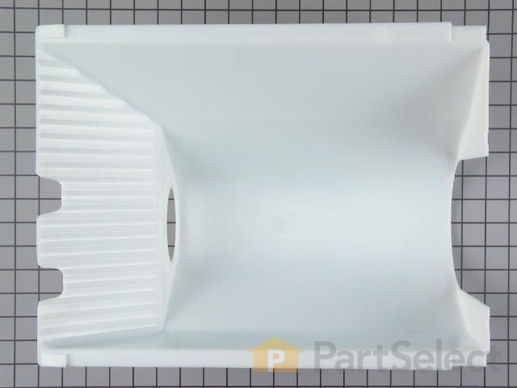
Part Location Diagram of WP10111905 Whirlpool Crushed Ice Bucket
See part 15 in the diagram
( Grid squares measure 1x1 inch )
Customer Service Representative

Get in touch, we're here to help!

Daily 8am - 9pm EST

customerservice@partselect.ca

Crushed Ice Bucket

$205.21
  Special Order
PartSelect Number PS11738205
Manufacturer Part Number WP10111905
Manufactured by Whirlpool
Product Description

Crushed Ice Bucket Specifications

This crushed ice bucket is nineteen inches long and fourteen inches wide. It is all white in color and is made of plastic.
How Buying OEM Parts Can Save You Time and Money

How Buying OEM Parts Can Save You Time and Money

Troubleshooting
This part works with the following products:
Refrigerator.
This part works with the following products:
Amana, Kenmore, Litton, KitchenAid.
Part# WP10111905 replaces these:
10111901, 10111905, 10111905V, 4343896
Back to Top
Customer Repair Stories
 Average Repair Rating: 4.5 / 5.0, 11 reviews. What's this?
  • 1
  • 2
Sort by:
Sorry, we couldn't find any existing installation instruction that matched.
broken side rail
It took longer to assemble the tools, empty the ice and dispose of the ice than to disassemble and reassemble the bucket. Easy!!!
Other Parts Used:
  • Dale from Las Cruces, NM
  • Difficulty Level:
    Really Easy
  • Total Repair Time:
    15 - 30 mins
  • Tools:
    Nutdriver
9 of 10 people found this instruction helpful.
Was this instruction helpful to you?
Thank you for voting!
broken ice bucket
Removed Ice bucket. Removed two screws and removed front cover from old ice bucket, two more screws under cover to remove ice agitator. Installed ice agitator to new ice bucket, installed two screws holding it. Installed ice bucket front cover on new ice bucket with two screws. Put new ice bucket into freezer. Finished! That was easy!
Other Parts Used:
  • kevin from yucaipa, CA
  • Difficulty Level:
    Easy
  • Total Repair Time:
    Less than 15 mins
  • Tools:
    Nutdriver
7 of 7 people found this instruction helpful.
Was this instruction helpful to you?
Thank you for voting!
Ice maker tray would overfill tray and create large clumps of ice.
Repair Refrigerator Kick Plate Grill:
No tools were required. I removed old grill with hands. I attached two clips to new grill, and re-installed the new grill. (less than 5 minutes very easy)

Repair Crushed Ice Bucket:
You will need sockets or nut driver. Remove the Ice crusher dispenser and metal rod from the existing unit. You will then re-install with the new Ice Bucket. There were two scews that held the front cover. You will need to remove four screws to remove the ice crusher mechanism and re-install with new bucket. (10 minutes to replace)

Repair Ice Maker Assembly:
I removed the plastic cap on the top left edged of the ice maker. You will need to use your existing cap with the replacement unit. I then loosened the top two screws on the ice maker assembly. You do not need to remove the top two screws. There is one screw on the bottom that will need to be removed. This will allow you to get to the wiring harness. I pulled out the white tube that fills the ice maker with water. I then used a small bucket to pour existing water out of the ice maker. I used a small screw driver to depess the clip on the wiring harness. You can not pull out the wiring harnes unless the plastic clip is depressed. The new ice maker assembly did not have the same type of water line attachment. It looks like it is made for different assemblys. For my water tube, I noticed a notched area on the new unit that could be cut out to work like my existing unit did for the water line. I used a box knife to cut out the notched area. On the new water tray, there was a hole in the side that my existing unit did not have. It does not affect the installation of the water tube. I installed the new ice maker assembly by attaching the wiring harness. Installed the bottom screw using my original bracket instead of the new bracket that came with the new unit. Tightened the top screws and bottom screw. Attached the water tube to the ice maker assembly. Attached plastic cap between the refrigerator wall and left side of the ice maker assembly. (15 minutes)
Other Parts Used:
Kickplate Grille Kit Replacement Ice Maker
  • Billy from Edmond, OK
  • Difficulty Level:
    Easy
  • Total Repair Time:
    15 - 30 mins
  • Tools:
    Nutdriver, Screw drivers, Socket set
7 of 10 people found this instruction helpful.
Was this instruction helpful to you?
Thank you for voting!
Ice crushing auger had come loose and cracked front panel and ice bucket
Reassembled auger assembly to new ice bucket with new screws. Fairly simple and straight forward.
Other Parts Used:
  • Trevor from Glendale, AZ
  • Difficulty Level:
    Really Easy
  • Total Repair Time:
    15 - 30 mins
  • Tools:
    Nutdriver
4 of 5 people found this instruction helpful.
Was this instruction helpful to you?
Thank you for voting!
The plastic rails broke on the original unit
Have to say it was a pleasure doing business with PartSelect. Purchased the icebin from Whirlpool and the entire backside of the bin broke off in less than 10 days. I called Whirlpool for warranty and they said it had been more than 30 days since the order was placed and it is only a 30 day warranty. I spoke to a supervisor and pleaded my case that I work out of town and only make it home every 2-3 weeks and it was only installed for 10 days. I further explained that the original unit lasted 10 years so I would think it would be pretty obvious that this was a defective product. She said sorry, only 30 day warranty, but she would offer a 25% discount if I wanted to reorder. I told her what I thought of their policy and offer and told her I would rather pay full price than any further support of their company.
The phone agent with PartSelect was friendly, professional and I received my new icebin in just a few days. I don't purchase many parts from the internet but I would bookmark this company for future reference.
Other Parts Used:
  • Jeff from Liberty Lake, WA
  • Difficulty Level:
    Really Easy
  • Total Repair Time:
    Less than 15 mins
  • Tools:
    Screw drivers
3 of 4 people found this instruction helpful.
Was this instruction helpful to you?
Thank you for voting!
Ice maker leaked
Very easy to replace. The hardest part was the removal of the power cable connector. Had to use a screwdriver to pry the connector from the unit;.
Took less than 10 min. to complete the repair.
Had ice cubes in less than 2 hrs.
Other Parts Used:
Replacement Ice Maker Light Bulb - 40W
  • Sheryl from San Diego, CA
  • Difficulty Level:
    Really Easy
  • Total Repair Time:
    Less than 15 mins
  • Tools:
    Nutdriver, Screw drivers
3 of 8 people found this instruction helpful.
Was this instruction helpful to you?
Thank you for voting!
Ice Maker Leaked / Ice Bucket Cracked
Took out the OLD Ice Bucket and removed the Ice Turning / Crusher bar by removing (5) screws and sliding the bar unit out and then replacing the bar unit into the NEW Ice Bucket Tray.

Unplugged the Frig removed the screws (3) holding the unit in place i then removed the Ice Maker from the freezer, i had to remove the Ice level arm from the OLD Ice Maker and installed it on the NEW Ice Maker with a push in setting on the left and then hooked the right side to lock in place.

I then replaced the Ice Maker by Plugging the unit in and replaced the (3)Screws, lined up the water supply line from the frezzer back wall into the Ice Maker and then replaced the new Ice Bucket.

Plugged the Frig back in for power and waited for the NEW unit to run making sure no leaks, after the NEW Ice Maker dumped several times i empty the Bucket and allowed the unit to fill up overnight.

Key is U can do this, just take ur time and the end results will be a COOL Job Well Done -

Hello Ice :}
Other Parts Used:
Replacement Ice Maker
  • Louis from Egg Harbor City, NJ
  • Difficulty Level:
    Really Easy
  • Total Repair Time:
    30 - 60 mins
  • Tools:
    Nutdriver
2 of 2 people found this instruction helpful.
Was this instruction helpful to you?
Thank you for voting!
Ice Auger Not Working
Removed two screws on original ice bucket auger front panel-removed old ice auger assembly from old ice bucket and installed new auger assembly in new ice basket.Replaced ice auger/bucket front panel with the two screws and we now have a working ice dispensing unit and uncracked ice bucket
Other Parts Used:
Ice Maker Auger and Crusher Blade Assembly
  • Robert from IndianHead Park, IL
  • Difficulty Level:
    Really Easy
  • Total Repair Time:
    Less than 15 mins
  • Tools:
    Socket set
2 of 3 people found this instruction helpful.
Was this instruction helpful to you?
Thank you for voting!
The ice bucket had split.
The hardest part was getting the unit out of the refrigerator because the split caused it to drop down when it filled with ice while we were on vacation. After the ice I had to give the bucket a firm jerk to remove it. Then it was just a matter of replacing the old bucket with the new one using a phillips screw driver.
Other Parts Used:
  • Earlon from Lufkin, TX
  • Difficulty Level:
    Really Easy
  • Total Repair Time:
    15 - 30 mins
  • Tools:
    Screw drivers
2 of 3 people found this instruction helpful.
Was this instruction helpful to you?
Thank you for voting!
Crushed ice bucket was damaged and needed to be replaced
I removed the damaged ice bucket and replaced the parts from the old one on to the new one. It was straight forward and not difficult
Other Parts Used:
  • Thomas from Tucson, AZ
  • Difficulty Level:
    Really Easy
  • Total Repair Time:
    15 - 30 mins
  • Tools:
    Nutdriver, Pliers, Screw drivers, Wrench (Adjustable)
1 of 2 people found this instruction helpful.
Was this instruction helpful to you?
Thank you for voting!
  • 1
  • 2
Questions and Answers

Be the first to ask our experts a question about this part!

Related Parts
Model Cross Reference
This part works with the following models:
PartSelect Number: PS11738205
Manufacturer Part Number: WP10111905
Brand
Model Number
Description
Amana
1999A
Refrigerator
Amana
1999A-P1193906WL
Refrigerator - SIDE BY SIDE REFRIGERATOR
Amana
1999W
Refrigerator
Amana
1999W-P1193906WW
Refrigerator - SIDE BY SIDE REFRIGERATOR
Amana
2599A
Refrigerator
Amana
2599A-P1190419WL
Refrigerator - SIDE BY SIDE REFRIGERATOR
Amana
2599W
Refrigerator
Amana
2599W-P1190419WW
Refrigerator - SIDE BY SIDE REFRIGERATOR
Amana
2699A
Refrigerator
Amana
2699W
Refrigerator
Litton
35271
Refrigerator
Amana
35271-P1121805W
Refrigerator - REFRIGERATOR
Amana
35271W-P1121805WW
Refrigerator - 20, 25, & 27 CUBIC FOOT SIDE BY SIDE ICE AND WATER
Litton
35278
Refrigerator
Amana
35278-P1121806W
Refrigerator - REFRIGERATOR
Amana
35278L-P1121806WL
Refrigerator - 20, 25, & 27 CUBIC FOOT SIDE BY SIDE ICE AND WATER
Litton
35501
Refrigerator
Amana
35501-P1121711W
Refrigerator - REFRIGERATOR
Amana
35501W-P1121711WW
Refrigerator - 20, 25, & 27 CUBIC FOOT SIDE BY SIDE ICE AND WATER
Litton
35508
Refrigerator
Amana
35508-P1121712W
Refrigerator - REFRIGERATOR
Amana
35508L-P1121712WL
Refrigerator - 20, 25, & 27 CUBIC FOOT SIDE BY SIDE ICE AND WATER
Litton
35541
Refrigerator
Amana
35541-P1121709W
Refrigerator - REFRIGERATOR
Amana
35541W-P1121709WW
Refrigerator - 20, 25, & 27 CUBIC FOOT SIDE BY SIDE ICE AND WATER
Litton
35548
Refrigerator
Amana
35548-P1121710W
Refrigerator - REFRIGERATOR
Amana
35548L-P1121710WL
Refrigerator - 20, 25, & 27 CUBIC FOOT SIDE BY SIDE ICE AND WATER
Litton
36051
Refrigerator
Amana
36051-P1122003W
Refrigerator - REFRIGERATOR
Customer Service Representative

Get in touch, we're here to help!

Daily 8am - 9pm EST

Contact Customer Service