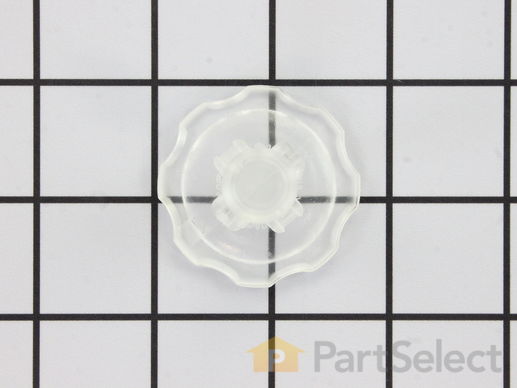
Part Location Diagram of WP3378134 Whirlpool Rinse Aid Cap
See part 13 in the diagram
Replacing your Whirlpool Dishwasher Rinse Aid Cap
( Grid squares measure 1x1 inch )
Customer Service Representative

Get in touch, we're here to help!

Monday to Saturday
8am - 9pm EST

customerservice@partselect.ca

Rinse Aid Cap

★★★★★
★★★★★
14 Reviews
$14.11
  In Stock

Get this part fast! Average delivery time for in-stock parts via standard shipping: 1.8 days.

PartSelect Number PS11741341
Manufacturer Part Number WP3378134
Manufactured by Whirlpool
Product Description

Rinse Aid Cap Specifications

This cap does not require the use of a o-ring seal.
How Buying OEM Parts Can Save You Time and Money

How Buying OEM Parts Can Save You Time and Money

Part Videos

Replacing your Whirlpool Dishwasher Rinse Aid Cap

Replacing your Whirlpool Dishwasher Rinse Aid Cap
Troubleshooting
This part fixes the following symptoms:
Will not dispense detergent | Not cleaning dishes properly | Leaking | Not drying dishes properly
This part works with the following products:
Dishwasher.
This part works with the following products:
Whirlpool, Kenmore, Roper, Estate.
Part# WP3378134 replaces these:
AP6008208, 3369155, 3369200, 3369512, 3378134
Back to Top
Customer Reviews
Average Rating:
★★★★★
★★★★★
14 Reviews
5.0
Filter By Rating:
  • 5 Stars
    14
  • 4 Stars
    0
  • 3 Stars
    0
  • 2 Stars
    0
  • 1 Star
    0
  • 1
  • 2
Sort by:
Sorry, we couldn't find any existing reviews that matched. Try using some different or simpler keywords.
  • 1
  • 2
Customer Repair Stories
 Average Repair Rating: 3.9 / 5.0, 10 reviews. What's this?
  • 1
Sort by:
Sorry, we couldn't find any existing installation instruction that matched.
Water dripped out from the bottom of door.
Diagnosing the problem, i.e. finding the source of the leak, was the hardest part. The best clue was the leak only occurred well into the cycle when the water was hot and steam was coming out the vent. I then assumed there was a bad seal and steam & condensed water was leaking down into the door. I replaced the vent duct & seal, a broken drip cover (an internal part in the door), and replaced a missing rinse aid cap. This stopped the leak.
Other Parts Used:
Vent Assembly (Includes Item 6 Dispenser Cover
  • Louis from Niceville, FL
  • Difficulty Level:
    A Bit Difficult
  • Total Repair Time:
    30 - 60 mins
  • Tools:
    Screw drivers
25 of 41 people found this instruction helpful.
Was this instruction helpful to you?
Thank you for voting!
soap lid missing
Replacing the pin with the spring is a little tricky, it was hard to hold it. And the little plastic pin breaks real easy too, its hard to get the lid to snap in place without breaking the pin.
Other Parts Used:
Wheel Assembly Spring, Lid Soap Dispenser Cover Pin (Lid Hinge)
  • Jim from Oktaha, OK
  • Difficulty Level:
    A Bit Difficult
  • Total Repair Time:
    15 - 30 mins
  • Tools:
    Screw drivers
8 of 25 people found this instruction helpful.
Was this instruction helpful to you?
Thank you for voting!
MY RINSE AID CAP WAS MISSING
I ORDERED THE PART THAT WAS EASY BUT WHILE THE MACHINE WAS USED FOR HOW LONG I DON'T KNOW WITH OUT THE CAP IT GOT FILLED WITH FOOD AND JUNK. FIRST THING I HAD TO DO WAS EXAMIN THE DOOR AS TO HOW I COULD CLEAN THIS THING OUT. I REMOVED 6 SCREWS THAT HELD THE DOOR TOGETHER AND PULLED EASY CAUSE I DIDN'T KNOW WHAT I WAS GETTING INTO. NO PROBLEM THERE WAS NO ELECTRIC PLUGS HOOKED TO THE DOOR. I TOOK IT OUT SIDE AND STARTED USING VINIGAR AND POURING IT INTO THE HOLE AND SHAKING THEN TRYING TO GET IT BACK OUT. WELL THERE IS ONLY ONE POSITION THAT WILL LET THE VINEGAR BACK OUT. I HAD TO HOLD IT SIDEWAYS THEN TILT FORWARD AND IT WOULD RUN OUT AND BRING SOME JUNK WITH IT. THIS WAS A TIME CONSUMING PROCESS BEING YOU COULD NOT SEE INSIDE TO KNOW HOW MUCH JUNK WAS IN THERE. JUST POUR AND DUMP. AND DON'T FOR GET TO SHAKE TO LOOSEN ANY THING LEFT INSIDE.LOL I WAS VERY PROUD OF MYSELF NOT KNOWING FOR SURE IF I FIXED IT OR NOT BUT I TOOK A SHOT I HAD. I DID SOME SCRUBBING AND DEGREASING ON THE UNDERSIDE OF THE BOTTOM OF THE DOOR BEFORE I REASSEMBLED IT. THAT WAS EASY AND I CROSSED MY FINGERS ANY WAY. I GOT OUT MY NEW PART AND THE JET DRY I BOUGHT AND STATED TO FILL THE DISPENSER AND IT TOOK HALF THE BOTTLE.YEA !!! I PUT THE CAP ON AND COULDN'T WAIT TO DO A LOAD OF DISHES. EVERY THING IS LOOKING GOOD NOW. THANK YOU PART SELECT FOR MAKING GETTING THE PARTS I NEEDED SO EASY AND SHOWING DIAGRAMS SO I HAD THE RIGHT PART. I COULDN'T HAVE DONE IT WITH OUT YOU.
Other Parts Used:
  • carol from BATESVILLE, IN
  • Difficulty Level:
    Easy
  • Total Repair Time:
    More than 2 hours
  • Tools:
    Screw drivers
3 of 3 people found this instruction helpful.
Was this instruction helpful to you?
Thank you for voting!
Cap was missing/lost.
Easy fix. It’s a screw on by hand piece.
Other Parts Used:
  • Jose from Coolidge, AZ
  • Difficulty Level:
    Very Easy
  • Total Repair Time:
    Less than 15 mins
2 of 2 people found this instruction helpful.
Was this instruction helpful to you?
Thank you for voting!
Cap did not stay in the hole any longer.....was melted
Just screwed the new cap in. This PartSelect was AWESOME. So easy. Lighting fast shipping !!!!
Other Parts Used:
  • Debra from York, PA
  • Difficulty Level:
    Really Easy
  • Total Repair Time:
    Less than 15 mins
2 of 6 people found this instruction helpful.
Was this instruction helpful to you?
Thank you for voting!
Upper spray arm mount cracked and rinse aid cap broke
Unlatch the rail clips on upper rack slides, slide rack off the rails. Flip rack upside down, use a philip screwdriver and remove screw that holds propeller to upper spray arm mount. Remove clamp of broken spray arm mount with philip screw driver. Replace with new upper spray arm mount (different design) and no tools needed. Just snap it in place where old one was. Put propeller over the spray arm mount and reuse screw with washer to tighten. Return rack back in the dishwasher and reattach the rail clips. For the rinse aid cap, the cap broke off. I used a nose plier to remove (unscrew) the remaining piece. Replace with new rinse aid cap. Dishwasher is running normal again.
Other Parts Used:
Upper Spray Arm Mount
  • Jeffrey from MEXICO, NY
  • Difficulty Level:
    Really Easy
  • Total Repair Time:
    Less than 15 mins
  • Tools:
    Screw drivers
1 person found this instruction helpful.
Was this instruction helpful to you?
Thank you for voting!
Lost the cap to the Rinse aid container in door
Ordered part, recieved part package, opened package, inserted screw cap rinse aid tank cover, twisted to close. Job completed. Time required about 15 seconds from opening package. Service was excellent and accurate. Thank you.
Other Parts Used:
  • Bruce W from WESTERLY, RI
  • Difficulty Level:
    Very Easy
  • Total Repair Time:
    Less than 15 mins
1 person found this instruction helpful.
Was this instruction helpful to you?
Thank you for voting!
The hose that connected to the middle spray arm was worn and had deteriorated
Easily installed the hose and replaced the middle spray arm with the help of my brother the savior! Lol. It was very easy for him to install.
Other Parts Used:
Middle Spray Arm Kit
  • Denise from BRONX, NY
  • Difficulty Level:
    Really Easy
  • Total Repair Time:
    30 - 60 mins
  • Tools:
    Screw drivers
1 person found this instruction helpful.
Was this instruction helpful to you?
Thank you for voting!
Wash arm retainer nut snapped in half
First I pulled the top half of the broken retainer nut out of the lower wash arm assembly. Then I took the was arm assembly off, removed the other half of the screw, set the lower spray arm seal into the lower wash arm assembly and screwed the wash arm retainer nut back in. As a bonus, I decided to replace the broken Wet agent cap. Had to use needle nose pliers to unscrew the broken bottom stuck in the well... That was the toughest part and it wasn't critical to the dishwasher functioning.
Other Parts Used:
Wash Arm Retainer Nut Lower Sprayarm Seal
  • Melissa from The Colony, TX
  • Difficulty Level:
    Really Easy
  • Total Repair Time:
    Less than 15 mins
  • Tools:
    Pliers
0 of 5 people found this instruction helpful.
Was this instruction helpful to you?
Thank you for voting!
Replaced broken/worn parts
Simple replacement
Other Parts Used:
Light Cover Lens Overflow Grille
  • Nicholas from Pleasanton, CA
  • Difficulty Level:
    Really Easy
  • Total Repair Time:
    Less than 15 mins
0 of 6 people found this instruction helpful.
Was this instruction helpful to you?
Thank you for voting!
  • 1
Questions and Answers

We're sorry, but our Q&A experts are temporarily unavailable.
Please check back later if you still haven't found the answer you need.

Related Parts
Model Cross Reference
This part works with the following models:
PartSelect Number: PS11741341
Manufacturer Part Number: WP3378134
Brand
Model Number
Description
Kenmore
110723120
Dishwasher
Kenmore
110773811
Dishwasher
Kenmore
110773812
Dishwasher
Kenmore
110773813
Dishwasher
Kenmore
110773881
Dishwasher
Kenmore
110773882
Dishwasher
Kenmore
110773883
Dishwasher
Kenmore
65715755791
Dishwasher - Kenmore Dishwasher Model 657.15755791 (65715755791, 657 15755791) Parts
Kenmore
66513402K900
Dishwasher
Kenmore
66513402K901
Dishwasher
Kenmore
66513409K900
Dishwasher
Kenmore
66513409K901
Dishwasher
Kenmore
66513442K900
Dishwasher
Kenmore
66513442K901
Dishwasher
Kenmore
66513443K900
Dishwasher
Kenmore
66513443K901
Dishwasher
Kenmore
66513444K900
Dishwasher
Kenmore
66513444K901
Dishwasher
Kenmore
66513449K900
Dishwasher
Kenmore
66513449K901
Dishwasher
Kenmore
66513492K600
Dishwasher
Kenmore
66513499K600
Dishwasher
Kenmore
66513592K600
Dishwasher
Kenmore
66513593K600
Dishwasher
Kenmore
66513594K600
Dishwasher
Kenmore
66513599K600
Dishwasher
Kenmore
66513692K600
Dishwasher
Kenmore
66513699K600
Dishwasher
Kenmore
66514212K900
Dishwasher
Kenmore
66514212K901
Dishwasher
Customer Service Representative

Get in touch, we're here to help!

Monday to Saturday
8am - 9pm EST

Contact Customer Service