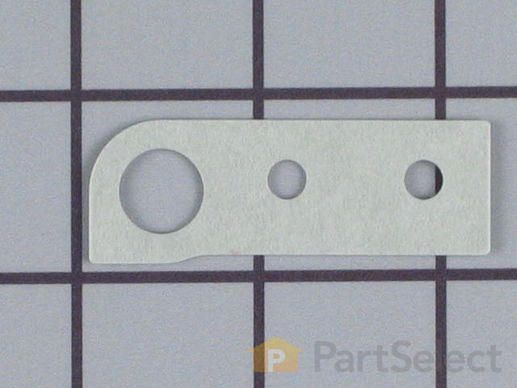
Part Location Diagram of WR2X7491 GE Door Hinge Shim
See part 17 in the diagram
Replacing your General Electric Refrigerator Door Hinge Shim
( Grid squares measure 1x1 inch )
Customer Service Representative

Get in touch, we're here to help!

Daily 8am - 9pm EST

customerservice@partselect.ca

Door Hinge Shim

$27.44
  Special Order
PartSelect Number PS298522
Manufacturer Part Number WR2X7491
Manufactured by GE
Product Description

Door Hinge Shim Specifications

This is the replacement door hinge shim, or riser cam shim for your refrigerator. It is made of metal and is approximately 2 inches in length, and 1 inch in width. Your refrigerator will have a door hinge shim on each door, and each shim is sold individually. The door hinge shim will have three holes in it; one larger hole, and two smaller ones. The door hinge shim is found on the bottom of your refrigerator door, and the main reason for replacing it is if it is torn or damaged. When you are completing this repair, the door will be briefly unsupported. As a result, it is recommended to remove everything from the door to make it as light as possible, and to ensure that the items in the door don’t fall out. This is an OEM part from the manufacturer.
How Buying OEM Parts Can Save You Time and Money

How Buying OEM Parts Can Save You Time and Money

Part Videos

Replacing your General Electric Refrigerator Door Hinge Shim

Replacing your General Electric Refrigerator Door Hinge Shim
Troubleshooting
This part fixes the following symptoms:
Door won’t open or close
This part works with the following products:
Refrigerator.
This part works with the following products:
General Electric, Kenmore, Hotpoint, RCA.
Part# WR2X7491 replaces these:
AP2059405, 297863, WR2X7491, SWR02X7491, SWR2X7491, WR02X7491, WR02X9147, WR2X9147
Back to Top
Customer Repair Stories
 Average Repair Rating: 4.0 / 5.0, 21 reviews. What's this?
  • 1
  • 2
  • 3
Sort by:
Sorry, we couldn't find any existing installation instruction that matched.
The refrigerator door side of the side-by-side refrigerator/freezer, bottom cams that auto close the door were broken.
First, I removed all items on the door shelves and the shelves themselves to reduce the weight of the door. Second, I removed the cover on the top hinge assembly and removed the two screws that secured that hinge. Third I lifted the door from the bottom hinge assembly and placed the door horizontal on the kitchen table to all easier access to the bottom of the door. I then removed two screws holding the door closing cam and shim and replaced them with the new parts. Next was to removed the old hinge assembly on the refrigerator itself and replace it with a new hinge assembly. All down hill from this point. Time to reinstall the door, aligning the bottom of the door cam over the hinge assembly and setting the door down on it making sure the door sets on the hinge assembly cams. To the top of the refrigerator. reinstalled the top door hinge assembly and cover, job complete. Total time from start to finish including cleaning the inside of the door and shelves about 30 minutes.

As for the replacing of the light lens in the freezer section. This was almost to easy. I removed the ice drawer from the freezer which exposed the one phillips screw that holds the lens in place. Removed the screw and what was left of the old lens, inserted the new lens from the underneath the ice drawer compartment and screw, replaced the ice drawer and, the task was complete. Total time about 5 minutes.
Other Parts Used:
Hinge Cam Riser Freezer Light Shield Bottom Hinge Assembly
  • Larry from Clinton, SC
  • Difficulty Level:
    Really Easy
  • Total Repair Time:
    15 - 30 mins
  • Tools:
    Screw drivers, Socket set
190 of 194 people found this instruction helpful.
Was this instruction helpful to you?
Thank you for voting!
Hinge at base of doors cracked and broke causing door to slip down when opened
Note difference between Freezer and Fresh food door.
Also, did not need the Door Stop but should have ordered one water tube union (PS299116). See Freezer below

Fresh Food Door
1. Removed cap at top of fresh food door (Philips screw) and used socket wrench to remove two hex head screws from top of refrigerator.
2. This allowed door to be lifted off base.
3. Removed door stop, hinge shim and broken cam riser from door using socket set and nut driver. Two hex head screws.
4. Replaced all three parts with new parts, re-attached using existing Hex Screws. Make sure cam riser is aligned properly to allow door to fit back on hinge. If it's slightly off, the door will not settle on hinge properly.
5. Replaced door, make sure it aligns properly before tightening Hex Screws to top of Refrigerator. Replaced cap at top.

Same process for freezer door except:
a. At the top of the door, I had an electrical connection due to Ice/water dispenser in the door. This connection is fairly easy to disconnect.
b. There is a drain tube that runs inside the door and through the hinge assembly in the base of the door. The door can not be removed unless the tube is disconnected or cut. There was a Water Tube Union (PS299116) just beyond the bottom hinge which I was able to disassemble to free the tube. However, this took considerable force and luck and I would recommend you consider buying a new part in case it breaks or you need to cut the tube. Otherwise you will not be able to get the door off. Once the tube is disconnected, it easily slides through the hinge and the door can be removed.
Other Parts Used:
Door Stop Hinge Cam Riser
  • James from Cromwell, CT
  • Difficulty Level:
    Easy
  • Total Repair Time:
    30 - 60 mins
  • Tools:
    Nutdriver, Pliers, Screw drivers, Socket set
12 of 12 people found this instruction helpful.
Was this instruction helpful to you?
Thank you for voting!
Fresh Food Door stop and hinge cam riser broke
I needed to replace the door hinge, the cam riser and the door stop. The first step was to jack up the door so the hinge could be replaced. After that it was just a matter of unscrewing the 2 screws holding the hinge and the two screws holding the door stop. Reassembly was easy after the cam riser was placed on the door hinge pin and the 4 screws reattached.

I did not need the door hinge shim and it has been returned for credit.
Other Parts Used:
Door Stop Cam Riser Bottom Hinge Pin and Cam Assembly
  • Edson from Houston, TX
  • Difficulty Level:
    Easy
  • Total Repair Time:
    30 - 60 mins
  • Tools:
    Socket set
11 of 13 people found this instruction helpful.
Was this instruction helpful to you?
Thank you for voting!
Refrigerator door wouldn't close automatically.
Removed the top hinge with a socket and lifted the door off. Removed the bottom hinge from the refrigerator with same sized socket. Used a Dermel to cut out the old rivet holding the old mangled cam. Attached the new cam with a screw, washers and nut. Reattached bottom hinge to the refrigerator. Removed the bracket holding the second cam on the bottom of the door. Replaced the shim and cam. Reinstalled the door. No problems. Just don't make the same mistake I made. You need two cams. They interlock and work together to close the door automatically. The cams are identical. They are just off set by 90 degrees when the door is closed.
Other Parts Used:
Door Closing Cam
  • Christopher from N. Merrick, NY
  • Difficulty Level:
    Really Easy
  • Total Repair Time:
    15 - 30 mins
  • Tools:
    Pliers, Screw drivers, Socket set
10 of 10 people found this instruction helpful.
Was this instruction helpful to you?
Thank you for voting!
Bottem assembly broken off causing door to make loud noice when opening or closing.
Shiimmed up the door unscrewed top and bottem hinges and replaced the bottem assembly. Note, if you do this replace the entire assembly because the hinge itself has a cam which is built into the hinge, therefore you must replace it also.
Other Parts Used:
Door Stop Hinge Cam Riser
  • Donald from Millersville, MD
  • Difficulty Level:
    Really Easy
  • Total Repair Time:
    Less than 15 mins
  • Tools:
    Nutdriver
5 of 8 people found this instruction helpful.
Was this instruction helpful to you?
Thank you for voting!
door hinge shims worn out
The PartSelect web site was able to direct me right to my GE double door frig using the model number. I called in to order the parts that were worn out with some operator assistance finding out all parts were available to my surprise. I received the parts in just a few days. I blocked the door up with some scrap lumber allowing me to take the old hinge off being careful to watch where the old parts were located. I reassembled the new hinge. It all took about 30 minutes and about $40. If I would have called a service repairman it would have easily cost me $100 and with a lot less satisfaction. This is the second time I have used PartSelect with similar results.
Other Parts Used:
Door Shim Cam Bottom Hinge Assembly
  • George from Harrisburg, PA
  • Difficulty Level:
    Easy
  • Total Repair Time:
    15 - 30 mins
  • Tools:
    Socket set
3 of 4 people found this instruction helpful.
Was this instruction helpful to you?
Thank you for voting!
Door was not properly closing
Note: I was not aware that the Cam Riser came with the Hinge Assembly, and did not need the part.

1)Removed all food from right refridge door, then removed all shelves etc.
2)Removed phillips screw holding protective plastic cap on upper hinge, then removed cap.
3)Removed upper hinge using socket (to loosen and tighten) and nut driver, then removed door.
4)Removed Old hinge assembly, replaced with new using socket and nut driver
5)Removed Old Door Shim Cam & Door Hinge Shim from bottom of Door, then replaced with new parts.
6)Re-Installed Door, adjusting the top hinge for door to close properly, then put shelved and food back.
Other Parts Used:
Door Stop Shim Cam Bottom Hinge Assembly Hinge Cam Riser
  • Kevin from Northbridge, MA
  • Difficulty Level:
    Easy
  • Total Repair Time:
    15 - 30 mins
  • Tools:
    Nutdriver, Screw drivers, Socket set
3 of 5 people found this instruction helpful.
Was this instruction helpful to you?
Thank you for voting!
Door would not close all of the way
I don't know exact details. My husband replaced parts while I held the door.

We removed connections for the door on the bottom (propped up on books). We installed the new cam, the old one cracked and broke, and the new shim and the door is now even with the top of the fridge. It was not before, and the seal near the bottom of the fridge was not solid. Now it is. It was very easy.
Other Parts Used:
Door Closing Cam
  • Traci from Erie, PA
  • Difficulty Level:
    Really Easy
  • Total Repair Time:
    15 - 30 mins
  • Tools:
    Wrench set
2 of 2 people found this instruction helpful.
Was this instruction helpful to you?
Thank you for voting!
Refrigerator Door Would Not Close
Kenmore 24 cu.ft. Side by Side Refrigerator. The bottom cam on the fresh food side of our refrigerator broke causing the door to stay open about 4 inches. We had to lift the door up about an inch to close it. We removed the top bracket cover by removing one screw with a screwdriver. We then removed two screws with a ratchet and socket, to remove the top bracket, which allowed us to lift the door up and off of the refrigerator. We removed two screws with a socket to remove the Door Cam and Shim. We replace the Shim, and Door Cam with the two screws. Make sure you line the Cam up with the hole it goes over, and tighten it up. Place the door over the bottom bracket, and replace and adjust the top bracket and cover.
Other Parts Used:
Door Closing Cam
  • Curtis from BELLEVILLE, IL
  • Difficulty Level:
    Easy
  • Total Repair Time:
    30 - 60 mins
  • Tools:
    Screw drivers, Socket set
2 of 2 people found this instruction helpful.
Was this instruction helpful to you?
Thank you for voting!
Doors would not self close
Ordered the parts from the parts braekdown on partselect on Thursday, received the parts on Monday and installed them Monday nite.
Removed the top hinge, then lifted the door off. replaced the shim and closing cam ,then put the door back on.
Other Parts Used:
Door Closing Cam
  • William from Apollo Beach, FL
  • Difficulty Level:
    Easy
  • Total Repair Time:
    30 - 60 mins
  • Tools:
    Nutdriver, Screw drivers
1 person found this instruction helpful.
Was this instruction helpful to you?
Thank you for voting!
  • 1
  • 2
  • 3
Questions and Answers

Be the first to ask our experts a question about this part!

Related Parts
Model Cross Reference
This part works with the following models:
PartSelect Number: PS298522
Manufacturer Part Number: WR2X7491
Brand
Model Number
Description
Kenmore
36348042894
Refrigerator
Kenmore
36348042896
Refrigerator
Kenmore
36348042897
Refrigerator
Kenmore
36348047894
Refrigerator
Kenmore
36348047896
Refrigerator
Kenmore
36348047897
Refrigerator
Kenmore
36348252894
Refrigerator
Kenmore
36348252896
Refrigerator
Kenmore
36348252897
Refrigerator
Kenmore
36348257894
Refrigerator
Kenmore
36348257896
Refrigerator
Kenmore
36348257897
Refrigerator
Kenmore
36350221000
Refrigerator
Kenmore
36350222000
Refrigerator
Kenmore
36350227000
Refrigerator
Kenmore
36350232000
Refrigerator
Kenmore
36350237000
Refrigerator
Kenmore
36350242000
Refrigerator
Kenmore
36350247000
Refrigerator
Kenmore
36350622000
Refrigerator
Kenmore
36350627000
Refrigerator
Kenmore
36357552790
Refrigerator
Kenmore
36357552791
Refrigerator
Kenmore
36357557790
Refrigerator
Kenmore
36357557791
Refrigerator
Kenmore
36358042894
Refrigerator
Kenmore
36358042896
Refrigerator
Kenmore
36358042897
Refrigerator
Kenmore
36358047894
Refrigerator
Kenmore
36358047896
Refrigerator
Customer Service Representative

Get in touch, we're here to help!

Daily 8am - 9pm EST

Contact Customer Service