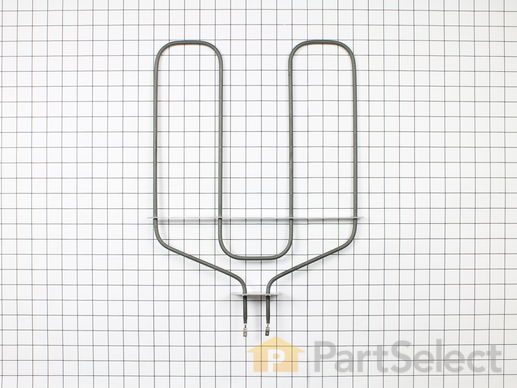
Broil Element - 240V
$117.12
Special Order


Get this part fast! Average delivery time for in-stock parts via standard shipping: 1.8 days.


PartSelect Number PS249236
Manufacturer Part Number WB44K10002
Manufactured by
GE
Product Description
Broil Element - 240V Specifications
This broil element is found on the roof of the oven.

How Buying OEM Parts Can Save You Time and Money
Troubleshooting
This part fixes the following symptoms:
Little to no heat when broiling | Element will not heat | Oven not heating evenly
This part works with the following products:
Range.
This part works with the following products:
General Electric, Hotpoint, Kenmore.
Part# WB44K10002 replaces these:
AP2030962, 876000, WB44K10002
Questions and Answers
Ask our experts a question about this part and we'll get back to you as soon as possible!
Search filter:
Clear Filter
Your search term must have 3 or more characters.
Keep searches simple. Use keywords, e.g. "leaking", "pump", "broken" or "fit".
Sorry, we couldn't find any existing answers that matched.Try using some different or simpler keywords, or submit your new question by using the "Ask a Question" button above!
Larry
July 9, 2021
How do I order the boiler holder that keeps the boiler from falling down
For model number RB787WHW

Hello Larry, Thank you for contacting us. We have researched the model you have provided and have found the part you are looking for is PartSelect Number PS223060. We hope this helps!
Was this helpful?
Thank you for voting!
Related Parts:
✖
Ask a Question
Ask our experts a question on this part and we'll respond as soon as we can.
Something went wrong. Please try again later.
Your Question Has Been Submitted!
Our experts will send you an email as soon as your question has been answered.
Part Videos
Replacing your General Electric Range Broil Element - 240V

Customer Repair Stories
Average Repair Rating: 3.4 / 5.0, 11 reviews.
What's this?
Search filter:
Clear Filter
Your search term must have 3 or more characters.
Keep searches simple. Use keywords, e.g. "leaking", "pump", "broken" or "fit".
Sorry, we couldn't find any existing installation instruction that matched.
Broiler burnt out.
Removed screws using nut driver. Pulled element way forward until wires came through. Pondered how to detach burned out element from wires. Chickened out, call neighbor who grasped things firmly with two hands and pulled. Old element came loose. Popped in new element. Cursed the screws that wouldn't align with holes to support element; finally did it. Screwed element plate in place. Put oven door back on, plugged it in and turned it on hoping that we hadn't reversed the wires. Job accomplished.
Other Parts Used:
-
ellen from centennial, CO
-
Difficulty Level:Easy
-
Total Repair Time:15 - 30 mins
-
Tools:Nutdriver
18 of 21 people
found this instruction helpful.
Was this instruction helpful to you?
Thank you for voting!
Broiler element was burned out
After turning the power off to the range, it was as simple as removing the screws for the broiler itself and the bracket and plugging in the new element. Yes, it was that easy.
Other Parts Used:
-
Ursula from Suffolk, VA
-
Difficulty Level:Really Easy
-
Total Repair Time:Less than 15 mins
-
Tools:Nutdriver
10 of 10 people
found this instruction helpful.
Was this instruction helpful to you?
Thank you for voting!
Broiler Element Wouldn't Heat
The broiler uses two male slip-on connectors that attach to two wires with female connectors in the stove. When removing the broiler element, I discovered that one of the two wires was burned in half specifically where the wire crimped to the female connector. This is abnormal and raised some concern. However, I deduced that the terminal crimp from the factory must have been defective and the wire nicked or cut in order to produce enough heat at that point for the wire to burn and fail. The female crimp terminal is a special, solid right angle design that I was unable to locate locally even at an electrical wholesale distributor. A straight terminal connector was used and crimped after stripping a new section of the wire. Heat will melt solder. You must use a high quality crimp connector and tool. The connector was then very carefully angled down slightly to maintain a safe distance from the back shield of the stove to the wire when in place. The new broiler works fine. There was likely nothing wrong with the old one. Just a wiring issue.
Other Parts Used:
-
Ranse from Layton, UT
-
Difficulty Level:A Bit Difficult
-
Total Repair Time:More than 2 hours
-
Tools:Nutdriver, Pliers
10 of 11 people
found this instruction helpful.
Was this instruction helpful to you?
Thank you for voting!
The broiler element wouldn't work.
After I ordered a new element unit, I read the "do it yourself" review on the page. I took the back off of the range and found the broken wire. I found that I had the same problem with the wiring, and that maybe the element was not the problem. I went to Lowe's and purchased a female spade connector, because no one would sell me one through the parts department. All I did was cut off the wire at the end of the burned section, stripped back about 1/2 inch of the wire and put on the new spade connector. I took off the origonal connector/crimp, and slipped on the new one. (You do have to make sure that the wiring doesn't touch the range back) The element was not the problem, so the origonal one still works fine. I may keep the element I ordered, just to have it if this one goes out. I didn't even need to remove the screws from the element inside the oven. It can all be done from the back of the range.
Other Parts Used:
-
Lajuanna from O'Fallon, IL
-
Difficulty Level:Easy
-
Total Repair Time:30 - 60 mins
-
Tools:Nutdriver, Pliers
5 of 6 people
found this instruction helpful.
Was this instruction helpful to you?
Thank you for voting!
change broiler element
removed 2 1/4in. drill screws holding broiler element to oven removed 2 1/4in.drill screws holding broiler element to top of oven removed female spade connectors ffom old element and reversed assembley very easy
Other Parts Used:
-
lee from bethel, CT
-
Difficulty Level:Really Easy
-
Total Repair Time:Less than 15 mins
-
Tools:Nutdriver
4 of 5 people
found this instruction helpful.
Was this instruction helpful to you?
Thank you for voting!
Broiler not working
Turned off electricity. Removed two screws that held the element in back of oven. Removed the two screws that held it up to top of oven. Disconnected the two wires that held it in the rear of the oven. Removed it from the top support. Replaced the old element with the new in the support. plugged it it, replaced all four screws. Turned on the electricity and turned on the oven-it worked!
Other Parts Used:
-
Teresa M from denver, CO
-
Difficulty Level:Really Easy
-
Total Repair Time:15 - 30 mins
-
Tools:Nutdriver
4 of 6 people
found this instruction helpful.
Was this instruction helpful to you?
Thank you for voting!
burned out broiler element
Don't forget to unplug and/or turn off the main breaker!
Other Parts Used:
-
Amanda from Thornton, CO
-
Difficulty Level:A Bit Difficult
-
Total Repair Time:Less than 15 mins
-
Tools:Screw drivers
3 of 4 people
found this instruction helpful.
Was this instruction helpful to you?
Thank you for voting!
Broiler element was sparking
I removed oven door so i could reach easier. Then removed screws from Broiler element at the back of the oven. Pulled off connected wires. Slid wire connectors on new element and screwed bracket in.
Other Parts Used:
-
jeff from NEENAH, WI
-
Difficulty Level:Very Easy
-
Total Repair Time:Less than 15 mins
-
Tools:Nutdriver
2 of 2 people
found this instruction helpful.
Was this instruction helpful to you?
Thank you for voting!
When I took out the baking element, the wires went up inside because they were so short, I got a hold of one of them but couldn't get a hold of the other.
Had to pull out the refrigerator and put it in the dining room in order to pull out the stove to be able to get to the back of it. Had to take off the back of the stove to get to the wiring for the baking element, so at that point I replaced the broil element at the same time. Not a easy job at all.
Other Parts Used:
-
Daniel from SPRINGFIELD, OR
-
Difficulty Level:Very Difficult
-
Total Repair Time:More than 2 hours
-
Tools:Screw drivers, Socket set
1 person
found this instruction helpful.
Was this instruction helpful to you?
Thank you for voting!
broiler unit went out
less then ten minutes, used a electric screw driver and in a snap, finished, I always buy my parts on line at parts select my stove is old but in good condition except parts give out sometimes and I just order part and keep on cooking.
Other Parts Used:
-
helen from PRINCETON, NC
-
Difficulty Level:Really Easy
-
Total Repair Time:Less than 15 mins
1 person
found this instruction helpful.
Was this instruction helpful to you?
Thank you for voting!
Customer Reviews
Filter By Rating:
Search filter:
Clear Filter
Your search term must have 3 or more characters.
Keep searches simple. Use keywords, e.g. "leaking", "pump", "broken" or "fit".
Sorry, we couldn't find any existing reviews that matched. Try using some different or simpler keywords.
Catherine K - May 18, 2021

Easy repair. Service was excellent!
The part arrived quickly and was easy to install. Range is working perfectly again. Thank you.
Jasbir U - January 2, 2021

Broil Element
Excellent and efficient service. It worked fine.
Peter S - March 4, 2020

Easy repair
The part was in good condition and arrived promptly.
Rose C - January 29, 2019

easy oven broiler replacement
Great part - perfect fit -works well. Difficult to connect wires from inside the oven - very easy when you take the back of the stove off. Easy to take off and easy to reinstall. All told - took me about 25 minutes. Rose Collette, Minto, NB
Related Parts
Model Cross Reference
This part works with the following models:
PartSelect Number: PS249236
Manufacturer Part Number: WB44K10002
Brand
Model Number
Description