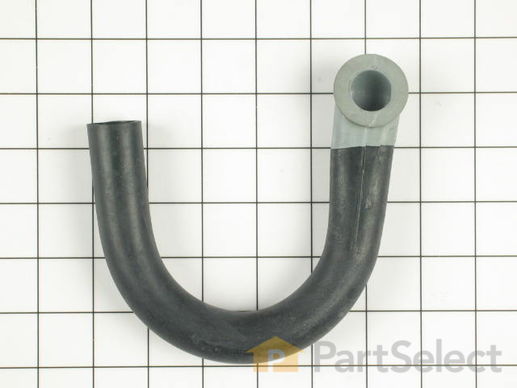
Injector Hose Seal
$69.96
In Stock


Get this part fast! Average delivery time for in-stock parts via standard shipping: 1.8 days.
PartSelect Number PS2017271
Manufacturer Part Number 206154
Manufactured by
Whirlpool
Product Description
Injector Hose Seal Specifications
This Injector hose seal is sold individually. The injector hose is no longer available.

How Buying OEM Parts Can Save You Time and Money
Troubleshooting
This part fixes the following symptoms:
Leaking
This part works with the following products:
Washer.
This part works with the following products:
Maytag, Jenn-Air.
Part# 206154 replaces these:
AP4023914, 435487, 2-11599, 2-13055, 2-2472, 2-6154, 202472, 206154, 211599, 213055, 80-055, J28-605
Questions and Answers
Be the first to ask our experts a question about this part!
✖
Ask a Question
Ask our experts a question on this part and we'll respond as soon as we can.
Something went wrong. Please try again later.
Your Question Has Been Submitted!
Our experts will send you an email as soon as your question has been answered.
Customer Repair Stories
Average Repair Rating: 3.1 / 5.0, 13 reviews.
What's this?
Search filter:
Clear Filter
Your search term must have 3 or more characters.
Keep searches simple. Use keywords, e.g. "leaking", "pump", "broken" or "fit".
Sorry, we couldn't find any existing installation instruction that matched.
Injector hose rotted from age
Removed the two Phillips screws from the bottom of the front panel on the washer. I pulled the front panel, from the bottom, outward untill the two spring clips released that attach the front panel to the washer top/lid assembly. Removed the two 3/8" hex head bolts securing the washer top to the side panels, with a nut driver. These are located just inside the side panels in each upper corner. Tilted the washer top / lid assembly back in order to expose the injector hose and top of tub. With 1/4 " nut driver, I loosened and removed the hose clamp around the nozzle body and the injector hose. Installed the new hose on the nozzle body , re-tightened clamp. Inserted the grooved end of the injector hose into hole on top of tub. Ran washer fill to check for leaks. None found, reassembled washer in reverse of disassembly.
Other Parts Used:
-
Hal from Salisbury, MD
-
Difficulty Level:Really Easy
-
Total Repair Time:15 - 30 mins
-
Tools:Nutdriver, Screw drivers
31 of 33 people
found this instruction helpful.
Was this instruction helpful to you?
Thank you for voting!
The hot water intake valve did not function
This clothes washer is 35 years old and runs like a champ. I did notice a bit of water below the left rear and assumed that a hose was leaking. I let it go for about 6 months, until I could fit it into the "to-do" list. During that time, the hot/cold water intake valve died. I ordered the replacement hot/cold valve a month ago but noticed, upon removal of the valve, that there was significant water drip evidence around the electrical valve solenoids. The water drips caused the valve to die. Drips came from a clogged injector hose air break directly above the valve. Replaced all hoses and water level vacuum air line. Very easy process. The front drops off with two screws. The lid is off with two screws. All hoses easy to R/R. It took about 2 hours to complete. All replacement parts were perfect. My belts are fine so I'm ready for another 30 years of service.
Other Parts Used:
-
Paul from Huntington Beach, CA
-
Difficulty Level:Really Easy
-
Total Repair Time:More than 2 hours
-
Tools:Nutdriver, Pliers, Screw drivers, Socket set, Wrench set
17 of 20 people
found this instruction helpful.
Was this instruction helpful to you?
Thank you for voting!
Washer was leaking water from top left back of tub
I opened the front of cabinet (2 philips screws at bottom corner with short screwdriver. Then took out 2 cap screws that hold top on with a 3/8" deep socket and ratchet. Once in, I removed the 3 hose clamps that hold the injector and hose in place and removed both pieces. I put the injector together and put it in and clamped it back in. I put the the seal on the tub end of the hose and installed it in the tub, then clamped the other end again. I ordered the seal separate but I wouldn't have had to since one was included with the injector hose. I reused my old hose clamps since they were in good shape. With that I closed up in reverse order. I could have gotten the parts cheaper from another online souce that I found later. Other than that, PartSelect worked great.
Other Parts Used:
-
John from Stayton, OR
-
Difficulty Level:Really Easy
-
Total Repair Time:15 - 30 mins
-
Tools:Nutdriver, Screw drivers, Socket set
14 of 15 people
found this instruction helpful.
Was this instruction helpful to you?
Thank you for voting!
Water leak during fill cycle
Found the 35 year old Water injector hose was dry, brittle, and cracked. Found the new part online at a reasonable price, but was unsure if the seal came with it or not. At $3 it was worth the gamble to buy the seal. Turns out that it did come with it so in another 35 years, I'll be ready ;-) Simple replacement of the hose, one hose clamp and fitting the lip of the new seal into the hole in the top of the tub. Access was gained quickly by removing the front panel (2 phillips screws) then removing 2 sheet metal screws in the front top corners and swinging the hinged top upwards. Piece of cake.
Other Parts Used:
-
Mark from Clinton, NC
-
Difficulty Level:Really Easy
-
Total Repair Time:15 - 30 mins
-
Tools:Screw drivers, Socket set
4 of 4 people
found this instruction helpful.
Was this instruction helpful to you?
Thank you for voting!
Water leaked when the washer tub filled.
I removed two screws near the bottom of the front panel and removed the panel by pulling the bottom away from the machine. Inside, I removed two cap screws, one under each front corner of the top panel. The top panel is hinged at the rear. I lifted the top panel from the front, rotated it to the rear and leaned it against the wall behind the machine. It was not necessary to disconnect any wiring. The "U" shaped water injector hose connects to the washer water source with a hose clamp and has a grommet-like end that fits in a round hole in the top of the tub. The hose had cracked and was leaking where it connected to the tub. The new injector hose was a direct replacement and was easy to install.
Other Parts Used:
-
Michael from Wauwatosa, WI
-
Difficulty Level:Easy
-
Total Repair Time:15 - 30 mins
-
Tools:Screw drivers, Socket set
2 of 2 people
found this instruction helpful.
Was this instruction helpful to you?
Thank you for voting!
water leaking
opened washer removed old damaged part and replaced with new part, losen brackets from hose inlet, removed hose, then fit new hose into tub groves can be very frustrating take your time and be patient, once you get it on, fit over inlet, tighten brackets make sure that seal is secure by turning on the water to fill if no leak the job is done run thru complete cycle to test. Thanks
Other Parts Used:
-
Stacey from Philadelphia, PA
-
Difficulty Level:Easy
-
Total Repair Time:30 - 60 mins
-
Tools:Pliers, Screw drivers
2 of 2 people
found this instruction helpful.
Was this instruction helpful to you?
Thank you for voting!
Leak due to torn hose
Loosen one hose clamp, slide old hose off fitting, disconnect hose from washer tub. Apply liquid soap to both ends of new hose to make it easy to slip onto the fitting and the tub. Slip hose clamp on one end, fit other end to washer tub, slip hose onto fitting, tighten clamp.
Other Parts Used:
-
Dean from Lynnwood, WA
-
Difficulty Level:Really Easy
-
Total Repair Time:Less than 15 mins
-
Tools:Screw drivers, Socket set
2 of 2 people
found this instruction helpful.
Was this instruction helpful to you?
Thank you for voting!
Water Leak
This new injector hose was much better than the original part which was plastic and had cracked with age and flexing the now one is rubber and should last a long time. The part, although it wasn't clear, came with the seal.
The only trick to installing it that I came across was with the hose clamp. I could not get the clamp over the hose once in place so the trick was to get the clamp in proper position on the hose and the put the hose over its barb (it will go with some careful "fenagleing"), you can't get the hose clamp to move after you put the hose on.
Other Parts Used:
-
William from Gladstone, VA
-
Difficulty Level:Easy
-
Total Repair Time:30 - 60 mins
-
Tools:Nutdriver, Screw drivers
2 of 3 people
found this instruction helpful.
Was this instruction helpful to you?
Thank you for voting!
Bad injector tube
Could not complete because sent the wrong part (just a seal instead of the tube) several times, in spite of talking on the phone for hours. Eventually gave up and ordered from another company.
Other Parts Used:
-
Corey from Mehoopany, PA
-
Difficulty Level:Very Difficult
-
Total Repair Time:More than 2 hours
1 person
found this instruction helpful.
Was this instruction helpful to you?
Thank you for voting!
Washer leaked during fill
Remove 2 screws from bottom of front panel, swing panel out and lift off. Remove 2 hex head screws from inside front corners. Lift top to expose injector in left rear corner. Remove clamp, remove injector from air break box then use screwdriver to pry the lip back through the hole in the tub. Carefully squeeze the lip of injector through the tub hole. Silicone grease or liquid detergent may help. Then reattach the injector to air break box and reassemble washer.
Other Parts Used:
-
Gerald from BRIDGEPORT, WV
-
Difficulty Level:Easy
-
Total Repair Time:30 - 60 mins
-
Tools:Nutdriver, Screw drivers, Socket set
1 person
found this instruction helpful.
Was this instruction helpful to you?
Thank you for voting!
Customer Reviews
Filter By Rating:
Search filter:
Clear Filter
Your search term must have 3 or more characters.
Keep searches simple. Use keywords, e.g. "leaking", "pump", "broken" or "fit".
Sorry, we couldn't find any existing reviews that matched. Try using some different or simpler keywords.
Gail M - May 13, 2019

Tune for washer
The part was exactly what we needed and works great !
John I - April 15, 2019

Solved The Issue
Courteous staff assisted in ensuring this is what we were looking for to correct our problem. Part arrived quicker than anticipated and proved to be just what we needed.
Related Parts
Model Cross Reference
This part works with the following models:
PartSelect Number: PS2017271
Manufacturer Part Number: 206154
Brand
Model Number
Description