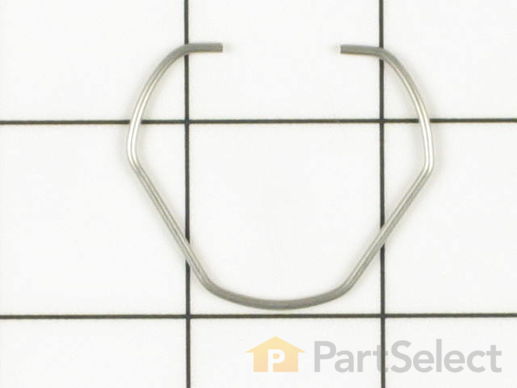
Retaining Ring
$12.54
Special Order
PartSelect Number
PS11757441
Manufacturer Part Number
WPY015667
Manufactured by
Whirlpool
Troubleshooting
This part fixes the following symptoms:
Leaking
This part works with the following products:
Washer, Washer Dryer Combo.
This part works with the following products:
Maytag, International, Jenn-Air.
Part# WPY015667 replaces these:
015667, 15667, Y015667
Customer Repair Stories
Average Repair Rating: 2.6 / 5.0, 3 reviews.
What's this?
- < Prev
- 1
- Next >
Sort by:
Search filter:
Clear Filter
Your search term must have 3 or more characters.
Keep searches simple. Use keywords, e.g. "leaking", "pump", "broken" or "fit".
Sorry, we couldn't find any existing installation instruction that matched.
Washer Leaking and Spin Cycle stopping frequenly
* Remove front Panel
* Remeove two screws that allow the top to hing up.
* Loosen set screw on agitator (1/4" socket)
* Remove Agitator
*Loosen spanner nut from mounting seal with hammer and punch remember to loosen, turn clockwise
* Remove Inner Tub
* Losen Mounting stem with Hammer and Punch- Remember to loosen, turn clockwise
* Remove Boot seal with hands
* Remove bolts from the three brackets that attach to the outer tub
* Remove Outer Tub hoses
* Remove outer Tub. CAREFUL, I cut my hands on sheet metal when outer tub broke free and came up
* Knock Outer tub bearing out with large block of wood
* Cut bearing sleeve off of the transmission with a drimmel tool and cutting wheel. It was siezed on and would not turn off. Also, first tried to chisel , but was too difficult
* Cleaned area where bearing sleeve came off with fine sandpaper
* Put small amount of non-permanent thread lock on transmission (bearing area) before installing the new bearing sleeve because the sleeve is not pressed on and I did not want it to turn freely
* I did not but new bolts for the outer tub 3 brackets, but noticed that they needed to be sealed. So I bought some rubber washers at hardware store
* I also used some stuff called CLR to clean some rust off of the outside of the INNER tank
* I replaced the O-ring on the top of the agitator shaft
Also, on the agitator shaft: To really do it right, I probably should have changed the agitator shaft because the old seal wore grooves into the shaft. I took my chances and cleaned it up with some fine metal sandpaper. I could not get the worn grooves completely smooth, but did not want to take off more material as I thought it may cause a leak. We'll see
* I just used a hammer and punch to retighten the mounting stem and Spanner nut. REMEMBER COUNTER CLOCKWISE TO TIGHTEN
* This was not too bad if you are somewhat mechanically inclined. I could have got a new washer, but quite frankly, I get more satisfaction from seeing the old one keep working
* One last thing...and this is mostly for the younger guys cause the older guys already know it. CLEAN EVERYTHING on the washer...make it look like NEW and tell your wife how much you saved. Make sure you have the parts and tools to do the job within a timeframe that you do not have to go to the laundry mat and do not leave a big mess. This advice will definately pay off.
GOOD LUCK
Other Parts Used:
-
Dan from Mason, OH
-
Difficulty Level:A Bit Difficult
-
Total Repair Time:More than 2 hours
-
Tools:Pliers, Screw drivers, Socket set, Wrench set
209 of 222 people
found this instruction helpful.
Was this instruction helpful to you?
Thank you for voting!
Agitator shaft and agitator came up and leaked water
lifted washer top, removed front panel, took punch and hammer to loosen collar (right to loosen- left to tighten) removed tub replaced seals and o-ring. then replaced the nylon retaining ring then reassembled. all works well now no leaks. Easy fix saved $500.00
Other Parts Used:
-
Johnny from Cedarburg, WI
-
Difficulty Level:Really Easy
-
Total Repair Time:1- 2 hours
-
Tools:Screw drivers, Wrench set
18 of 26 people
found this instruction helpful.
Was this instruction helpful to you?
Thank you for voting!
Leaking water from bottom
I followed Dan from Mason OHIO instructions.They were perfect. I have a different series washer so I did not need the washer and retaining ring. I used 2 lengths of 4x4 to support the tub when smacking the bearing with the narrow side of a 2x4 to drive it out. You hit it from the inside of the tub. When installing the new one, use the wide side of the 2x4 to drive it flush.
Other Parts Used:
-
Tim from Diamond, MO
-
Difficulty Level:Easy
-
Total Repair Time:1- 2 hours
-
Tools:Nutdriver, Pliers, Screw drivers, Socket set, Wrench (Adjustable)
7 of 9 people
found this instruction helpful.
Was this instruction helpful to you?
Thank you for voting!
- < Prev
- 1
- Next >
Questions and Answers
We're sorry, but our Q&A experts are temporarily unavailable.
Please check back later if you still haven't found the answer you need.
- < Prev
- 1
- Next >
Sort by:
Search filter:
Clear Filter
Your search term must have 3 or more characters.
Keep searches simple. Use keywords, e.g. "leaking", "pump", "broken" or "fit".
Sorry, we couldn't find any existing answers that matched.Try using some different or simpler keywords, or submit your new question by using the "Ask a Question" button above!
Terry
August 12, 2019
How is the retaining ring installed on the drive shaft to hold the retaining washer in place? What keeps it in place? Thank you
For model number A612
Hi Terry, thank you for your question. There should be holes on your shaft that this part slips into to hold everything in place. There is another part above this that holds the whole assembly of parts together. Good luck with your repair.
Was this helpful?
Thank you for voting!
- < Prev
- 1
- Next >
Related Parts
Model Cross Reference
This part works with the following models:
PartSelect Number: PS11757441
Manufacturer Part Number: WPY015667
Brand
Model Number
Description