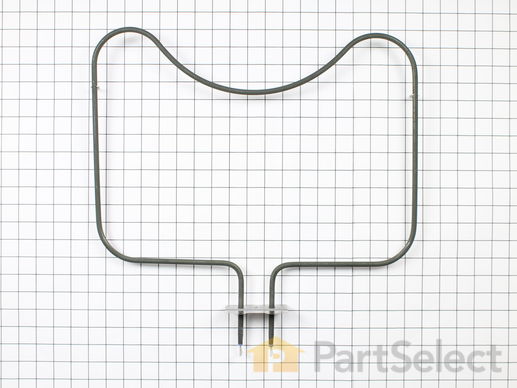
Part Location Diagram of WP7406P272-60 Whirlpool Bake Element
See part 1 in the diagram
( Grid squares measure 1x1 inch )
Customer Service Representative

Get in touch, we're here to help!

Daily 8am - 9pm EST

customerservice@partselect.ca

Bake Element

 Fits your CWE6800ACE!
★★★★★
★★★★★
1 Review
$159.94
  In Stock

Get this part fast! Average delivery time for in-stock parts via standard shipping: 1.8 days.

 Fits your CWE6800ACE!
PartSelect Number PS11744515
Manufacturer Part Number WP7406P272-60
Manufactured by Whirlpool
Product Description

Bake Element Specifications

This bake element is found on the bottom of the oven.
How Buying OEM Parts Can Save You Time and Money

How Buying OEM Parts Can Save You Time and Money

Troubleshooting
This part fixes the following symptoms:
Little to no heat when baking | Element will not heat | Oven not heating evenly
This part works with the following products:
Wall Oven, Microwave Oven Combo.
This part works with the following products:
Jenn-Air, Maytag, Magic Chef.
Part# WP7406P272-60 replaces these:
AP6011319, 71001636, 7406P272-60, W10314692
Back to Top
Customer Reviews
Average Rating:
★★★★★
★★★★★
1 Review
5.0
Filter By Rating:
  • 5 Stars
    1
  • 4 Stars
    0
  • 3 Stars
    0
  • 2 Stars
    0
  • 1 Star
    0
  • 1
Sort by:
Sorry, we couldn't find any existing reviews that matched. Try using some different or simpler keywords.
  • 1
Customer Repair Stories
 Average Repair Rating: 4.7 / 5.0, 15 reviews. What's this?
  • 1
  • 2
Sort by:
Sorry, we couldn't find any existing installation instruction that matched.
baking element burnt out
It was so easy....a cave man could do it.

Power off to oven, 2 screws, swapped the elements, 2 screws back in. Keep the original screws. The only delay we had was the right screw was a little hard to "start".
Once we had it tightened up, we turned the breaker back on and wah la....we had our oven back!

Shipping was much faster than expected!
Other Parts Used:
  • Kathy from Powder Springs, GA
  • Difficulty Level:
    Really Easy
  • Total Repair Time:
    Less than 15 mins
  • Tools:
    Screw drivers
21 of 23 people found this instruction helpful.
Was this instruction helpful to you?
Thank you for voting!
Electronic display was too dim to read and the top baking element was burned out.
I removed two screws to take the control panel off.
The electronic display is held in place with four screws which are easily removed with a nut driver.
The wiring work is extremely simple.
To replace the element, I removed the oven racks, took two screws out, disconnected the two wires, then replaced the element by reversing the process.
Both jobs took less than 20 minutes and that includes two trips to the breaker box in the basement.
Other Parts Used:
Electronic Clock Control Board
  • Tom from Elba, AL
  • Difficulty Level:
    Really Easy
  • Total Repair Time:
    15 - 30 mins
  • Tools:
    Nutdriver, Screw drivers
10 of 11 people found this instruction helpful.
Was this instruction helpful to you?
Thank you for voting!
The bake heating element shorted out on the oven. Called several appliance dealers in Kansas City and the said that it would take two weeks to get the part.
I ordered the bake heating element from Part Select on March 23rd and paid the small amount for overnight shipping. Believe it or not I received the heating element the next morning at 10:00 am. I do not know how they did this since I live in KC MO and they are in PA i believe. They show you a diagram of the part you need with the part number on their web sight. I opened the well packaged item and took out two screws on the existing bad element and took it out, BY THE WAY MAKE SURE THAT YOU SHUT OFF THE POWER TO THE OVEN. I neglected to turn off the breaker because I thought the oven would have to be on to have power. This was a mistake because the heating element shorted when I tried to pull it out.
This was entirely my fault. I shut off the breaker and installed the new heating element in about five minutes. It worked great and we had our oven back in two days. My wife was very impressed with my electronics experience but I did not tell her everything. I would highly recomend this company. Don
Other Parts Used:
  • Don from Kansas City,, MO
  • Difficulty Level:
    Really Easy
  • Total Repair Time:
    Less than 15 mins
  • Tools:
    Screw drivers
7 of 7 people found this instruction helpful.
Was this instruction helpful to you?
Thank you for voting!
Heating element not working
I removed the 2 screws in the back. You have limited room to work but it is enough. The screws were somewhat hard to come off so I used a rachet set as well as a screwdriver. Pulled the element forward and tilted it up. The prongs has to be wiggled out. Went back together very easily. Wouldn't have tried it myself if I hadn't read the posts here. It was REALLY that easy!!!
Other Parts Used:
  • Linda from Erving, MA
  • Difficulty Level:
    Easy
  • Total Repair Time:
    15 - 30 mins
  • Tools:
    Screw drivers, Wrench (Adjustable)
7 of 8 people found this instruction helpful.
Was this instruction helpful to you?
Thank you for voting!
Element Burned OUt
Piece of cake. Removed two screws holding the element in place and pulled the element out to expose two wires connected with friction clips. Connected the new element and screwed it back in place. My wife got back to baking and now I am enjoying a different piece of cake.
Other Parts Used:
  • Mark from Millbrook, AL
  • Difficulty Level:
    Really Easy
  • Total Repair Time:
    Less than 15 mins
  • Tools:
    Screw drivers
5 of 5 people found this instruction helpful.
Was this instruction helpful to you?
Thank you for voting!
No heat in oven
The repair was really simple. I removed the 2 screws holding the baking element to the oven wall, pulled the element out about 2 inches, lifted the front of the element and pulled it out more to reach the 2 wires. I disconnected the two wires and reversed the procedure for installation, inserted the 2 screws and turned the power back on. The element works fine.
Other Parts Used:
  • Thomas from Pittsburgh, PA
  • Difficulty Level:
    Really Easy
  • Total Repair Time:
    Less than 15 mins
  • Tools:
    Screw drivers, Socket set
3 of 3 people found this instruction helpful.
Was this instruction helpful to you?
Thank you for voting!
Element burnt out
First I removed the two retaining screws that hold the element in place. I then pulled the element out about 3 inches to disconnected the two wire leads. Removed element.

Note: Retain the two screws, the new element doesn't come with new screws.

To install new element simply reverse what you did to remove old element.
Other Parts Used:
  • George from Medford, NJ
  • Difficulty Level:
    Really Easy
  • Total Repair Time:
    Less than 15 mins
  • Tools:
    Screw drivers
3 of 5 people found this instruction helpful.
Was this instruction helpful to you?
Thank you for voting!
Oven element burned through 2 hours before Thanksgiving dinner
Ordered the part Thanksgiving Day, received it Tuesday. Came home and my son, who has the mechanical aptitude of a rock, had already changed it. Must not be too hard.
Other Parts Used:
  • Douglas from Nicholasville, KY
  • Difficulty Level:
    Really Easy
  • Total Repair Time:
    Less than 15 mins
  • Tools:
    Screw drivers
2 of 3 people found this instruction helpful.
Was this instruction helpful to you?
Thank you for voting!
Burnt oven heating element
Ordered part on line, part came within few days well wrapped and protected, very simple repair removed two mounting screws and two lead wires to remove burnt element, replaced with new one, wire were re-connected and the mounting screws secured the new element in place, about 20 min job.
Other Parts Used:
  • Fadi from Wilmington, OH
  • Difficulty Level:
    Really Easy
  • Total Repair Time:
    15 - 30 mins
  • Tools:
    Nutdriver
1 of 2 people found this instruction helpful.
Was this instruction helpful to you?
Thank you for voting!
Uneven Heating In Oven
Removed two screws, pulled out element and trnasfered over lead wires. Made sure power is off first. Easy to order, easy to replace.
Other Parts Used:
  • Jenni from Rolling Meadows, IL
  • Difficulty Level:
    Really Easy
  • Total Repair Time:
    Less than 15 mins
  • Tools:
    Screw drivers
1 of 2 people found this instruction helpful.
Was this instruction helpful to you?
Thank you for voting!
  • 1
  • 2
Questions and Answers

Ask our experts a question about this part and we'll get back to you as soon as possible!

1 question answered by our experts.
  • 1
Sort by:
Sorry, we couldn't find any existing answers that matched.Try using some different or simpler keywords, or submit your new question by using the "Ask a Question" button above!
Mamerto
December 13, 2018
Bake element on my bottom oven does not heat. Continuity test reads 22.1 ohms. I read between 30-100 ohms is good, right?
For model number JJW9627CAS
PartSelect logo
Hello Mamerto, Thank you for the question. A bake or broil oven element's resistance may be in the area of 20 to 40 ohms. Hope this helps, good luck with this repair!

Was this helpful?
Thank you for voting!
  • 1
Model Cross Reference
This part works with the following models:
PartSelect Number: PS11744515
Manufacturer Part Number: WP7406P272-60
Brand
Model Number
Description
Magic Chef
9845VVV
Wall Oven - Electric
Magic Chef
9845XVB
Wall Oven - Electric
Magic Chef
9855VVV
Wall Oven - Electric
Magic Chef
9855XVB
Wall Oven - Electric
Maytag
CWE6800ACB
Wall Oven - Wall, Electric
Maytag
CWE6800ACE
Wall Oven - Wall, Electric
Maytag
CWE6830ACB
Wall Oven - Wall, Electric
Maytag
CWE6830ACE
Wall Oven - Wall, Electric
Maytag
CWE7800ACB
Wall Oven - Built-in, Electric
Maytag
CWE7800ACE
Wall Oven - Built-in, Electric
Maytag
CWE7830ACB
Wall Oven - Wall, Electric
Maytag
CWE7830ACE
Wall Oven - Wall, Electric
Jenn-Air
JEW8527AAB
Wall Oven - Built-in, Electric, Wall
Jenn-Air
JEW8527AAW
Wall Oven - Built-in, Electric, Wall
Jenn-Air
JEW8627AAB
Wall Oven - Built-in, Electric, Wall
Jenn-Air
JEW8627AAW
Wall Oven - Built-in, Electric, Wall
Jenn-Air
JEW9527AAB
Wall Oven - Built-in, Electric, Wall
Jenn-Air
JEW9527AAS
Wall Oven - Built-in, Electric, Wall
Jenn-Air
JEW9527AAW
Wall Oven - Built-in, Electric, Wall
Jenn-Air
JEW9627AAB
Wall Oven - Built-in, Electric, Wall
Jenn-Air
JEW9627AAS
Wall Oven - Built-in, Electric, Wall
Jenn-Air
JEW9627AAW
Wall Oven - Built-in, Electric, Wall
Jenn-Air
JJW8127AAB
Wall Oven - Built-in, Electric
Jenn-Air
JJW8127AAW
Wall Oven - Built-in, Electric
Jenn-Air
JJW8227AAB
Wall Oven - Built-in, Electric
Jenn-Air
JJW8227AAW
Wall Oven - Built-in, Electric
Jenn-Air
JJW8527AAB
Wall Oven - Built-in, Electric, Wall
Jenn-Air
JJW8527AAW
Wall Oven - Built-in, Electric, Wall
Jenn-Air
JJW8527BAB
Wall Oven - Built-in, Electric, Wall
Jenn-Air
JJW8527BAW
Wall Oven - Built-in, Electric, Wall
Customer Service Representative

Get in touch, we're here to help!

Daily 8am - 9pm EST

Contact Customer Service