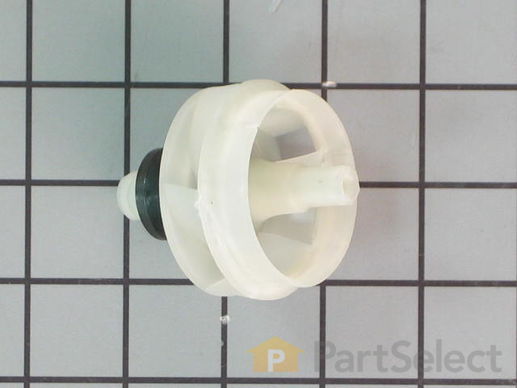
Part Location Diagram of WP6-904027 Whirlpool Impeller with Motor Shaft Seal
See part 26 in the diagram
( Grid squares measure 1x1 inch )
Customer Service Representative

Get in touch, we're here to help!

Daily 8am - 9pm EST

customerservice@partselect.ca

Impeller with Motor Shaft Seal

 Fits your CDU600V!
$37.21
  Special Order
 Fits your CDU600V!
PartSelect Number PS11743041
Manufacturer Part Number WP6-904027
Manufactured by Whirlpool
Product Description

Impeller with Motor Shaft Seal Specifications

This impeller rotates and is used to force water up through to the spray arm.
How Buying OEM Parts Can Save You Time and Money

How Buying OEM Parts Can Save You Time and Money

Troubleshooting
This part works with the following products:
Dishwasher.
This part works with the following products:
Magic Chef, Jenn-Air, Maytag, Crosley.
Part# WP6-904027 replaces these:
6-904027, 9-3493, 9-3962, 9-4027, 903493, 903962, 904027
Back to Top
Customer Repair Stories
 Average Repair Rating: 1.9 / 5.0, 5 reviews. What's this?
  • 1
Sort by:
Sorry, we couldn't find any existing installation instruction that matched.
leak through impeller seal.
removed spray head, pulled motor/pump assembly. took apart impeller housing and then removed motor and pulled impeller off its shaft, the most difficult part was actually pulling off impeller from the splined shaft. I actually broke old impeller in the process. The good thing is that the new seal came assembled with new impeller so that was not a problem. After re-assembling everything it worked fine and still works for a week since repair.
Other Parts Used:
  • Maxim from Ashburn, VA
  • Difficulty Level:
    A Bit Difficult
  • Total Repair Time:
    1- 2 hours
  • Tools:
    Pliers, Screw drivers, Socket set, Wrench (Adjustable), Wrench set
7 of 8 people found this instruction helpful.
Was this instruction helpful to you?
Thank you for voting!
Deteriorated (and leaking) Impeller seal.
Dealer phone quote = $250. DIY repair = $55.
Turn-off DW electrical circuit breaker and shut-off hot water supply. Remove lower Front Access Panel and Toe Panel. Disconnect hot water supply, corrugated drain hose, electrical connection, and uncounter mounting brackets. Slide-out DW (being careful not to scratch flooring) and gently tip DW onto its back side. Rotate Ring-Lock at underside of Tub and (from inside the Tub) carefully lift out Motor-and-Pump assembly. At the Motor-and-Pump assembly, unscrew Center Spray Nozzle and remove Lower Spray Arm and lv Filter. At the end of the Impeller, remove Chopper Screw, Chopper, Chopper Plate (rotate 1/4 turn) and Chopper Wear Ring. Remove Motor Mount Screws and Motor Shield. Loosen Impeller {NOTE: left-hand thread} from motor shaft by the holding Motor Fan stationary and unscrewing Impeller. Pull apart the Motor and Impeller; discard old Impeller. Gently and thoroughly clean the internal surface of Housing Assembly seal with a toothbrush and soapy water. Carefully reassemble in the reverse order using the new Impeller. (Prophylactically, I also replaced the Motor "O" Ring and Pump Gasket.) DW works perfectly; no leaks!
Other Parts Used:
Motor "O" Ring Pump Gasket
  • Ron from Sandusky, MI
  • Difficulty Level:
    A Bit Difficult
  • Total Repair Time:
    More than 2 hours
  • Tools:
    Nutdriver, Screw drivers, Socket set, Wrench (Adjustable), Wrench set
6 of 6 people found this instruction helpful.
Was this instruction helpful to you?
Thank you for voting!
Dishwasher leaking around pump motor shaft seal
Disassembled my dishwasher and found the rubber on the impeller seal had deteriorated causing the leak. If this is all that is wrong with your unit, it is well worth the repair attempt. Find the service manual pdf on servicematters (dot) com for detailed instructions on removing and re-installing the part. The only thing I have to add is the on my first try installing the part, I still had a leak. I may have just had the motor/impeller slightly mis-aligned (the water tight seal is actually the carbon disk on the impeller rubbing against the carbon disk on the seal seat in the pump housing). On the second attempt I used silicone to glue the 'seal seat' into the pump housing (carbon side out). After waiting a day for the silicone to dry, the dishwasher ran without leaking. It continues to be leak free several weeks later.
Other Parts Used:
  • Michael from Belleville, IL
  • Difficulty Level:
    Difficult
  • Total Repair Time:
    1- 2 hours
  • Tools:
    Nutdriver, Pliers, Screw drivers, Wrench set
4 of 5 people found this instruction helpful.
Was this instruction helpful to you?
Thank you for voting!
A leak around the motor shaft.
Everything is straight forward with the following two exceptions; The threads that hold the motor fan to the impeller are left hand, and it takes a special tool to remove the top rotating assembly. It took about 4 hours to figure out what to do, and make the tool . I put it back together in about 20 minutes.
Other Parts Used:
Pump Gasket
  • Donald from Windsor, CO
  • Difficulty Level:
    Difficult
  • Total Repair Time:
    More than 2 hours
  • Tools:
    Screw drivers, Socket set, Wrench set
3 of 3 people found this instruction helpful.
Was this instruction helpful to you?
Thank you for voting!
Water leaking from impeller shaft/motor seal
Remove the motor and impeller housing assembly from the unit by disconnecting the motor wiring plug, green ground wire, removing the drain and transfer hose, wash arm assembly and three screws for the filter assembly. A plastic locking ring secures the housing assembly into the unit and is removed by rotating aft about an eighth turn. The impeller is removed from the motor shaft by unscrewing the left hand threads on the fan that attaches to the end of the impeller. The impeller has longitudinal splines that engage the motor shaft, so it has to be removed by pulling straight off of the motor shaft. My impeller was stuck on the motor shaft, so I used a dremel tool with a cut off wheel and sliced through the impeller to loosen it. Installed a new motor shaft oring, and then slid the new integrated seal/impeller onto the motor shaft and secured with the fan (remember left hand threads). Reassembled unit and no leaks...
Other Parts Used:
Motor "O" Ring
  • Christopher from Wichita, KS
  • Difficulty Level:
    A Bit Difficult
  • Total Repair Time:
    1- 2 hours
  • Tools:
    Pliers, Screw drivers, Socket set, Wrench set
3 of 5 people found this instruction helpful.
Was this instruction helpful to you?
Thank you for voting!
  • 1
Questions and Answers

Be the first to ask our experts a question about this part!

Related Parts
Model Cross Reference
This part works with the following models:
PartSelect Number: PS11743041
Manufacturer Part Number: WP6-904027
Brand
Model Number
Description
Crosley
CDC400B
Dishwasher
Crosley
CDC450B
Dishwasher
Crosley
CDC5J
Dishwasher
Crosley
CDU20J
Dishwasher
Crosley
CDU250B
Dishwasher
Crosley
CDU250V
Dishwasher
Crosley
CDU2J
Dishwasher
Crosley
CDU400B
Dishwasher - Undercounter
Crosley
CDU450B
Dishwasher
Crosley
CDU450V
Dishwasher
Crosley
CDU5J
Dishwasher
Crosley
CDU5JV
Dishwasher
Crosley
CDU600B
Dishwasher
Crosley
CDU600V
Dishwasher
Crosley
CDU8000B
Dishwasher
Crosley
CDU8000V
Dishwasher
Crosley
CDU8J
Dishwasher
Magic Chef
DC4000B
Dishwasher
Magic Chef
DC4500B
Dishwasher
Magic Chef
DC5J
Dishwasher
Magic Chef
DU2000B
Dishwasher
Magic Chef
DU2000B-C
Dishwasher
Magic Chef
DU2000V
Dishwasher
Magic Chef
DU2000V-C
Dishwasher
Magic Chef
DU2000W
Dishwasher
Magic Chef
DU20J
Dishwasher
Magic Chef
DU20J-CAN
Dishwasher
Magic Chef
DU20JV
Dishwasher
Magic Chef
DU2100B
Dishwasher
Magic Chef
DU2500B
Dishwasher
Customer Service Representative

Get in touch, we're here to help!

Daily 8am - 9pm EST

Contact Customer Service