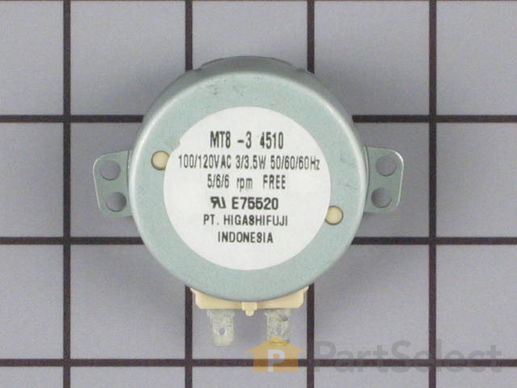
Part Location Diagram of WP58001047 Whirlpool Turntable Drive Motor
See part 18 in the diagram
( Grid squares measure 1x1 inch )
Customer Service Representative

Get in touch, we're here to help!

Daily 8am - 9pm EST

customerservice@partselect.ca

Turntable Drive Motor

$126.42
  Special Order
PartSelect Number PS11742994
Manufacturer Part Number WP58001047
Manufactured by Whirlpool
Product Description

Turntable Drive Motor Specifications

This motor rotates the glass turntable in the microwave.
How Buying OEM Parts Can Save You Time and Money

How Buying OEM Parts Can Save You Time and Money

Troubleshooting
This part fixes the following symptoms:
Tray won’t turn
This part works with the following products:
Microwave.
This part works with the following products:
Maytag, Jenn-Air.
Part# WP58001047 replaces these:
AP6009821, 58001047
Back to Top
Customer Repair Stories
 Average Repair Rating: 3.3 / 5.0, 10 reviews. What's this?
  • 1
Sort by:
Sorry, we couldn't find any existing installation instruction that matched.
Turntable on Maytag MMV5100AAW Stopped Turning
Symptom: Turntable stopped turning. Was able to remove the glass tray in the microwave and the little cam that drives the glass tray was barely turning. Control on microwave to turn the turntable on/off was working as evidenced by the cam not turning when I turned off the turntable. When I turned the cam manually, I could feel the motor turn so I knew the CAM and motor shaft were not stripped.

Repair Procedure:
1) Unplug the microwave.
2) Remove the 4 screws from the bottom of the microwave while holding the bottom cover so that it does not suddenly drop. It is not very heavy so you are fine to hold it with one hand and unscrew the screws with the other. Don't drop it as it has a glass lens for your lights and two light bulbs that light up the cooktop below.
3) Swing the front of the cover down slowly. You wil notice that the back is held in by tabs that slide into the back of the microwave. The bottom cover comes off very easily with some forward motion to dislodge the tabs.
4) Now look up under the bottom of the microwave(assuming your microwave is mounted over the range like mine) and you will see the turntable motor (GEAR MOTOR) in the center.
5) Carfully remove the two wires from the motor by gently working the connectors off of the motor using neegle nose or regular pliers. Don't grab the wires as you may pull them out of the connectors. Work with the connectors on the motor terminals. You will find the job much easier to do if you also remove the wires from the light housing. This will allow you to set the bottom cover aside and will give you greater access to do the job.

NOTE: Now is a great time for you to clean the filters, filter slots, bottom cover, and the light lens. A lot of grease can accumulate on the bottom of the microwave if it is mounted over a range (like mine). If you remove the light assembly, you can clean the cover, filters, and and light lens in the sink. Make sure that you dry all components thoroughly before re-assembling.
6) Make a note of which wires go to which terminals on the motor and the lights.
7) Remove the two screws from the motor and remove it. Note that there is a little plastic insulator film, a very thin washer and a bushing associated with the motor. You will want to re-install these with the new motor. Replace the motor with the new one being careful to put the other pieces back in place as well. Note that the little black turntable cam has a tab on one side so if you want to put it out of the top, you will need to tilt it slightly.
8) With the motor and associated parts back in and secured with the two screws previously removed, re-attach the wires to the lights and motor.
9) Replace the cover and screws and you are done!

This repair is much easier than these steps would suggest but I wanted to be thorough.

I called Maytag and they refused to sell me the part because they said it was dangerous for the user to replace it - rubbish. As long as you kill the power to the microwave and confine your work to the bottom of the unit as described, you will be fine. Maytag wanted to send out a repairman at $80 just to show up. I did the entire repair myself in about 15 minutes for about $40.
Other Parts Used:
  • Tim from Oviedo, FL
  • Difficulty Level:
    Easy
  • Total Repair Time:
    Less than 15 mins
  • Tools:
    Pliers, Screw drivers
46 of 47 people found this instruction helpful.
Was this instruction helpful to you?
Thank you for voting!
turntable motor was bad.
fliped it upside down and took of the panel un screwd the motor and un hooked the wire leads.then revesed the process.
Other Parts Used:
  • CHARLES from HOLCOMBE, WI
  • Difficulty Level:
    Really Easy
  • Total Repair Time:
    15 - 30 mins
  • Tools:
    Screw drivers
6 of 7 people found this instruction helpful.
Was this instruction helpful to you?
Thank you for voting!
Turntable quit working
Removed the 4 screws holding the base of the microwave, it was mounted over the stove. Unpluged the wires from the motor, removed 2 screws holding to motor to the underside of the stove. Removed the motor and replaced it with the new motor, replaced the 2 screws, replaced the bottom cover, and started the oven. The turntable worked / revolved once again. WAL-LAH!
Other Parts Used:
  • Richard from Spokane, WA
  • Difficulty Level:
    Easy
  • Total Repair Time:
    15 - 30 mins
  • Tools:
    Screw drivers
3 of 3 people found this instruction helpful.
Was this instruction helpful to you?
Thank you for voting!
Turntable stopped turning.
Removed bottom panel, disconnected power wires, removed and replaced motor with new part.
Other Parts Used:
  • Clyde from Greensboro, NC
  • Difficulty Level:
    Easy
  • Total Repair Time:
    15 - 30 mins
  • Tools:
    Screw drivers
2 of 3 people found this instruction helpful.
Was this instruction helpful to you?
Thank you for voting!
turn table would not rotate gear was bad
Very easy to remove the bottom on the Microwave. Make sure you have unplug the electrical cord. Take the screw driver remove three screws and use your pliers to remove the two wire terminals. Reverse the order and you have a new microwave that works great. Also if you are not using the tray in the microwave remove it as it heats up and takes away from the item you are trying to heat. Good luck to you!!!!
Other Parts Used:
  • Teril from Wetumpka, AL
  • Difficulty Level:
    Really Easy
  • Total Repair Time:
    15 - 30 mins
  • Tools:
    Pliers, Screw drivers
2 of 3 people found this instruction helpful.
Was this instruction helpful to you?
Thank you for voting!
Turntable Drive Motor Stopped Working
1. Removed bottom panel
2. Replaced Turntable Drive Motor
3. Checked that it was centered in the hole
4. Replaced part that the glass tray sits on
5. Replaced bottom panel
Other Parts Used:
  • John from COHUTTA, GA
  • Difficulty Level:
    Easy
  • Total Repair Time:
    30 - 60 mins
  • Tools:
    Screw drivers
1 person found this instruction helpful.
Was this instruction helpful to you?
Thank you for voting!
Turntable not turning, motor is good. Turntable spins freely
Thought it was a bad motor. Figured out it was a stripped shaft in the turntable drive thimble. The flat side in the unit was stripped out round. This part is no longer made or available.

1. Pull the motor and the drive part. (procedure described elsewhere on this site - basically remove 4 screws along the front of the bottom panel and have someone hold the panel tipped down, or support the panel on something enough to remove the 2 screws holding the motor on. Remove the 2 wires on the motor and remove the motor. Pull the table drive piece out inside the microvave.)
2. Mark on the outside of the drive piece where the flat side used to be.
3. Stretch a layer of teflon pipe thread tape on the motor shaft (leave extra lying on top the motor)
4. Mix a small portion of J.B Quick epoxy using a toothpick to stir it.
5. Hold the drive part horizontally so the stripped out flat place is on the bottom.
6. Using a toothpick, put a small amount of the mixed epoxy inside the hole, use enough to make the epoxy fill where the flat used to be.
7. Check the unused portion of the epoxy waiting till it just begins to harden. (2 or 3 minutes)
8. Aligning the "epoxy flat point" with the flat on the motor shaft, put the drive part on the motor. (allow the epoxy to create the new flat place.) Set the motor down flat on a counter or table with the drive part on top. Do not turn the drive part, just let it sit on the motor for an hour or two minimum. Check the unused portion of epoxy to see how it is setting up. After the epoxy is hard, carefully pull the drive off the motor. The teflon tape will stick to the epoxy in the drive but not to the motor shaft. Let the whole assembly cure overnight.
9.Carefully clean off excess teflon tape that is hanging loose on the drive part. Teflon tape inside the drive part can be left. Just cut/remove any loose leftover tape outside of the now repaired shaft hole.
10. Reassemble the drive piece, motor and microwave.
11. Do not [ever] try turning the drive table by hand. This is a big reason why the drive gets stripped out in the first place.
Other Parts Used:
  • Thomas from LONDONDERRY, NH
  • Difficulty Level:
    Really Easy
  • Total Repair Time:
    30 - 60 mins
  • Tools:
    Screw drivers
1 person found this instruction helpful.
Was this instruction helpful to you?
Thank you for voting!
Gear motor went bad
Took cover off 4screws motor has 2 screws pulled off 2 wires.Put new motor on.
Other Parts Used:
  • Michael from New Port Richey, FL
  • Difficulty Level:
    Really Easy
  • Total Repair Time:
    Less than 15 mins
  • Tools:
    Screw drivers
1 person found this instruction helpful.
Was this instruction helpful to you?
Thank you for voting!
Unable to self-clean, lock not working
The repairman called me during the scheduled window of time and talked me out of coming over to fix it. So he never came over.
Other Parts Used:
  • Linda from Maspeth, NY
  • Difficulty Level:
    Very Difficult
  • Total Repair Time:
    Less than 15 mins
  • Tools:
    Pliers
1 of 2 people found this instruction helpful.
Was this instruction helpful to you?
Thank you for voting!
Turntable inoperative
Motor replacement was ok and could have been accomplished is less than a half hour.

Replaced turntable drive motor. Unfortunately, the problem was the turntable shaft (It was worn). The turntable shaft is no longer available. So, the problem is not yet fixed.
Other Parts Used:
  • Robert from Harrisonville, MO
  • Difficulty Level:
    Very Difficult
  • Total Repair Time:
    More than 2 hours
  • Tools:
    Screw drivers
1 of 3 people found this instruction helpful.
Was this instruction helpful to you?
Thank you for voting!
  • 1
Questions and Answers

Be the first to ask our experts a question about this part!

Model Cross Reference
This part works with the following models:
PartSelect Number: PS11742994
Manufacturer Part Number: WP58001047
Brand
Model Number
Description
Maytag
CMV1100AAB
Microwave - Hood Combo
Maytag
CMV1100AAQ
Microwave - Hood Combo
Maytag
CMV1100AAW
Microwave - Hood Combo
Jenn-Air
JMV8100AAB
Microwave - Hood Combo
Jenn-Air
JMV8100AAQ
Microwave - Hood Combo
Jenn-Air
JMV8100AAS
Microwave - Hood Combo
Jenn-Air
JMV8100AAW
Microwave - Hood Combo
Maytag
MMV5100AAB
Microwave - Hood Combo
Maytag
MMV5100AAQ
Microwave - Hood Combo
Maytag
MMV5100AAS
Microwave - Hood Combo
Maytag
MMV5100AAW
Microwave - Hood Combo
Customer Service Representative

Get in touch, we're here to help!

Daily 8am - 9pm EST

Contact Customer Service