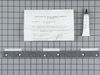
This idler pulley assembly is a manufacturer-approved replacement part for your washer/dryer. The assembly includes the idler pulley and arm. The idler pulley provides tension for the belt to rotate t...
$48.76
In Stock
Order within the next 6 hrs and your part ships today!
Order within the next 6 hrs and your part ships today!
Questions And Answers for WSM27TCAWWW
Ask our experts a question about this model and we'll get back to you as soon as possible!
1 question answered by our experts.
< Prev
1
Next >
Sort by:
Search filter:
Clear Filter
Your search term must have 3 or more characters.
Keep searches simple. Use keywords, e.g. "leaking", "pump", "broken" or "fit".
Sorry, we couldn't find any existing answers that matched.Try using some different or simpler keywords, or submit your new question by using the "Ask a Question" button above!
Maria
March 31, 2024
My dryer makes noise when drying
What could that be
For model number WSM27TCAWWW
Hi Maria, thank you for reaching out. We would suggest checking the drive belt, part number PS16542496. You may need to replace it to fix the issue. We hope that helps!
Unpluged dryer. Removed the top of dryer by pushing in a retaining clip on both sides of the front lip with a screw driver. Remove the two screws on both sides of front panel. These screws are square head or phillips #2. Unplugged the wiring harness to front panel (make sure power has been disconnected). Support drum and lean front panel away from dryer body. Front panel will pull off of tabs at bottom. The old drum glide is fiberous and hard to remove. I removed most of it with the pliers, but had to carefully scrape the balance of the glide off with the wood chisel. The adhesive that comes with the repair part has an acetone base, so I used acetone (or you could use nail polish remover) to remove the old adhesive. Once the acetone has dried, I applied an 1/8" snaking bead of adhesive to the front panel. There is more adhesive in the tube than you need so do not use too much. Make sure that you get adhesive as close to the base of the lower seal as you can. Follow directions on adhesive tube and then attach the glide. I let it set up for about 30 seconds. Place the front panel back on the tabs of the dryer. Carefully lift the drum an fit it on the front panel and insert the two screws holding the panel to the base. Reconnect the wiring harness and make sure it is not in contact with the drum. Check to make sure that all of the electrical connectors on the timer are still in place. Reassemble the dryer. Reconnect power.
Removed the front Dryer panel. Left drum in place and lifted it up slightly to get access to motor drive. Slipped belt in place and put panel back on. This was a first attempt ever at fixing an appliance and it was no big deal.
Replacing the switch is relatively easy, however, I would caution all experiencing similar problems one thing. Before assuming, as I did, that the switch was bad, first remove the panel of the washer that houses the washing tub/basin. On the back of the tub, check to make sure that the tube connecting the tub and switch has not come off from the tub as it did in my situation. The solution to my problem of a leaking washing machine where the water would not stop filling on both wash and rinse cycles was simply reattaching the tube to the tub. If I would have checked that first, total job completion time would have been under 15 minutes. Hope this helps. If you need to replace the actual switch, remove the knobs, screws, and panel. Remove the wires, tube, and screw from the switch and reassemble new switch. That took me about 30-45 minutes.