This 18 ml bottle of white appliance touch-up paint is used to cover scratches or marks on your appliance. The white touch-up paint can be used on refrigerators, microwaves, ranges, clothes dryers, an...
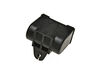
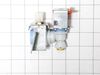
This evaporator fan motor is located in the back of the freezer, and circulates air over the refrigerator coils. These coils will convert the heat into cool air, which is then circulated.
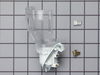
This track is a genuine OEM replacement part for your refrigerator. It is made of white plastic. The track supports the shelf within your fridge, and can be snapped in and out of place, which makes re...
This is a genuine Whirlpool replacement part. This drawer hanger is for refrigerators and its job is to support the drawer. It is approximately 11 inches in length, and is made of plastic.
Sold individually. Hardware not included. Roller only.
$44.00
In Stock
Questions And Answers for WRT3L9SZYW00
Ask our experts a question about this model and we'll get back to you as soon as possible!
1 question answered by our experts.
< Prev
1
Next >
Sort by:
Search filter:
Clear Filter
Your search term must have 3 or more characters.
Keep searches simple. Use keywords, e.g. "leaking", "pump", "broken" or "fit".
Sorry, we couldn't find any existing answers that matched.Try using some different or simpler keywords, or submit your new question by using the "Ask a Question" button above!
Brenda
June 28, 2022
Ice builds up and n bottom shelf of freezer could the drain line be clogged
For model number WRT3L9SZYW00
Hello Brenda, thank you for your question. When you are having temperature problems in your fridge, there are a few parts that could cause the issue. You can use a multi meter to test most of the parts. Make sure you cut power to your appliance before doing any repairs or tests. First you should test your defrost thermostat. Place the thermostat in ice cold water for 2-3 minutes after removing it from your appliance. It should be reading 0 ohms to be working correctly. Another part to check would be your defrost heater. Remove it from the appliance. It should be reading anywhere between 0 - 50 ohms to be working. You could check your temperature sensor. To find the correct reading for this part you will have to refer to your tech sheet that comes with your appliance. You can usually find this tech sheet behind the bottom grille of your fridge on either the right or left side. These are the most common parts that cause this issue in your appliance. If you need help placing an order, customer service is open 7 days a week. Please feel free to give us a call. We look forward to hearing from you.
Was this helpful?
Thank you for voting!
< Prev
1
Next >
✖
Ask a Question
Ask our experts a question on this model and we'll respond as soon as we can.
I knew the chances of all the freon leaking out was unlikely so I looked at the wiring to the compressor and there was a capacitor and a starter/overload so i figured I would start there. I went on line and found the parts at this site and they were less than the minimum service call charge for a service tech so I figured what the heck let's give her a shot so I did give it a shot. I ordered the parts and they were there in less time than a service tech could come out and i installed the parts and guess what for 90.00 in parts and 15 minutes in time I repaired my refrigerator. Thanks guys, It took less time to order the parts than it did to make the repair so thanks, your website rocks and is very well designed so my hat is off to you guys!
The reason I repaired it myself was because the repairman that diagnosed the problem.didn't come back in two weeks. The evaporator fan sits behind a vented wall in the freezer and directs cold air into freezer and refrigerator.I removed the ice make assembly first and then the freezer wall held in place by two sheet metal nuts. Then removed wires from fan motor. Removed the fan blade from fan motor,which was press fitted on,then removed fan motor from bracket assembly(make sure and retain the two vibration rubber washers on back and front of motor. Reinstall new motor with vibration washers and press fan blade on new motor. Install in bracket assemble and reassemnble.
I used a flat-head screwdriver to pop out the old light rocker switch. Then, I unplugged the wires, plugged them into the new light rocker switch, and then popped the new switch into the hole. That's it! Lights began working again.