Models > WRT318FZDB06

WRT318FZDB06 Whirlpool Refrigerator - Overview

Sections of the WRT318FZDB06

[Viewing 6 of 6]
Keep searches simple, eg. "belt" or "pump".
Capacitor – Part Number: WPW10662129
Capacitor
★★★★★
★★★★★
(23)
PartSelect #: PS11757023
Manufacturer #: WPW10662129
This part helps the compressor kick on and off while maintaining a constant temperature to keep things frozen in your freezer.
$100.94
  In Stock
Hinge Bracket – Part Number: WP2183805
Hinge Bracket
★★★★★
★★★★★
(3)
PartSelect #: PS11739061
Manufacturer #: WP2183805
This part is used to support the hinge.
$13.68
  In Stock
Evaporator Fan Motor – Part Number: WP2315539
Evaporator Fan Motor
★★★★★
★★★★★
(22)
PartSelect #: PS11740359
Manufacturer #: WP2315539
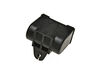
This evaporator fan motor is located in the back of the freezer, and circulates air over the refrigerator coils. These coils will convert the heat into cool air, which is then circulated.
$84.76
  In Stock
Meat Drawer Shelf – Part Number: W10861519
Meat Drawer Shelf
★★★★★
★★★★★
(11)
PartSelect #: PS11731608
Manufacturer #: W10861519
$83.16
  In Stock
Door Shelf Retainer Bar End Cap – Part Number: WP2156003
Door Shelf Retainer Bar End Cap
★★★★★
★★★★★
(1)
PartSelect #: PS11738927
Manufacturer #: WP2156003
The door shelf retainer bar end cap connects to the retainer bar on your refrigerator’s door shelf, and attaches it to the refrigerator door. If your shelf retainer bar has become disconnected, a dama...
$16.79
  In Stock
Door Handle - Stainless – Part Number: W10806512
Door Handle - Stainless
★★★★★
★★★★★
(3)
PartSelect #: PS11703503
Manufacturer #: W10806512
$202.16
  In Stock
Screw – Part Number: WP489497
Screw
PartSelect #: PS11742758
Manufacturer #: WP489497
Sold individually.
$17.06
  In Stock
Compartment Door – Part Number: WP2218113
Compartment Door
★★★★★
★★★★★
(2)
PartSelect #: PS11739749
Manufacturer #: WP2218113
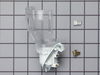
This part is the replacement compartment door for your refrigerator. It is made of clear plastic and is approximately 9 inches by 6 inches. The compartment door snaps into the walls of the dairy compa...
$54.18
  In Stock
THERMISTOR – Part Number: W11438736
THERMISTOR
★★★★★
★★★★★
(3)
PartSelect #: PS12745758
Manufacturer #: W11438736
$79.94
  In Stock
Center Door Hinge – Part Number: WP2254618
Center Door Hinge
PartSelect #: PS11739891
Manufacturer #: WP2254618
$60.62
  In Stock
Insert – Part Number: WP489467
Insert
PartSelect #: PS11742752
Manufacturer #: WP489467
$17.16
  In Stock
Screw – Part Number: WP489357
Screw
PartSelect #: PS11742744
Manufacturer #: WP489357
Sold individually.
$10.14
  In Stock

Questions And Answers for WRT318FZDB06

Be the first to ask our experts a question about this model!

Common Symptoms of the WRT318FZDB06

[Viewing 16 of 16]
Fridge too warm
Fixed by
these parts
Fixing Fixing Fixing
Show All
Will Not Start
Fixed by
these parts
Fixing Fixing
Show All
Fridge and Freezer are too warm
Fixed by
these parts
Fixing Fixing
Show All
Freezer section too warm
Fixed by
these parts
Fixing Fixing
Show All
Door won’t open or close
Fixed by
these parts
Fixing Fixing Fixing
Show All
Light not working
Fixed by
these parts
Fixing
Show All
Noisy
Fixed by
these parts
Fixing Fixing Fixing
Show All
Clicking sound
Fixed by
these parts
Fixing
Show All
Too warm
Fixed by
these parts
Fixing Fixing
Show All
Fridge too cold
Fixed by
these parts
Fixing
Show All
Leaking
Fixed by
these parts
Fixing Fixing Fixing
Show All
Ice maker not making ice
Fixed by
these parts
Fixing Fixing
Show All
Fridge runs too long
Fixed by
these parts
Fixing
Show All
Freezer not defrosting
Fixed by
these parts
Fixing
Show All
Frost buildup
Fixed by
these parts
Fixing
Show All
Won’t start
Fixed by
these parts
Fixing
Show All
Keep searches simple. Use keywords, e.g. "leaking", "pump", "broken" or "fit".
My refrigerator stopped cooling and the freezer section stopped freezing
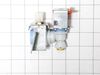
I knew the chances of all the freon leaking out was unlikely so I looked at the wiring to the compressor and there was a capacitor and a starter/overload so i figured I would start there. I went on line and found the parts at this site and they were less than the minimum service call charge for a service tech so I figured what the heck let's give her a shot so I did give it a shot. I ordered the parts and they were there in less time than a service tech could come out and i installed the parts and guess what for 90.00 in parts and 15 minutes in time I repaired my refrigerator. Thanks guys, It took less time to order the parts than it did to make the repair so thanks, your website rocks and is very well designed so my hat is off to you guys!
Parts Used:
Capacitor
  • garth from forest lake, MN
  • Difficulty Level:
    Really Easy
  • Total Repair Time:
    15 - 30 mins
  • Tools:
    Nutdriver, Screw drivers
396 of 478 people found this instruction helpful.
Was this instruction helpful to you?
Thank you for voting!
Evaporator Fan failure
The reason I repaired it myself was because the repairman that diagnosed the problem.didn't come back in two weeks. The evaporator fan sits behind a vented wall in the freezer and directs cold air into freezer and refrigerator.I removed the ice make assembly first and then the freezer wall held in place by two sheet metal nuts. Then removed wires from fan motor. Removed the fan blade from fan motor,which was press fitted on,then removed fan motor from bracket assembly(make sure and retain the two vibration rubber washers on back and front of motor. Reinstall new motor with vibration washers and press fan blade on new motor. Install in bracket assemble and reassemnble.
Parts Used:
Evaporator Fan Motor
  • William from Middletown, NY
  • Difficulty Level:
    Easy
  • Total Repair Time:
    15 - 30 mins
  • Tools:
    Nutdriver
156 of 175 people found this instruction helpful.
Was this instruction helpful to you?
Thank you for voting!
Light Would Not Go On In The Refrigerator
First I removed the old lightbulb from the socket and replaced it with a new one to confirm that the bulb was not the problem. I then pryed the socket out with a flat-head screwdriver. I could tell that the socket was anchored in its hole with clips so it was relatively easy to pry it out. Once the socket was out, I disconnected the lead wires and ordered a replacement socket kit from Partselect. When the new one arrived, I reconnected the lead wires to it, snapped it back into its hole, screwed in a new lightbulb, and presto!! The light was back on with no further problem. Thank you, Partselect!! A $15.00 part saved me what probably would have been at least a $100. service call and heaven knows what the technician would have told me I needed!!!
Parts Used:
Light Socket Kit
  • DANIEL from MINNEAPOLIS, MN
  • Difficulty Level:
    Easy
  • Total Repair Time:
    Less than 15 mins
  • Tools:
    Screw drivers
61 of 77 people found this instruction helpful.
Was this instruction helpful to you?
Thank you for voting!