The crisper drawer in your refrigerator is used for storing various items. If you notice that your current crisper drawer is damaged, you may need to replace it. You may notice that your refrigerator ...
This 18 ml bottle of white appliance touch-up paint is used to cover scratches or marks on your appliance. The white touch-up paint can be used on refrigerators, microwaves, ranges, clothes dryers, an...
This OEM refrigerator filter is for french door and side-by-side door types and is located in the back, top-right of your appliance. By absorbing heavy metals, pharmaceuticals, pesticides, chlorine, a...
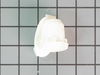
This light switch may also be known as a refrigerator door switch or a light switch kit, and is compatible with your refrigerator. The function of the refrigerator door switch is to turn on the light ...
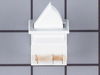
This is a replacement pivot block for your refrigerator. It is made of white plastic and is approximately 4 inches long and 1 inch wide. The pivot block catches and holds the door mullion cover when y...
$14.15
In Stock
Questions And Answers for WRF550CDHZ03
Ask our experts a question about this model and we'll get back to you as soon as possible!
1 question answered by our experts.
< Prev
1
Next >
Sort by:
Search filter:
Clear Filter
Your search term must have 3 or more characters.
Keep searches simple. Use keywords, e.g. "leaking", "pump", "broken" or "fit".
Sorry, we couldn't find any existing answers that matched.Try using some different or simpler keywords, or submit your new question by using the "Ask a Question" button above!
Mike
May 1, 2023
Ice maker does not make ice…have turned it off and back on…replaced all filters…water dispenses from door but no water is filling ice tray.
For model number WRF550CDHZ03
Hi Mike, thank you for reaching out. The issue is probably due to the ice maker fill tube, part number PS12745424. We hope this helps!
Removed door and crisper pans. Removed nuts on left end cap - think there were 3. Removed nuts on right end cap and one or two on back air regulator attached to right end cap. Replaced left end cap with new one using reserved nuts. Carefully removed back air regulator from right end cap. Attached back air regulator to new right end cap. Replaced right end cap and back air regulator and attached with nuts. Carefully inserted pantry door into pin on one side and slightly bent both right and left pins to insert door fully into end caps. Replaced crisper pans. That's it.
I used a flat screwdriver and released the lock tab on the bottom of the light switch, and pried the switch out, being careful to not damage the plastic around the mounting place of the switch, unplugged wiring from old switch, plugged in the new one and pushed the new switch into place. Job finished light switch now working.