This water filter purifies water going to the water dispenser and sometimes the icemaker as well. This part should be replaced if it is causing reduced water flow or just replaced periodically per the...
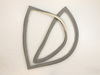
The crisper drawer in your refrigerator is used for storing various items. If you notice that your current crisper drawer is damaged, you may need to replace it. You may notice that your refrigerator ...
This 18 ml bottle of white appliance touch-up paint is used to cover scratches or marks on your appliance. The white touch-up paint can be used on refrigerators, microwaves, ranges, clothes dryers, an...
Ask our experts a question about this model and we'll get back to you as soon as possible!
1 question answered by our experts.
< Prev
1
Next >
Sort by:
Search filter:
Clear Filter
Your search term must have 3 or more characters.
Keep searches simple. Use keywords, e.g. "leaking", "pump", "broken" or "fit".
Sorry, we couldn't find any existing answers that matched.Try using some different or simpler keywords, or submit your new question by using the "Ask a Question" button above!
Marsha
January 16, 2023
What part do I need to fix a grinding noise that happens when the water dispenser is pushed to fill a glass or cup. This is a Whiirlpool counter depth fridge and the water dispenser is inside the fridge on the left hand side.
For model number WRF540CWBW01
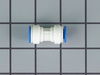
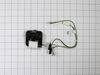
Hello Marsha, thank you for contacting us. We would recommend checking the following parts to fix your issue: Water Filter, part number PS11722130, Water Inlet Valve Assembly, part number PS11754529, and Water Filter Head, part number PS12712109. We look forward to hearing from you if you need assistance with placing an order through our 7-days-a-week customer service. We hope this helps!
Pressed in the end of the filter cover, lowered it down part way. Twisted the old filter 1/4 turn and removed it. Set in the sink to drain. Inserted new filter and twisted it to lock. closed cover. Done. Total time @ 1 Minute.
I removed the drop-down outer housing by gently prying the sides of the two pivot pins at the rear. This gave me move 'room' to grip and slightly rotate then pull the old filter forward and away from the tight suction connection. I was concerned that I would be too forceful for the plastic assemblies and would break something; deliberate motions and a steady thought process on the problem helped disengage the darned old filter!
Removed door and crisper pans. Removed nuts on left end cap - think there were 3. Removed nuts on right end cap and one or two on back air regulator attached to right end cap. Replaced left end cap with new one using reserved nuts. Carefully removed back air regulator from right end cap. Attached back air regulator to new right end cap. Replaced right end cap and back air regulator and attached with nuts. Carefully inserted pantry door into pin on one side and slightly bent both right and left pins to insert door fully into end caps. Replaced crisper pans. That's it.