


Models
>
SGV68U53UC
SGV68U53UC Bosch Dishwasher - Overview
Models starting with SGV68U53UC
Click on the best match to narrow your results.
- SGV68U53UC (B3) Bosch Dishwasher (DISHWASHER)
- SGV68U53UC (A5) Bosch Dishwasher (DISHWASHER)
- SGV68U53UC (A3) Bosch Dishwasher (DISHWASHER)
- SGV68U53UC (B4) Bosch Dishwasher (DISHWASHER)
- SGV68U53UC (C6) Bosch Dishwasher (DISHWASHER)
- SGV68U53UC (C9) Bosch Dishwasher (DISHWASHER)
- SGV68U53UC (D5) Bosch Dishwasher (DISHWASHER)
Keep searches simple, eg. "belt" or "pump".

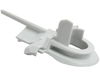
Dishrack Roller - Grey
PartSelect #: PS8727387
Manufacturer #: 00611475
This is a replacement dishrack roller or wheel for your dishwasher. It is made of gray plastic, measures a little over an inch in diameter, and is sold individually. This roller is designed for the lo...
$15.00
In Stock


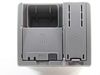
Inner Door Panel Screw Kit
PartSelect #: PS8695919
Manufacturer #: 00151703
Includes 6 screws. You will need a size T20 Torx screwdriver.
$12.50
In Stock
Common Symptoms of models starting with SGV68U53UC
[Viewing 8 of 8]Not draining
Fixed by
these parts
these parts


Show All
Door latch failure
Fixed by
these parts
these parts


Show All
Leaking
Fixed by
these parts
these parts


Show All
Not cleaning dishes properly
Fixed by
these parts
these parts

Show All
Will not dispense detergent
Fixed by
these parts
these parts

Show All
Will Not Start
Fixed by
these parts
these parts

Show All
Door won’t close
Fixed by
these parts
these parts
Show All
Noisy
Fixed by
these parts
these parts
Show All
Keep searches simple. Use keywords, e.g. "leaking", "pump", "broken" or "fit".
Replacing the pocket handle on a Bosch Dishwasher
I removed the 3 #20 torn screws in the handle, and the six #20 tore screws inside the door that hold the outer door skin in place.
The plastic handle has a series of molded hooks that allow it to snap into the stainless steel skin.
To avoid damaging the skin, use a utility knife to cut behind the two large hooks on the bottom of the handle and the one on each end. One trimmed, the handle easily slides out of the door skin.
The new one will effortlessly snap in-place, then reposition the door skin and fasten with the 9 screw previously removed.
Parts Used:
-
Michael from CASTLE ROCK, CO
-
Difficulty Level:Really Easy
-
Total Repair Time:15 - 30 mins
-
Tools:Socket set
14 of 15 people
found this instruction helpful.
Was this instruction helpful to you?
Thank you for voting!
rollers broke
pushed with thumb pressure and snapped rollers into place.....EASY
Parts Used:
-
Dennis from PLEASANTVILLE, NJ
-
Difficulty Level:Very Easy
-
Total Repair Time:Less than 15 mins
13 of 18 people
found this instruction helpful.
Was this instruction helpful to you?
Thank you for voting!
Broken handle
1 remove three screws from handle
2 remove screws from door panel
3 slide control box up out of outer door panel
4 outer panel is now free and old handle can be removed
5 snap in new handle from front of panel
6 reverse process
2 remove screws from door panel
3 slide control box up out of outer door panel
4 outer panel is now free and old handle can be removed
5 snap in new handle from front of panel
6 reverse process
Parts Used:
-
Kay from POWELL, OH
-
Difficulty Level:Easy
-
Total Repair Time:15 - 30 mins
-
Tools:Screw drivers
9 of 11 people
found this instruction helpful.
Was this instruction helpful to you?
Thank you for voting!