Models > MVWB766FW0

MVWB766FW0 Maytag Washer - Overview

Sections of the MVWB766FW0

[Viewing 5 of 5]
Keep searches simple, eg. "belt" or "pump".
Touch-Up Paint - White – Part Number: 72017
Touch-Up Paint - White
★★★★★
★★★★★
(16)
PartSelect #: PS385132
Manufacturer #: 72017
This 18 ml bottle of white appliance touch-up paint is used to cover scratches or marks on your appliance. The white touch-up paint can be used on refrigerators, microwaves, ranges, clothes dryers, an...
$10.20
  In Stock
Order within the next 12 hrs and your part ships today!
Hose Clamp – Part Number: WP285655
Hose Clamp
PartSelect #: PS11740613
Manufacturer #: WP285655
This hose clamp is sold individually.
$14.15
  In Stock
Order within the next 12 hrs and your part ships today!
Water Inlet Valve – Part Number: W11165546
Water Inlet Valve
★★★★★
★★★★★
(9)
PartSelect #: PS12348013
Manufacturer #: W11165546
$112.33
  In Stock
Order within the next 12 hrs and your part ships today!
Screw, 8/18 x 3/8 – Part Number: WP90767
Screw, 8/18 x 3/8
PartSelect #: PS11746840
Manufacturer #: WP90767
This screw is sold individually.
$6.91
  In Stock
Order within the next 12 hrs and your part ships today!
Washer Drain Hose – Part Number: W11244231
Washer Drain Hose
★★★★★
★★★★★
(2)
PartSelect #: PS12578897
Manufacturer #: W11244231
The drain hose carries used water from the washer to your house drain.
$31.80
  In Stock
Order within the next 12 hrs and your part ships today!
Lid Hinge Mounting Screw – Part Number: WPW10119828
Lid Hinge Mounting Screw
PartSelect #: PS11748588
Manufacturer #: WPW10119828
Sold individually. NOTE: The color on the screw may not be the same as the image, but will still function the same.
$11.68
  In Stock
Order within the next 12 hrs and your part ships today!
Washer Washplate Screw – Part Number: W10752187
Washer Washplate Screw
PartSelect #: PS10064547
Manufacturer #: W10752187
$6.91
  In Stock
Order within the next 12 hrs and your part ships today!
Lid Lock Assembly – Part Number: W10810403
Lid Lock Assembly
★★★★★
★★★★★
(2)
PartSelect #: PS11722981
Manufacturer #: W10810403
$183.30
  In Stock
Order within the next 12 hrs and your part ships today!
Hose Clamp – Part Number: WP356138
Hose Clamp
PartSelect #: PS11741854
Manufacturer #: WP356138
This clamp helps to prevent leaking by holding the end of water hose in place.
$13.81
  In Stock
Order within the next 12 hrs and your part ships today!
Affresh Washing Machine Cleaner - 3 pack – Part Number: W10135699
Affresh Washing Machine Cleaner - 3 pack
★★★★★
★★★★★
(2)
PartSelect #: PS1960673
Manufacturer #: W10135699
This front load washer cleaner removes odor-causing residue. Use it once a month and it will keep your machine fresh and clean. Package comes with 3 tablets.
$16.07
  In Stock
Order within the next 12 hrs and your part ships today!
AGITATOR – Part Number: W11550891
AGITATOR
★★★★★
★★★★★
(1)
PartSelect #: PS16620354
Manufacturer #: W11550891
$114.25
  In Stock
Order within the next 12 hrs and your part ships today!
Water-Pump – Part Number: W10876600
Water-Pump
PartSelect #: PS11738156
Manufacturer #: W10876600
$214.40
  In Stock
Order within the next 12 hrs and your part ships today!

Questions And Answers for MVWB766FW0

Ask our experts a question about this model and we'll get back to you as soon as possible!

5 questions answered by our experts.
  • 1
Sort by:
Sorry, we couldn't find any existing answers that matched.Try using some different or simpler keywords, or submit your new question by using the "Ask a Question" button above!
Kevin
January 12, 2024
Washer will start filling with water then stop after 6 seconds and continue thru complete wash cycle
For model number MVWB766FW0
PartSelect logo
Hi Kevin, thank you for getting in touch. Based on our understanding, we would recommend checking the electronic control board, part number PS16875371. It manages the washer's functions such as filling, washing, draining and spinning. You may need to replace it to fix the issue. We hope this solves your problem!

1 person found this helpful.

Was this helpful?
Thank you for voting!
Related Parts:
Rhonda
September 13, 2021
Sheets keeping getting caught in the slot between the washer arm and tub. How do I remove the sheets
For model number MVWB766FW0
PartSelect logo
Hello Rhonda, Thank you for the question. We suggest removing the Agitator. At the top of the agitator there is a cap, once the cap is removed you will see the bolt. Remove the bolt and pull up on the agitator to remove. Check the Fins and the agitator for damage that would be catching the Sheets. We hope this helps!

Was this helpful?
Thank you for voting!
Related Parts:
David
November 2, 2021
How to hold agitator to remove bolt that holds agatitor?
For model number MVWB766FW0
PartSelect logo
Hi David, Thank you for your question. Here is a link to one of our YouTube videos that you may reference on how to install the agitator bolt, https://www.youtube.com/watch?v=eSBM3N-c8xI. The washer in the video may appear different from yours, but it will give you a general idea on how to install the part. We hope this helps! Good luck with the repair!

Was this helpful?
Thank you for voting!
Related Parts:
Tonya
August 9, 2023
Does this washer have a filter?
For model number MVWB766FW0
PartSelect logo
Hi Tonya, thank you for the question. The filter for your model is part number PS11750500. The filter is under the basket at the bottom of the outer tub assembly. It traps lint and debris from drain water. We hope this helps!

Was this helpful?
Thank you for voting!
Related Parts:
Steve
December 29, 2023
What causes the machine to not fill with enough water but if I put wet clothes in it fills with more water
For model number MVWB766FW0
PartSelect logo
Hi Steve, thank you for reaching out. We have found that the issue is with the control board, part number PS16875371. It manages the washer's functions such as filling, washing, draining and spinning. You may need to replace the control board to fix the issue. We hope this solves your problem!

Was this helpful?
Thank you for voting!
Related Parts:
  • 1

Common Symptoms of the MVWB766FW0

[Viewing 8 of 8]
Leaking
Fixed by
these parts
Fixing Fixing Fixing
Show All
Lid or door won’t close
Fixed by
these parts
Fixing Fixing Fixing
Show All
Will not agitate
Fixed by
these parts
Fixing Fixing Fixing
Show All
Will not drain
Fixed by
these parts
Fixing
Show All
Will Not Start
Fixed by
these parts
Fixing
Show All
Water Filling Issues
Fixed by
these parts
Fixing
Show All
Does not dispense fabric softener or detergent
Fixed by
these parts
Fixing
Show All
No hot or cold water
Fixed by
these parts
Fixing
Show All
Keep searches simple. Use keywords, e.g. "leaking", "pump", "broken" or "fit".
Scratches in Surface
This product comes in a bottle with a brush like Liquid Paper. It goes on incredibly easy. A second coat might be needed. I wanted to prevent rust from setting in so I covered the scratches and dings. The paint is a little brighter since my washer is 10 years old but it still looks great.
Parts Used:
Touch-Up Paint - White
  • Michelle from Richardson, TX
  • Difficulty Level:
    Really Easy
  • Total Repair Time:
    Less than 15 mins
64 of 125 people found this instruction helpful.
Was this instruction helpful to you?
Thank you for voting!
Broken lid frame at left hinge.
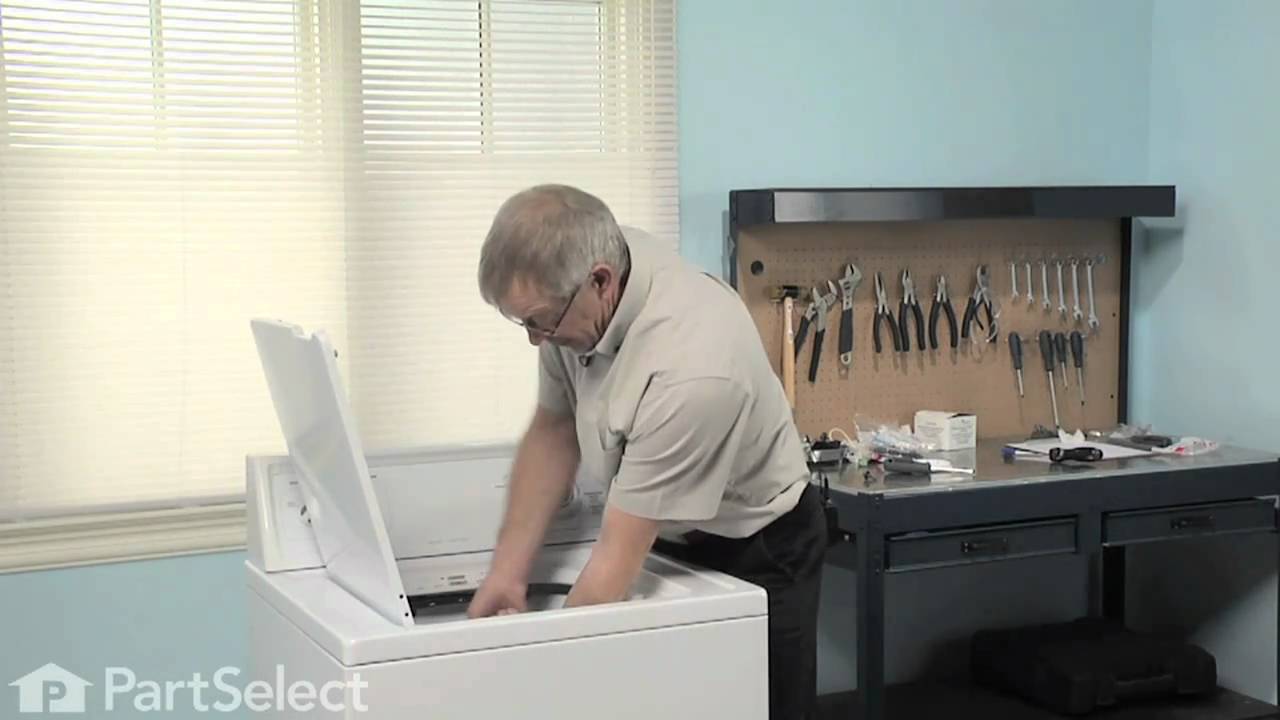
Raised lid to remove two Torx head screws from each hinge. Lid will then lift off of hinges. Installation of new lid was the reverse of the removal procedure. It is best to install one hinge to the lid by removing that hinge from the washer. The lid can then be installed by inserting that hinge into it's spot and then over the other hinge. Install the hinge screws into the second hinge and the job is complete. The lid now closes properly allowing the automatic lid lock to function properly.
Parts Used:
Washer Lid
  • Greg from RICHMOND, VA
  • Difficulty Level:
    Easy
  • Total Repair Time:
    30 - 60 mins
  • Tools:
    Socket set
25 of 27 people found this instruction helpful.
Was this instruction helpful to you?
Thank you for voting!
Lid was broken at the hinge and would not stay closed
Removed the old lid by removing the two screws on both sides of the lid holding it to the hinge. Then pull upon the lid to remove. Slide the new lid back on the hinges being careful to slide in the right slot in the lid. Replace the screws through the lid into the hinges and your done
Parts Used:
Washer Lid
  • Gary from GLADE VALLEY, NC
  • Difficulty Level:
    Easy
  • Total Repair Time:
    15 - 30 mins
15 of 18 people found this instruction helpful.
Was this instruction helpful to you?
Thank you for voting!